P-51D "Shu-Shu/Chuck-o" Mjr Norman McDonald 325th FG - Aircraft of the Aces GB (1 Viewer)

Ad: This forum contains affiliate links to products on Amazon and eBay. More information in Terms and rules

Great looking pit Peter.

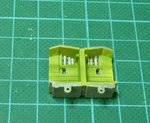
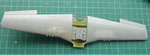
I was thinking about it Andy, but could come up with a strategy to make it neat enough. The Eduard instrument dials are very close together, more so than the Tamiya panel.

That's why I used acrylic white. If you mess up, it comes off easily. If I recall corretly, I applied it fairly liberally with a pin, then when dry, ran the pin along the edges to make the line straight. It's a forgiving process and may take a couple of passes.
 
That's why I used acrylic white. If you mess up, it comes off easily. If I recall corretly, I applied it fairly liberally with a pin, then when dry, ran the pin along the edges to make the line straight. It's a forgiving process and may take a couple of passes.

Aha CR. Impeccable sense of timing, just that i'm 16hrs ahead of you here in Oz! Good plan - I'll have a go on my next P-51, which won't be too far away. I have a 357th FG in mind called "Passion Wagon". It was nearly my choice for this Aces build but, you guys would not have liked the scheme -the judges would have hated it....
 

Attachments

  • passion wagon.jpg
    passion wagon.jpg
    49.9 KB · Views: 145
Cheers guys

Pic 1 2
The gear bay was finished in the same chromate colour as the interior, then the fittings were picked out in aluminium and black. I'll be giving this area a 'wash' later to enhance the detail further.

Pic 3, 4 5
The wings. A bit of graft in these so far.

First job was to sand down some of the rivet detail on the wings.

Next, most of you would know that the laminar flow wing's seams were filled forward of the main spar and painted overall aluminium at the factory, so to duplicate this I've used Tamiya white putty to fill the seams and sanded and polished them back, ready for the painting stage.

Back soon, cheers

Peter
 

Attachments

  • gear bay 001 resized.jpg
    gear bay 001 resized.jpg
    101.3 KB · Views: 129
  • gear bay 002 resized.jpg
    gear bay 002 resized.jpg
    63.5 KB · Views: 129
  • wings 003 resized.jpg
    wings 003 resized.jpg
    40.1 KB · Views: 129
  • wings 005 resized.jpg
    wings 005 resized.jpg
    34.1 KB · Views: 137
  • wings 001 resized.jpg
    wings 001 resized.jpg
    39.8 KB · Views: 124
This is heading for becoming a real gem of a build. Excellent stuff Peter.

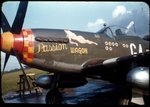
Yes, we judges, may take offence to Passion Wagon. But if you black out the girly parts, it might be OK. :lol:
 
Superb work so far Peter, it's looking great.
Two notes - in the ETO, all P51s had the 'basic six' instruments bracketed by the yellow taped line, in order to provide quick focus of concentration in the mostly poor flying conditions, at long range, particularly over northern Europe and the UK.
In general, only the rear wall of the wheel bay, which was actually the main spar, was in Chromate Green/yellow, the remainder being clear-lacquered alloy. (Some restorations show chromate overall, and some WW2 aircraft might have had this added at unit level.)
Personally, I wouldn't have a problem with the nose art on "Passion Wagon", as it is 'art', and historically correct. The decision, of course, would be up to the mods/admin, whether it's appropriate for the forum. As it's a painting, and not 'real', I personally think it's acceptable.
Looking forward to the next stage.
 
I hope you didn't think I was serious about my Passion Wagon comment Terry. As far as I'm concerned, no problem with the full frontal
 

Users who are viewing this thread

Back