RCAF CF-104 'Starfighter', 1/48th scale.

Ad: This forum contains affiliate links to products on Amazon and eBay. More information in Terms and rules

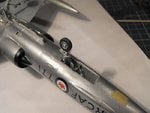
Here' s the pics of progress to date.
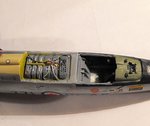
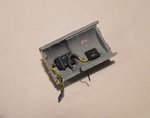
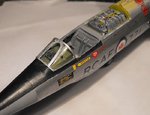
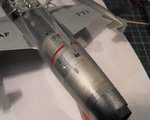
There's a lot of re-touching needed in the avionics bay, and some decal placards to be added. The hatch cover has had the wiring added, and the basic painting done, but still needs some detail painting, and adjustment to the bracket for the support stay (top left corner).
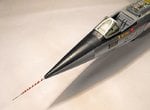
The instrument panel shroud has been painted, and the gun sight optics glazed and painted, although it's difficult to see that yet, until the 'Clear Fix' dries. The sight collecting glass will be added tomorrow, and the remainder of the details painted, before fitting the windscreen.
I'm just hoping I get some articulation back in hands and wrists, as things are getting very difficult - when opening a new tin of silver paint, my hands just would not co-operate, and flipped the bl**dy tin over, spilling the entire contents onto the work bench - b*gg*r !!
I'm putting this aside until tomorrow, otherwise I just know I'm going to mess-up good style, so all being well, I'll have more to show, and hopefully of a better standard, sometime in the next day or so.
 

Attachments

  • DSCF0002 (21).JPG
    DSCF0002 (21).JPG
    62.7 KB · Views: 115
  • DSCF0007 (14).JPG
    DSCF0007 (14).JPG
    44.4 KB · Views: 106
Thanks Hugh.
I've managed to get some 'fiddly bits' done, as my hands and wrists haven't been too bad today.
The windscreen and avionics bay glazing have been masked, and the interior and exterior frames painted, and are almost ready for fitting, and the brass pitot tube has had the first stage of the red and white spiral painted, free hand, and just needs a little re-touching to even things up, before giving it a clear coat and then painting the stainless steel tip.
As I suspected, trying to mask the very thin, turned brass part was virtually impossible, so I was quite surprised that the free-hand painting of the red spiral worked at the first attempt, if a little ragged in parts.
I can't get any meaningful pics at the moment, as the parts are in clamps or tweezers, waiting to dry.
With a bit of luck, I might have them finished and fitted tomorrow, so more pics then.
Thanks once again for your continued interest and kind comments.
 
Thanks very much Kevin.

A bit more to show, although somewhat later than intended.

PICS 1 and 2. The main wheels have been painted and fitted, and the nose gear leg, retraction clamp and nose wheel painted and fitted, and await some final touch-up. The main wheel doors have been painted and will be fitted next, whilst the nose gear doors need to have yet more ejector pin marks removed, and some 'hinges' fabricated, as there is no way to attach them to the model without cementing direct to the fuselage, with the resultant damage to the paintwork, which already needs cleaning and re-touching after handling.
PICS 3 and 4. The turned brass pitot tube has been painted and fitted, and has yet to be 'blended' into the radome and re-touched, and the gun sight combining glass has been fitted, made from clear sheet, as the kit part was too thick and the wrong size. The windscreen has been fitted after painting the frames internally and externally and adding rivets, and has yet to be sealed around the edges.
The red spiral on the pitot is not perfect by any means, being done freehand, but will have to do. I was alarmed that I'd painted too many 'hoops', but after re-checking many photos of RCAF birds, I found the number of 'hoops' seemed to vary between 4 and 8 !
PIC 5. The kit afterburner can might have been acceptable in the original mouldings, some 40 years ago, and still shows very feint external detail, but this example (made in Poland incidentally) is very basic, so it has been replaced by the nice resin example shown here, part of the complete jet exhaust set from Aires, designed for the Hasegawa kit.
PICS 6 and 7. The afterburner can painted, and fitted to the model.
PIC 8. The arrestor hook has been fitted after painting in various steel shades.

There's still a lot of work to do externally on the airframe, including some remedial work to the paint finish, before moving on to adding detail to the canopy, and scratch-building the main frame, detail parts and harness for the ejector seat, which I hope to tackle in the next day or so.
Many thanks for your kind comments and continued interest, and I hope to post more pics soon.
 

Attachments

  • DSCF0009 (6).JPG
    DSCF0009 (6).JPG
    89.6 KB · Views: 109
  • DSCF0018 (2).JPG
    DSCF0018 (2).JPG
    52.6 KB · Views: 114
  • DSCF0004 (15).JPG
    DSCF0004 (15).JPG
    49.5 KB · Views: 110
  • DSCF0006 (17).JPG
    DSCF0006 (17).JPG
    61.2 KB · Views: 110
  • DSCF0005.JPG
    DSCF0005.JPG
    39.9 KB · Views: 106
  • DSCF0002 (22).JPG
    DSCF0002 (22).JPG
    52.7 KB · Views: 105
  • DSCF0011 (8).JPG
    DSCF0011 (8).JPG
    49.3 KB · Views: 121
  • DSCF0012 (4).JPG
    DSCF0012 (4).JPG
    56.6 KB · Views: 120
Thanks very much indeed chaps !
I might get a bit more done later tonight, although I'm struggling to stay awake, so might have a break from the bench.
 
Zzzzzzz! Eh .... what... ah !
Just working on scratch detail on the ejection seat and scratch-building the internal support frame for the canopy - pics eventually.
 
Thanks very much Hugh.
It's getting close to being finished, but I'm awaiting delivery of some various scale oxygen hoses, which I'll try out on the seat, once the scratch-built parts are made.
Meanwhile, I'm about to start Part Two, the build of the same aircraft when in Danish service, and I'll start a separate thread to cover it.
 

Users who are viewing this thread

Back