Suggestions For Repairing My Dreadful Rookie Mistake

Ad: This forum contains affiliate links to products on Amazon and eBay. More information in Terms and rules

Chip B.

Airman
58
12
Oct 19, 2016
Long Island, New York
06FB8C5E-1736-441B-893A-D8D2164A127B.jpeg
Greets,

I am building Hasegawa's 1/32 F6F - 3/5, and in my haste to complete the build and meet a commitment for delivery, well let's just say the pooch is well screwed, blued and tattooed. To say that I was horrified upon discovering my gaffe would be the understatement of the decade.

If you have not noticed, permit me to swallow the shreds of my tattered pride... it isn't the missing well cover. That came off during my aborted attempt at releasing the landing gear struts with this wiz-bang CA dissolver.

No? Ok, I reversed the bloody MLG struts! The wheels should face outboard...

I was reviewing a magazine article about a P51 build, and must have had the gear configuration in mind as the wheels face each other.

The problem is this: the project is promised to a local WWII museum, where it is to be displayed with my name on it. If it was to remain with me I could overlook this gaffe. But in public? I think not.

So is it obvious?

Anyway, my thought is to use a sprue nipper (God Hands - very expensive but is the best I have ever used) and cut the struts and drag braces at their attach points, swap them and reattach them with Tamiya Super Thin cement, supported with epoxy and perhaps CA. The joints should not be easily visible so a small glob of epoxy resin should not be worrisome.

Might there be other solution I have overlooked?

Thank you!
 
You might try removing the landing gears, drilling hole in the centers, and then with stiff wire reinforcements, re- attach them to the wings. You may have been thinking FW-190 as the P-51 gears also face outward. Hope this helps. I see Fubar beat me to it while I was typing. Maybe I should learn to type faster.:)
 
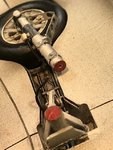
I would cut the legs at the red pointed areas then just swap them. Of course I would drill the cut off legs and the "roots" with thin drill bit and insert there a thin wire to buttress the joint there. If the cutting is made quite carefully with no damages to the brake lines there shouldn't be any traces of the work noticed.

12.jpg
 
Thank you, Gents, for the ideas and for keeping derision (however well deserved) muted.

I will employ the internal wire for stability (thanks fubar, at and Wurger) and do the *gulp* cut as suggested by Wurger.

I will have to cut the lines as they are glued at both ends. The cut & repair will be inside one of the line clamps and should remain unseen.

I was considering using the super duper sprue nipper but with the cut being below the 'upper' clamp a micro saw seems a better idea now that there is sufficient room for options.

Would you gents have a preference as to the method of amputation? As you may notice, I am not anxious to begin the surgery -
 
Thanks. Fortunately I have been given very good advice and will begin the procedures shortly (as soon as anesthesia shows up to put my poor Hellcat under...).

A follow up question please: as finding the exact center of each piece will be essential to obtaining a match once the posts have been drilled and inserted, what in your experience would be the most accurate way to center the post holes on each leg?
 
Usually I use the JLC razor saw for such cutting. But the ordinary razor blade should work too. A such kind of saw is also offered by a couple of other manufacturers. Just look around the net. Of course the legs have to be of plastic if you want to use the saw. I must admit I use it for wood as well without any trouble.

piłka.jpg
 
...A follow up question please: as finding the exact center of each piece will be essential to obtaining a match once the posts have been drilled and inserted, what in your experience would be the most accurate way to center the post holes on each leg?

I colour these endings with a red colour using a marker. Then with a needle and magnifying glasses I puncture the center of the surface. Then drilling at both endings The next step is to insert and glue a piece of a wire at one ending. Then fitting the second one with rotating at a such bolt and gluing finally.

legs3-jpg.jpg


legs6-jpg.jpg


legs2-jpg.jpg


legs5-jpg.jpg


legs7-jpg.jpg
 
Thanks Wurger. I have a similar saw.

Have you any thoughts about finding/drilling the center of all four legs to ensure a centered joint?

I was thinking of a hole a little bit wider than the post to give a little play to adjust the alignment of upper/lower pieces. But then the added support of the post is diminished.
 
The colouring of endings should be done with a colour that contrasts to the plastic used for the parts.It is very helpful. Just you can see the entire shape of the surface.The finding of its center is easy then.

BTW these legs in my pics above are for 1/72 scale Bf 109F. I needed them to make longer. but the way for making that is the same you need.
 
I'm going to throw this out there. Why not just cut the wheel axles off, redrill holes in the right side, then do the pin trick discussed above and CA glue the wheels back on in the right place? Use a good steel pin and it should work. You won't have to do anything with the brake lines other than turn the very bottom end 180 degrees.
 
Yes Andy, the way seems to be the easiest one. However the brake lines would have to be bended at their endings that come to the wheel to another side. Because these seem to be glued to the legs ,their bending may cause damages to both the brake lines and legs. Additionally the attaching pins for the wheel doors should be on the another side of the legs. So swaping of the entire legs with the brake lines and wheels seems to be the better way IMHO.
 
Ha, ha, ha .. that's the best way.. :lol: Andt it that's true.. a small kid and disassembly is done quickly.
 
Now THAT is funny!

Sorry to have missed the exchange and some really interesting ideas. Likely I'll get the opportunity to try all of them, often.

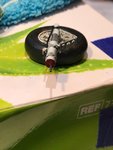
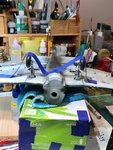
Thanks again, fellas. For a first effort my resultsis not quite reaching mediocrity, but it was fun to do and I'll only get better. If you see in these pics results that screams Novice I am wide open to criticism


823BC148-54DB-4CD7-84B2-39C8341DBA69.jpeg D51B2A8F-BAC4-40BD-BEFF-A99EA14902C1.jpeg 852EA465-719C-4388-8F76-9B734E3714B8.jpeg
 
I've fixed bigger mistakes than that, lol. I have disassembled whole fuselage halves just by heating with a hair blower, the glued areas just fall apart. Might be a little tight where the struts are located, but a bit of heat could release them.
 

Users who are viewing this thread

Back