Super detailing Guillow's P-51D Mustang

Ad: This forum contains affiliate links to products on Amazon and eBay. More information in Terms and rules

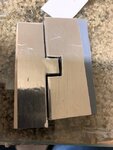
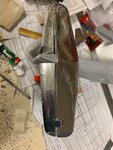
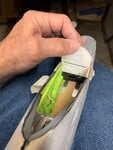
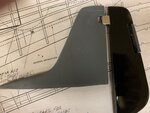
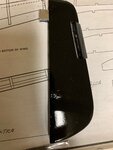
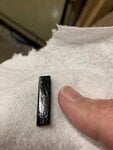
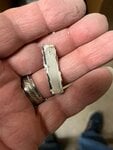
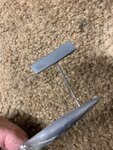
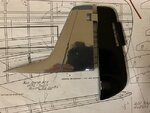
The results. As you can see, I have lots of room for the folded foil along the edges. This means I can cut out the elevator pieces from the horizontal stab in tighter tolerances. I still have to leave some room, but not as exaggerated as my practiced faux piece. Now I know....
 

Attachments

  • P-51 tail feathers -model # 35A.jpg
    P-51 tail feathers -model # 35A.jpg
    60.6 KB · Views: 41
Wurger and Gonemy,
Thank you sirs. Much appreciated.

I've enclosed another photo of the nearly completed set of stab and elevators as it stands today. Only remains to have some rivet detailing on the port side and some additional detailing on the starboard as well.
 

Attachments

  • P-51 tail feathers -model # 96.jpg
    P-51 tail feathers -model # 96.jpg
    454.9 KB · Views: 71
Gnomey & Wurger,
Thank you sirs. I lost the serial number to John Lander's late P-51D. I'm wondering if Wurger could provide it. I'm doing the ailerons now & will post the results. Then I will carefully wrap all of the foil-covered surfaces to protect from further scratches while I focus on detailing the cockpit interior.
 
Good day to everyone. I trust that this post finds all in good health and in good spirits.

Not much to report today. I've been replacing some of the coverings to the flight surfaces as I am trying to be as perfect as humanly possible, or at least as my OCD (Obsessive Compulsive Disorder) will allow it.

Here, I'm using a blank piece of paper to help me orient an instrument panel. If you look closely, I have also penciled in some sketches of where the instruments themselves will go. It's all a matter of perspectives and trying to get everything in proper order. No measurements here.
 

Attachments

  • P-51 instrument panel -model # 1.jpg
    P-51 instrument panel -model # 1.jpg
    484.8 KB · Views: 56
Gnomey and Wurger,

Thank you gentlemen.

Getting back to the tail. The primer was dried and sanded smooth. Following the photo, I painted the rudder overall glossy black. I realize the photo is from a book and the tail is not seen too clearly, but I'm hoping this is good enough to see that the rudder is entirely black.
 

Attachments

  • P-51 # 174 BBD overall shot.JPG
    P-51 # 174 BBD overall shot.JPG
    247.9 KB · Views: 45
  • P-51 tail feathers -model # 103.jpg
    P-51 tail feathers -model # 103.jpg
    300.2 KB · Views: 44
The glossy black really shows up very well here. There's just a "peek" of wood grain seen near the bottom. I can live with that. Unfortunately, the rudder trim had way too much wood grain, despite several coats of primer and sanding.
 

Attachments

  • P-51 tail feathers -model # 102.jpg
    P-51 tail feathers -model # 102.jpg
    306.7 KB · Views: 43
  • P-51 tail feathers -model # 99.jpg
    P-51 tail feathers -model # 99.jpg
    268.6 KB · Views: 40
So, this time, I've applied "mud" in the form of drywall compound we call "Spackling Compound" and puttied over the trim. When dried, it was sanded smooth using a fine-grade # 320 sandpaper followed by a finer grade #400. Today, I'll give it a quick shot of glossy black paint and we'll see.

In the meantime, I'll continue working on the instrument panel and stenciling.

Cheers,
Gary
 

Attachments

  • P-51 tail feathers -model # 100.jpg
    P-51 tail feathers -model # 100.jpg
    310 KB · Views: 41
  • P-51 tail feathers -model # 101.jpg
    P-51 tail feathers -model # 101.jpg
    621.9 KB · Views: 39
Good stuff Gary.
back in the days of balsa flying models, before the advent of plastics and foam etc, wood grain was filled with banana oil and / or a product called sanding sealer.
Not sure if it's still around, but it's easy to make a substitute. Mix some talcum powder with gloss varnish (enamel or polyurethane) to form a thick 'porridge' like varnish.
Paint on a coat, let it set, then lightly sand. repeat if required and, when fully hardened, it can be coated with a varnish, and then a primer if required.
I use this method to produce a glass-like finish on balsa moulds, used for making clear canopies and other parts.
BTW, the cockpit placard decals are progressing, albeit slowly.
 
Airframes,
Thank you very much for your inputs. It's much appreciated. I haven't thought of that and I'll keep it in mind for future reference.

Thank you too for the mentioning of stenciling. I didn't wish to place any pressure. I just keep plugging away in any which way I can. The model is nearing the point where the cockpit interior has to be finished before covering with the aluminum foil commences.

Once the foil is in place, I've discovered to my surprise, that it's very sensitive to small dents and scratches. I've had to re-cover the horizontal stab at least three times. The first time was due to my lack of experience in its application, despite my practicing on several faux pieces. The last two were due to simple mishandling. If I so much look at the stab cross-eyed, it seem to generate a small dent or scratch. As I write this text, the stab, elevators and ailerons are carefully wrapped in soft tissue for later installation.

I have since spray painted the finished foiled surfaces with a clear coat of paint, but it's still extremely sensitive. The whole assembly, and ultimately the model will have to be very carefully handled (literally) with kid's gloves.

It's because of this foil's extreme sensitivity to touch, that I figured I must complete the cockpit interior as well as the canopy and front windshield due to my handling the fuselage in all manners of which ways to get the detailing completed within the confines of the small cavity. From there, I'll also be working on the wing fillets. Once they're complete, then I'll start the covering with the foil.

Again, Mr. Airframes, I sincerely thank you for your offering and help.

Sincerely,

Gary
 
Good news; Made some progress today. I spray painted the rudder trim tab after sanding the primer smooth. As you can see the results came out very well. The paint is still settling down as the photo was taken.
 

Attachments

  • P-51 tail feathers -model # 119A.jpg
    P-51 tail feathers -model # 119A.jpg
    34.2 KB · Views: 39
I'm going to jump ahead of myself and show the semi-finished polished aluminum cover for the dorsal fillet, fin and glossy black paint rudder. As you can see, they really give off a unique finish to the Big Beautiful Doll scheme in highly polished natural metal. From here, I'll be posting a step-by-step series on how I managed to stretch the aluminum foil to conform to the concave compound curve between the dorsal fillet and the fin. I was quite a challenge that was made surprisingly easy.

In this picture, the small white markings on the lower black rudder is actually the reflection of the shop lighting.

I mentioned "semi-finished" as I have yet to add the black paint to the tips of the fin and rudder. access hatches and panel lines as well as the rivet detailing.
 

Attachments

  • P-51 tail feathers -model # 107A.jpg
    P-51 tail feathers -model # 107A.jpg
    66.6 KB · Views: 40
Wurger,
Thank you, sir. I trust that you & your family are all in good health during these difficult times with this Coronavirus?
 

Users who are viewing this thread

Back