Navigation
Install the app
How to install the app on iOS
Follow along with the video below to see how to install our site as a web app on your home screen.
Note: This feature may not be available in some browsers.
More options
You are using an out of date browser. It may not display this or other websites correctly.
You should upgrade or use an alternative browser.
You should upgrade or use an alternative browser.
Super detailing Guillow's P-51D Mustang
- Thread starter Skyediamonds
- Start date
Ad: This forum contains affiliate links to products on Amazon and eBay. More information in Terms and rules
More options
Who Replied?- Thread starter
- #602
Skyediamonds
Staff Sergeant
- 1,362
- May 26, 2018
Wurger, thank you sir.
Great work so far!
- Thread starter
- #604
Skyediamonds
Staff Sergeant
- 1,362
- May 26, 2018
Happy Thanksgiving to everyone. Here, we only need an excuse to celebrate something (anything) to help get us through this virus. Without delving into the historical aspects, among other things tradition has it, we overstuff ourselves with too much food and then promise ourselves "Never to do that again" only to repeat the following year.
I thought in light of maintaining a cheerful point of humor to help cheer everyone here. I thought it a good idea to post a "Before" and "After" shot of a widely known aircraft from Thanksgiving.
Cheers,
Gary
I thought in light of maintaining a cheerful point of humor to help cheer everyone here. I thought it a good idea to post a "Before" and "After" shot of a widely known aircraft from Thanksgiving.
Cheers,
Gary
Attachments

- Thread starter
- #605
Skyediamonds
Staff Sergeant
- 1,362
- May 26, 2018
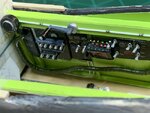
Good evening gentlemen,
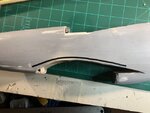
I've finally completed the right side panel. I tried to get it as reasonably close to the illustration as possible. I've enclosed the illustration near the end. At least as far as it goes prior to permanently gluing into the fuselage and installing the emergency release handle at the last minute.
The emergency handle is sticking out too far above the canopy rails and therefore I felt would be susceptible to breaking off during the handling of the right side and the fuselage during the foiling of the aluminum exterior.
Some of you who are familiar with the Mustang in general and the right side panel in particular will notice some of my errors. I admit it wasn't my best efforts, but it was one of those "It'll have to do for now," moments. I can only hope that it'll meet your approval. I'm also holding off on the main instrument panel for the time being. The reason is the weather here in Reno, Nevada. Whereas its cold, it's still bright and sunny and I felt I should take advantage of it and try to use resin and microballoons (filler material) for the wing fillets and also filling at the rear fuselage where the vertical fin and stab meet. The resin gives off an odor that my wife will not approve. Hence, the outdoor working of the wing fillets while the weather lasts.
I will keep you updated on my attempts to complete the wing fillets.
Thank you for looking in.
Attachments
Excellent work so far!
- Thread starter
- #608
Skyediamonds
Staff Sergeant
- 1,362
- May 26, 2018
Wurger and Gnormey,
Thank you, gentlemen.
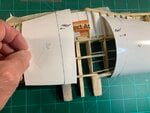
As the enclosed photos show, I've already started the process of creating the wing fillets by means of resins and microballoons. The first picture shows the markings and use of glossy paper. Later on during the actual foiling of the model using Flite Metal, the glossy paper will be substituted by using a light plastic sheet of similar thickness and glossy finish.
The light plastic sheet will serve as the "skin" and support for the aluminum foil to be applied over the wing.
The glossy paper is taped down securely to conform to the exact airfoil of the wing. It is here, that I am hoping that will help with the resin drying over this surface and thereby also conform to the wing surface airfoil as a wing fillet.
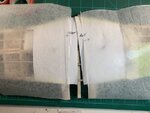
The second picture shows the wax paper covered over the glossy paper. This is to prevent the resin from sticking to the glossy paper.
The last picture shows the beginning of masking off the fuselage with electrical tape. It is from there, that the tape will be used to mask out the wing fillet outline. I'm not too sure if this will. work as the resin might stick to the tapes. Any comments?
Thank you, gentlemen.
As the enclosed photos show, I've already started the process of creating the wing fillets by means of resins and microballoons. The first picture shows the markings and use of glossy paper. Later on during the actual foiling of the model using Flite Metal, the glossy paper will be substituted by using a light plastic sheet of similar thickness and glossy finish.
The light plastic sheet will serve as the "skin" and support for the aluminum foil to be applied over the wing.
The glossy paper is taped down securely to conform to the exact airfoil of the wing. It is here, that I am hoping that will help with the resin drying over this surface and thereby also conform to the wing surface airfoil as a wing fillet.
The second picture shows the wax paper covered over the glossy paper. This is to prevent the resin from sticking to the glossy paper.
The last picture shows the beginning of masking off the fuselage with electrical tape. It is from there, that the tape will be used to mask out the wing fillet outline. I'm not too sure if this will. work as the resin might stick to the tapes. Any comments?
Attachments
Great work so far!
- Thread starter
- #611
Skyediamonds
Staff Sergeant
- 1,362
- May 26, 2018
Wurger & Gnomey;
Thank you gentlemen.
Thank you gentlemen.
- Thread starter
- #612
Skyediamonds
Staff Sergeant
- 1,362
- May 26, 2018
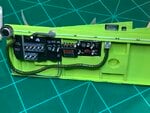
Good evening gentlemen.
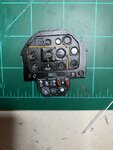
Ii took a temporary break from the fuselage and wing fillet to complete the front main instrument panel and the sub panel just below it. I could have posted a series of how-I-did-it photos but by now I'm sure most of you already have a good idea of the steps that were taken. If anyone should express an interest, let me know and I'll be more than happy to post the series. There are a few remaining switches to be installed on the instrument panel, but I'm holding off until the final installation as I know from past experience I'll knock them off during handling.
The remaining steps needed to complete the front section will be the fuel cutoff switch, fuel selector valve, and the hydraulic pressure gauge.
From here, I'll probably end up working on the pilot's seat and the radio stack behind the pilot's headrest. Thereafter, I'm of the opinion that I'll get back to the wing fillet and fuselage junction.
Cheers,
Gary
Attachments
- Thread starter
- #614
Skyediamonds
Staff Sergeant
- 1,362
- May 26, 2018
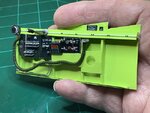
Thank you Wurger, sir.
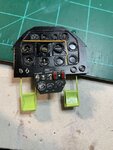
Just made a little bit more progress tonight. I finished fabricating the rudder pedals and glued them behind the main instrument panel. Now I only have to create a small sub panel just below the sub panel and from there, the pilot's seat and radio stack behind the headrest.
Everything. you see in the second. photo is only temporarily installed for fitting purposes. I'll be fine-tuning the adjustments just prior to permanently gluing everything in place. This won't happen until I finish covering the model. I figured with all of the small fragile switches and levers in the cockpit, any rough handling of t he fuselage during the covering would only make things worst. So, I'll have everything ready for instant installation after the covering.
Thank you for looking in.
Cheers,
Gary
Attachments
Excellent work so far!
Airframes
Benevolens Magister
Really coming together now - very nice work.
- Thread starter
- #618
Skyediamonds
Staff Sergeant
- 1,362
- May 26, 2018
Airframes,
Thank you, sir. Not perfect, but still making progress considering I don't have access to photo etchings.
Thank you, sir. Not perfect, but still making progress considering I don't have access to photo etchings.
- Thread starter
- #619
Skyediamonds
Staff Sergeant
- 1,362
- May 26, 2018
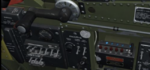
Good evening everyone. Hope all is well and in good health. Today is my birthday. I'm now a young 72. They haven't gotten rid of me (yet).
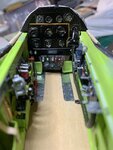
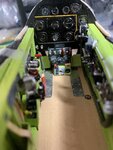
I finished what I could of the main instrument panel and the two sub panels below it. I also temporarily installed the panels inside the cockpit with the left and right sides to get a "feel"' for how things will turn out.. I must admit that I misjudged the overall thickness of the sides and the small area. It looks as though the pilot will have a lot of trouble getting inside without doing gymnastics. Oh well, I tried my best. Hope you'll be forgiven of me. My next project will be the benefit of my learning experience here on the Mustang..
I finished what I could of the main instrument panel and the two sub panels below it. I also temporarily installed the panels inside the cockpit with the left and right sides to get a "feel"' for how things will turn out.. I must admit that I misjudged the overall thickness of the sides and the small area. It looks as though the pilot will have a lot of trouble getting inside without doing gymnastics. Oh well, I tried my best. Hope you'll be forgiven of me. My next project will be the benefit of my learning experience here on the Mustang..
Attachments

Users who are viewing this thread
Total: 1 (members: 0, guests: 1)