Super detailing Guillow's P-51D Mustang

Ad: This forum contains affiliate links to products on Amazon and eBay. More information in Terms and rules

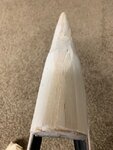
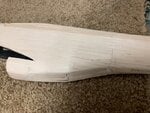
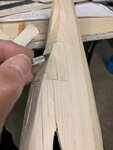
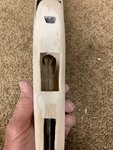
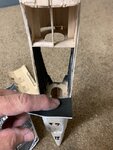
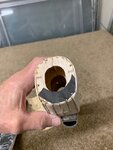
The first picture shows the initial stages of flattening out the underside of the fuselage. It appears now an oval shape, but the potential is there.....

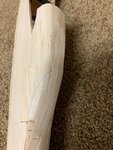
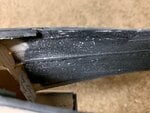
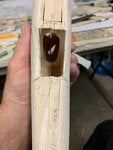
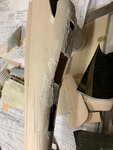
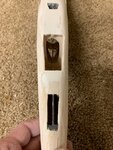
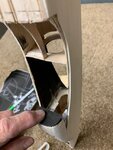
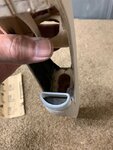
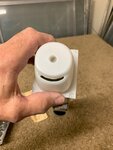
The second photo now shows the full potential of my ideas. I might as well keep sanding. Why stop a good thing, eh?
 

Attachments

  • P-51 fuselage belly -model # 2A.jpg
    P-51 fuselage belly -model # 2A.jpg
    45.1 KB · Views: 53
  • P-51 fuselage belly -model # 1A.jpg
    P-51 fuselage belly -model # 1A.jpg
    62 KB · Views: 55
  • P-51 belly scoop -model # 11A.jpg
    P-51 belly scoop -model # 11A.jpg
    56.1 KB · Views: 50
Spl Ed, Eurger, Gnomey, Crimea; thank you gentlemen. Any inputs are always welcome. I'll be posting my little mistakes in sanding a wee bit too much. All worked out well, but it was just "one of those learning experiences."
 
Gentlemen,

I guess you might say there really is such an expression as "too much of a good thing." I just kept on sanding until I almost went completely through the belly. Fortunately, I stopped to check my progress when I noticed I had gone too far. This is just one of those learning experiences and I should've stopped or at least checked more often.
 

Attachments

  • P-51 belly scoop -model # 5A.jpg
    P-51 belly scoop -model # 5A.jpg
    65.6 KB · Views: 50
  • P-51 belly scoop -model # 6A.jpg
    P-51 belly scoop -model # 6A.jpg
    69.9 KB · Views: 53
Before ;proceeding further on my belly scoop build thread, I'd like to pause just a moment and show the interior. As you can see from all the saw dust, I'm really glad that I decided to postpone my detailing of the interior until after all of the sanding and filling of the fuselage. With all of the small detailing, I'm sure it would've been almost impossible to thoroughly clear out all of the dust.
 

Attachments

  • P-51 cockpit interior -model # 1A.jpg
    P-51 cockpit interior -model # 1A.jpg
    62.1 KB · Views: 50
Spl Ed,

I apologize for not responding to your last reply. It slipped past me during my postings. I agree with you that perhaps the front windshield will have less spring when trying to unglue itself. At least that's the theory.
 
Now that I've achieved my original goal of flattened out the belly of the fuselage. My next objective is to ascertain as to how I may fabricate the variable inlet door/ramp and what exactly are the outlines. For this, I referred again to a combination of scale drawing and some photos. Yep, the same ones used as reference for the flattening out of the fuselage. Only in this case, it's more focused on the actual variable doors themselves. In this instance, the plastic models really helped out here to clarify what is on the drawing.
 

Attachments

  • P-51 belly scoop -model # 9A.jpg
    P-51 belly scoop -model # 9A.jpg
    50.4 KB · Views: 73
  • P-51 belly scoop -model # 12A.png
    P-51 belly scoop -model # 12A.png
    79.2 KB · Views: 65
  • P-51 fuselage belly detail- plastic model.PNG
    P-51 fuselage belly detail- plastic model.PNG
    106.7 KB · Views: 68
I decided to start cutting out the openings for the variable inlet doors, radiator cooler, oil cooler and tail wheel first before adding any filler to the over-sanded portion of the fuselage. This was done primarily so that I could see exactly the wooden structure underneath the infilled balsa and to determine the best approach to cutting without too much further damage. The location of the fuselage formers also played an important role here in helping me determine where to cut and how much pressure to apply to the cutting blade.

The other reason is that I knew that I would be adding filler material anyway after cutting and it would appear somewhat redundant for me to do the same task twice.

The first photo was (obviously) staged to show my initial cut for the radiator inlet.

The second picture shows the rough cuts. Ugh, pretty rough I'd say so myself. Not to worry.... I hope

The third photo shows the application of Spackling Compound as filler material. Here in the 'States, we have what is commonly called "Spackling Compound" and its primarily used mostly for filling in between cracks, holes, dents and drywalls inside homes. Because it's easier to sand than the surrounding soft balsa, it serves its purpose quite admirably in preventing me from accidentally sanding too far into the wood.

Only one major drawback in using this filler. It can be applied inside an enclosed room with no problem whatsoever. However, the sanding must absolutely be done in a well ventilated area. The fine dust from sanding can raise havoc on one's lungs and can also irritate the skin (Ask me). For this reason, because I'm working inside an enclosed area during the colder season, I find myself sanding with a nice cooling fan turned on and blowing the dust away from me. Otherwise, I would gladly sand outside with a nice gentle breeze while enjoying the scenery.

When carefully sanded using progressively finer grades of sand paper, this compound really ends up as an extremely smooth finish and ready for primer. I start out using say # 360 grade sand paper -no rougher than that, - as mentioned, the compound sands quite easily. I use this medium course sand paper to gently sand away most of the extraneous material and to help shape the final results as I get closer to the finish.

The second grade of sand paper is usually # 400 and this is sometimes used as wet-n-dry. I decided not to use it mixed with water as: 1) the compound is water soluble and 2) the water will also affect the surrounding wood. This sand paper is used to help finalize the smoothness of the overall finish and to remove any small particulate material remaining that otherwise would "pull" away some of the surrounding material if sanded with a more course sand paper.

The third (and for me) last sand paper is # 600. This is just to smooth out the surface and prepare it for primer paint. I could use a higher grade (more finer) type of sand paper, but for me, these three grades at this point are sufficient. When sanding the dried primer, that's when I'll probably use a higher grade.
 

Attachments

  • P-51 belly scoop -model # 7A.jpg
    P-51 belly scoop -model # 7A.jpg
    47.9 KB · Views: 42
  • P-51 belly scoop -model # 8A.jpg
    P-51 belly scoop -model # 8A.jpg
    46.3 KB · Views: 42
  • P-51 belly scoop -model # 17A.jpg
    P-51 belly scoop -model # 17A.jpg
    57.3 KB · Views: 50
I forgot to add that I also painted the insides of the surrounding woods flat black so as to help hide the bleached wood when finishing up of the variable inlet doors.
 

Attachments

  • P-51 belly scoop -model # 28A.jpg
    P-51 belly scoop -model # 28A.jpg
    74.4 KB · Views: 51
The photos shows the underside after the first application of the Spackling Compound and it has been sanded down to a smooth finish. As you can see, it's almost transparent and very smooth.

The first picture shows the large opening for the radiator, the smaller opening for the oil cooler above that, and lastly the tail wheel. The openings are still very rough and need to be finalized. For this, I decided to call to your attention of the large opening to the radiator. Looking carefully along the right side -as viewed directly on the picture, you can easily see that the right edge is somewhat curved.

The second picture shows the results of me taking small steps to sand and cut away that curve to help the right side be more straight. This was also applied to the remaining sides and with the oil cooler area and of course the tail wheel. It's all part of the preparation of the surfaces and getting down to the nit-picky stuff. And so it goes, back and forth, sanding here, adding a bit more compound there and letting it dry, cutting away a bit there and smoothing out the results and on and on, until it (hopefully) makes a difference between an average finish and that of a work of art. At least that's the theory. More often than that, it's a result of me getting to a point where I finally say to myself, " That's as far as I'll take it."
 

Attachments

  • P-51 belly scoop -model # 33A.jpg
    P-51 belly scoop -model # 33A.jpg
    68.7 KB · Views: 38
  • P-51 belly scoop -model # 34A.jpg
    P-51 belly scoop -model # 34A.jpg
    66.2 KB · Views: 44
Last edited:
While I was giving a coat of flat black paint to the openings of the radiator & oil cooling outlets I also gave a quick shot of paint to the front of the balsa wood radiator scoop. As the first picture shows, if you look carefully, the wood shows through despite the plastic covering over the black paint. This wouldn't do.

So, I cut out a piece of plain black paper and cut it to shape.

I then glued it over the front end of the scoop. Its not perfect, but definitely better than what it was before
 

Attachments

  • P-51 belly scoop -model # 27A.jpg
    P-51 belly scoop -model # 27A.jpg
    51.8 KB · Views: 55
  • P-51 belly scoop -model # 18A.jpg
    P-51 belly scoop -model # 18A.jpg
    50.2 KB · Views: 53
  • P-51 belly scoop -model # 20A.jpg
    P-51 belly scoop -model # 20A.jpg
    108.1 KB · Views: 61
  • P-51 belly scoop -model # 21A.jpg
    P-51 belly scoop -model # 21A.jpg
    59.6 KB · Views: 54
  • P-51 belly scoop # 22A.jpg
    P-51 belly scoop # 22A.jpg
    52.4 KB · Views: 59
  • P-51 belly scoop -model # 13A.jpg
    P-51 belly scoop -model # 13A.jpg
    50.9 KB · Views: 60
Of course, the front cowling got the same treatment. This is needed to help cover up any signs of that bleached white balsa from being seen. Thus, helping to preserve that illusion of looking at the full sized article. Or at least close to it.
 

Attachments

  • P-51 belly scoop -model # 14A.jpg
    P-51 belly scoop -model # 14A.jpg
    47.9 KB · Views: 53
  • P-51 belly scoop -model # 15A.jpg
    P-51 belly scoop -model # 15A.jpg
    45.7 KB · Views: 48
A suggestion for a filler. On wood models, a commercial brand designed for flying models is Hobbico Hobbylite filler. I have always used "balsa colored" but I think it comes in white also. Usually available in hobby shops and from Tower Hobbies on line. I have tried various types from the construction trades and even the "light" types are unsuccessful. Hobbylite allegedly thins with water as it is water based, but I have found after the model is finished and painted with model dope, the filler eventually drys/shrinks and comes out of the cracks filed with it. I now use two jars, one thinned with water and the second thinned with dope thinner. The dope thinned filler penetrates the wood better and is compatible with the later dope finish. Sanding is also easier and maybe less dusty than the hardware brands.
 

Users who are viewing this thread

Back