Navigation
Install the app
How to install the app on iOS
Follow along with the video below to see how to install our site as a web app on your home screen.
Note: This feature may not be available in some browsers.
More options
You are using an out of date browser. It may not display this or other websites correctly.
You should upgrade or use an alternative browser.
You should upgrade or use an alternative browser.
The Travels of Tel's Tin Tent.
Ad: This forum contains affiliate links to products on Amazon and eBay. More information in Terms and rules
More options
Who Replied?- Thread starter
- #1,222
Airframes
Benevolens Magister
Still struggling with the 'phone photos, and quite a few haven't transferred, with gaps in between some groups, but I'll persevere. Thankfully the pics from my camera downloaded easily, as usual.
Anyway, to continue.
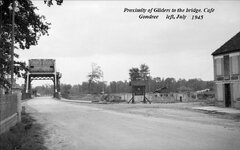
We took a "northern" route from Dieppe, avoiding possible congestion around Rouen, and approached our destination at Benouville through Ranville, and over the Pont du Ranville (Horsa bridge) over the river Orne, and the Caen canal bridge (Pegasus bridge), passing the famous Cafe Gondree on our left. (more on these places later).
We arrived at our hotel in the Le Port area of Benouville almost spot on the predicted time, at a few minutes after 18.00 hrs (French time) on Sunday evening, and easily found our hotel, Manoir Hastings, opposite Benouville church, on the corner of the attractive town square.
The hotel was originally a manor house, dating back to the early1600s, and was actually the scene of some intense fighting during the first day of the D-Day landings, and again, more of this later.
We found that our rooms were in the newly acquired annexe, across the car park. This had been another hotel, Le Palmiere, and had been bought by the owner of Manoir Hastings only recently, and used for further guest accommodation, with reception and bar and restaurant being in the original manor house itself, with a charming courtyard and terrace outside the reception area.
The annexe had a large area inside the entrance foyer (presumably a former bar or restaurant) which was ideal for planning meetings etc, and outside there were two decked areas, surrounded by date palms.
After checking-in, we dumped our kit in our rooms, and had a couple of beers on the terrace in the warm, evening sun, before enjoying a superb meal. A couple of beers later (or a bottle of vin rouge), we did some brief planning for the following day, and the retired for the night after a long day - ten hours of travelling.
Our objectives for this tour were to visit the areas covered by British and Canadian troops on D-Day and the first week or two of the Normandy campaign and, unlike the "average" D-Day tourist, we intended to see not only the beaches and associated museums, but to travel along the coast and inland, to some of the key battle sites, and some of those perhaps not so well known. (the American sector would be visited if time allowed, and more on this nearer the end of this chapter.)
Of course, with Karl and I both being ex-Airborne, the first places we had to visit were the locations of the very first Allied objectives seized and held by British (and Canadian) Airborne forces, namely the bridges over the Caen canal at Benouville (Pegasus bridge), ad the Pont du Ranville (Horsa bridge) over the Orne river, together with Merville battery, just a few short miles to the north east.
And now for the explanation of the "Ham and Jam" title !
Pegasus and Horsa bridges were stormed and seized by glider-borne troops of the British 6th Airborne Division (unit and action details later), and the radio code words for the successful capture of the vital crossings was "Ham" (for Pegasus bridge) and "Jam" for Horsa bridge, transmitted just about 15 minutes after the first glider landed, at 00.16 hrs on 6th June, 1944. (the Allies were supposed to be operating on Double British Summer Time, 2 hours in front of GMT, but it's not clear if this was British Summer Time, one hour in front. Some French records, and monuments etc, record the time as 23.16 hrs on 5th June).
As mentioned, I'll provide details of locations, actions and units in the relevant posts. Although brief details will be shown, as a form of explanation, it is not my intention to provide in-depth coverage of battles and units, as these can be found, to a greater or lesser degree, in numerous books, articles and videos. However, at the end of this thread I will offer some suggestions for further reading/research, and I'm sure Karl will chip in with some suggestions on good books covering the tank battles in particular.
One final note before I proceed with the photo record and narrative. We decided it would be easier, and time-saving, to start each day at the location furthest from our base, and then work back towards Benouville. Therefore, our first visit was to the second objective attacked, Merville battery, with the intention of covering Ranville, Pegasus bridge and Benouville on the return. The weather on the first day decided otherwise, so we had to rearrange plans "on the hoof", and return to these locations at another time. I will, however, attempt to post things in roughly chronilogical order.
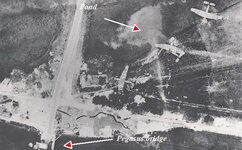
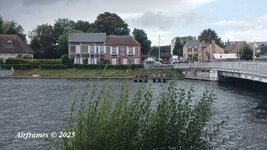
So, after that lengthy intro, on to the first photos of Benouville and our hotel, with the satellite image showing the hotel location in relation to Pegasus bridge.
Pics show the approach to Pegasus bridge from the east, cafe Gondree, our hotel, the hotel annexe, Karl with his well deserved first beer on the terrace, after a long drive, and Karl and Mick discussing the next day's tour whilst waiting for dinner.
Back with more tomorrow, 'phone pics permitting ...............


Anyway, to continue.
We took a "northern" route from Dieppe, avoiding possible congestion around Rouen, and approached our destination at Benouville through Ranville, and over the Pont du Ranville (Horsa bridge) over the river Orne, and the Caen canal bridge (Pegasus bridge), passing the famous Cafe Gondree on our left. (more on these places later).
We arrived at our hotel in the Le Port area of Benouville almost spot on the predicted time, at a few minutes after 18.00 hrs (French time) on Sunday evening, and easily found our hotel, Manoir Hastings, opposite Benouville church, on the corner of the attractive town square.
The hotel was originally a manor house, dating back to the early1600s, and was actually the scene of some intense fighting during the first day of the D-Day landings, and again, more of this later.
We found that our rooms were in the newly acquired annexe, across the car park. This had been another hotel, Le Palmiere, and had been bought by the owner of Manoir Hastings only recently, and used for further guest accommodation, with reception and bar and restaurant being in the original manor house itself, with a charming courtyard and terrace outside the reception area.
The annexe had a large area inside the entrance foyer (presumably a former bar or restaurant) which was ideal for planning meetings etc, and outside there were two decked areas, surrounded by date palms.
After checking-in, we dumped our kit in our rooms, and had a couple of beers on the terrace in the warm, evening sun, before enjoying a superb meal. A couple of beers later (or a bottle of vin rouge), we did some brief planning for the following day, and the retired for the night after a long day - ten hours of travelling.
Our objectives for this tour were to visit the areas covered by British and Canadian troops on D-Day and the first week or two of the Normandy campaign and, unlike the "average" D-Day tourist, we intended to see not only the beaches and associated museums, but to travel along the coast and inland, to some of the key battle sites, and some of those perhaps not so well known. (the American sector would be visited if time allowed, and more on this nearer the end of this chapter.)
Of course, with Karl and I both being ex-Airborne, the first places we had to visit were the locations of the very first Allied objectives seized and held by British (and Canadian) Airborne forces, namely the bridges over the Caen canal at Benouville (Pegasus bridge), ad the Pont du Ranville (Horsa bridge) over the Orne river, together with Merville battery, just a few short miles to the north east.
And now for the explanation of the "Ham and Jam" title !
Pegasus and Horsa bridges were stormed and seized by glider-borne troops of the British 6th Airborne Division (unit and action details later), and the radio code words for the successful capture of the vital crossings was "Ham" (for Pegasus bridge) and "Jam" for Horsa bridge, transmitted just about 15 minutes after the first glider landed, at 00.16 hrs on 6th June, 1944. (the Allies were supposed to be operating on Double British Summer Time, 2 hours in front of GMT, but it's not clear if this was British Summer Time, one hour in front. Some French records, and monuments etc, record the time as 23.16 hrs on 5th June).
As mentioned, I'll provide details of locations, actions and units in the relevant posts. Although brief details will be shown, as a form of explanation, it is not my intention to provide in-depth coverage of battles and units, as these can be found, to a greater or lesser degree, in numerous books, articles and videos. However, at the end of this thread I will offer some suggestions for further reading/research, and I'm sure Karl will chip in with some suggestions on good books covering the tank battles in particular.
One final note before I proceed with the photo record and narrative. We decided it would be easier, and time-saving, to start each day at the location furthest from our base, and then work back towards Benouville. Therefore, our first visit was to the second objective attacked, Merville battery, with the intention of covering Ranville, Pegasus bridge and Benouville on the return. The weather on the first day decided otherwise, so we had to rearrange plans "on the hoof", and return to these locations at another time. I will, however, attempt to post things in roughly chronilogical order.
So, after that lengthy intro, on to the first photos of Benouville and our hotel, with the satellite image showing the hotel location in relation to Pegasus bridge.
Pics show the approach to Pegasus bridge from the east, cafe Gondree, our hotel, the hotel annexe, Karl with his well deserved first beer on the terrace, after a long drive, and Karl and Mick discussing the next day's tour whilst waiting for dinner.
Back with more tomorrow, 'phone pics permitting ...............
Good shots Jeff!
- Thread starter
- #1,224
Airframes
Benevolens Magister
Thanks Harry !
Shortround6
Lieutenant General
Where is the jealously emoji ")
fubar57
General
Vic Balshaw
Major General
Good stuff Terry and some nice pics. How's it feel being a front seat passenger on the wrong side of the road! Looking forward to the next update and I take it you'll have your beret's on when travelling. 
- Thread starter
- #1,229
Airframes
Benevolens Magister
Thanks chaps.
Vic, although I'm used to being on the wrong side of the road (but not in England of course !), it was slightly strange being on the passenger side, and I'll admit, I did find my right foot seeking a non-existent brake pedal at times !!
(It was worse on the return journey from Norfolk, when a girl joined the A14 from my left, totally oblivious of other traffic and, had I not braked heavily, she would have embedded her car in my front passenger door !!).
Berets, and Denison smocks, were worn a couple of times, but only for photos, as we didn't want to look like a pair of d*ckhead "wanabes".
Some of the time we wore our Pegasus-badged caps though.
Was a great trip, amazing visiting a lot of the battle sites
Crimea_River
Marshal
Great intro Terry.
- Thread starter
- #1,232
Airframes
Benevolens Magister
OK, enough of the "Brits on Holiday" touristy stuff (for now), and on to the reason for our visit - viewing the British and Canadian battle sites.
I'll first provide a brief background, with some maps and photos, in order to give a broad outline of what happened, where, and when, as the tour progresses.
As previously mentioned, I'll provide info on some suitable sources for those requiring research and detailed reading on the various locations/battles nearer the end of this chapter of "The Travels of Tel's Tin Tent".
* * *
For the initial invasion of northern Europe to succeed, i.e. the landings along a stretch of the Normandy coastline between Le Havre and Cherbourg, the flanks had to be secured first, and this vital task fell to the Airborne Forces of the US and Britain.
The US Airborne would secure important corridors on the right flank, in the west, whilst British and Canadian Airborne troops would seize and hold vital bridges on the left flank, in the east, and also neutralise a gun battery that threatened the seaborne elements on D-Day, 6th June, 1944.
The eastern flank, in particular, was vitally important, as the targeted bridges were the main way that 21st Panzer Divn (and later 12th SS Pz Div) could move in the area around Caen, the main pivotal point for the battle of Normandy.
The bridges selected were relatively small (in comparison to those in Operation Market Garden in September '44) but of extreme strategic importance, nonetheless. These were over the rivers Dives and Divette in the east, and over the River Orne and the Caen canal, just slightly east and north of Caen itself.
The British 6th Airborne Division had the task of capturing the bridges, neutralising the battery at Merville, near the coast, and seizing and holding key crossroads/villages, and this came under the code name "Operation Tonga", and utilised both glider troops and parachute troops, the latter being from 7 Btn and 9 Btn The Parachute Regiment.
The first element of "Tonga" was the capture of the bridge over the Caen canal at Benouville and the nearby bridge over the Orne river near Ranville, and this was delegated to glider-borne troops of D Company, 2nd Oxfordshire & Buckinghamshire Light Infantry (2 Ox & Bucks), under the command of Major John Howard.
His force consisted of 180 men, including Sappers (engineers) and medics, to be carried in six Horsa gliders - three gliders for each bridge assault.
This part of "Tonga" was simply known as "Coup de main", not, as many sources state, "Operation Deadstick". (that code word was only used for pre-invasion rehearsal exercises on similarly located bridges in England).
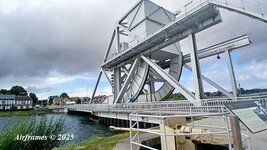
I will mainly deal here with the assault on the Benouville bridge over the Caen canal (now known as Pegasus bridge, after the emblem of British Airborne Forces), as this is where most of our tour of that particular area was conducted. The bridge over the River Orne, Ranville bridge (now Horsa bridge, named after the type of glider used), was difficult to photograph, due to the current road layout, but I'll provide brief coverage later.
The six Horsas, towed by Halifax bombers, crossed the coast between Cabourg and Ouistreham (see sat image below) and cast-off at 6,000 feet.
The Landing Zones (LZs) for each group of gliders were extremely small, especially for the canal bridge assault, and the pilots had to fly timed "legs", relying on stop-watch and compass. The party heading for the Orne river bridge took a slightly different course, landing on the west side of the river, on a different heading, in a larger, but quite narrow meadow, although one glider landed a few miles off course, due to high winds and a navigational error by the tow aircraft.
Major Howard's force had to follow a "dog leg" course, heading south, then turning west, before a final turn to the north, to land alongside the canal. as close as possible to their objective.
I'll provide a further description of this, and brief details of the assault, reinforcement and the subsequent battles around Benouville, Le Port and Ranville in subsequent posts.
Shown below are images of the area covered by "Operation Tonga", the area of Pegasus bridge, the bridge itself, and some aerial photos of the canal bridge area. Note that the church in Le Port, visible in one of the photos, is directly across a narrow street, in front of our hotel, and I'll cover this area in some detail further into this tour. (images from various sources, in the Public Domain).


That's it for today's entry, as the numbness in my hands is really affecting my typing, and quite painful, so I'm going to take a break and hope to continue, sometime over the weekend.
I'll first provide a brief background, with some maps and photos, in order to give a broad outline of what happened, where, and when, as the tour progresses.
As previously mentioned, I'll provide info on some suitable sources for those requiring research and detailed reading on the various locations/battles nearer the end of this chapter of "The Travels of Tel's Tin Tent".
* * *
For the initial invasion of northern Europe to succeed, i.e. the landings along a stretch of the Normandy coastline between Le Havre and Cherbourg, the flanks had to be secured first, and this vital task fell to the Airborne Forces of the US and Britain.
The US Airborne would secure important corridors on the right flank, in the west, whilst British and Canadian Airborne troops would seize and hold vital bridges on the left flank, in the east, and also neutralise a gun battery that threatened the seaborne elements on D-Day, 6th June, 1944.
The eastern flank, in particular, was vitally important, as the targeted bridges were the main way that 21st Panzer Divn (and later 12th SS Pz Div) could move in the area around Caen, the main pivotal point for the battle of Normandy.
The bridges selected were relatively small (in comparison to those in Operation Market Garden in September '44) but of extreme strategic importance, nonetheless. These were over the rivers Dives and Divette in the east, and over the River Orne and the Caen canal, just slightly east and north of Caen itself.
The British 6th Airborne Division had the task of capturing the bridges, neutralising the battery at Merville, near the coast, and seizing and holding key crossroads/villages, and this came under the code name "Operation Tonga", and utilised both glider troops and parachute troops, the latter being from 7 Btn and 9 Btn The Parachute Regiment.
The first element of "Tonga" was the capture of the bridge over the Caen canal at Benouville and the nearby bridge over the Orne river near Ranville, and this was delegated to glider-borne troops of D Company, 2nd Oxfordshire & Buckinghamshire Light Infantry (2 Ox & Bucks), under the command of Major John Howard.
His force consisted of 180 men, including Sappers (engineers) and medics, to be carried in six Horsa gliders - three gliders for each bridge assault.
This part of "Tonga" was simply known as "Coup de main", not, as many sources state, "Operation Deadstick". (that code word was only used for pre-invasion rehearsal exercises on similarly located bridges in England).
I will mainly deal here with the assault on the Benouville bridge over the Caen canal (now known as Pegasus bridge, after the emblem of British Airborne Forces), as this is where most of our tour of that particular area was conducted. The bridge over the River Orne, Ranville bridge (now Horsa bridge, named after the type of glider used), was difficult to photograph, due to the current road layout, but I'll provide brief coverage later.
The six Horsas, towed by Halifax bombers, crossed the coast between Cabourg and Ouistreham (see sat image below) and cast-off at 6,000 feet.
The Landing Zones (LZs) for each group of gliders were extremely small, especially for the canal bridge assault, and the pilots had to fly timed "legs", relying on stop-watch and compass. The party heading for the Orne river bridge took a slightly different course, landing on the west side of the river, on a different heading, in a larger, but quite narrow meadow, although one glider landed a few miles off course, due to high winds and a navigational error by the tow aircraft.
Major Howard's force had to follow a "dog leg" course, heading south, then turning west, before a final turn to the north, to land alongside the canal. as close as possible to their objective.
I'll provide a further description of this, and brief details of the assault, reinforcement and the subsequent battles around Benouville, Le Port and Ranville in subsequent posts.
Shown below are images of the area covered by "Operation Tonga", the area of Pegasus bridge, the bridge itself, and some aerial photos of the canal bridge area. Note that the church in Le Port, visible in one of the photos, is directly across a narrow street, in front of our hotel, and I'll cover this area in some detail further into this tour. (images from various sources, in the Public Domain).
That's it for today's entry, as the numbness in my hands is really affecting my typing, and quite painful, so I'm going to take a break and hope to continue, sometime over the weekend.
- Thread starter
- #1,233
Airframes
Benevolens Magister
Forget to add the satellite image showing the approximate flight paths of the two Horsa glider detachments, so here it is below.
Back tomorrow with more on the "Coup de main" ...................

Back tomorrow with more on the "Coup de main" ...................
Shortround6
Lieutenant General
Looking forward to more but only if your hands are up to it.
Vic Balshaw
Major General
Good early morning reading for me with first cuppa of the day.
Good stuff Terry! Hopefully the hands hold up for more.
A4K
Brigadier General
Great stuff Terry. Looking further to the next installments
- Thread starter
- #1,238
Airframes
Benevolens Magister
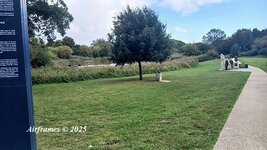
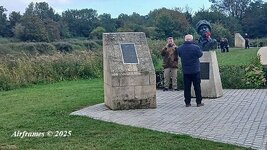
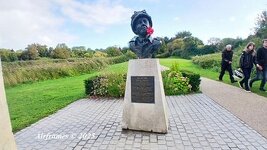
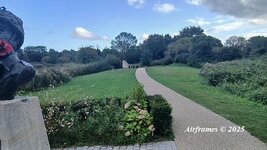
So, the first stage of "Tonga" begins, with Major Howard's force sweeping in to land, in their three Horsa gliders on LZ-X, a narrow, triangular strip of partly boggy land between the canal to the west, and a large pond just yards to the east, with the canal bridge to their front.
The first glider, with Major Howard and Lt. Den Brotheridge's 25 Platoon onboard, was piloted by Staff Sergeants Jim Wallwork and Johnnie Ainsworth, and touched down at 00.16 hours.
Slithering, banging and smashing over the soft ground, embedded with flints or rocks, with a line of trees on the port (canal) side, it lost a wing, suffered some other damage, and came to a halt with its nose embedded in the defensive barbed wire, just 47 yards (43 metres) from the bridge !!
An absolutely incredible demonstration of piloting skill.
The two other gliders quickly landed behind, with one ending up partly broken, in the edge of the pond and on marshy ground.
Several of the men on board were briefly trapped in the glider, but quickly recovered and fought their way out of the wreckage. Unfortunately, Bren gunner L/Cpl. Fred Greenhalgh was knocked unconscious and drowned. He became the first Allied casualty on D-Day, just 18 minutes into June 6th.
The men of the "Ox and Bucks" soon rallied and stormed the bridge, with Lt. Den Brotheridge, despite a fairly serious injury sustained during the landing, dashing across the wooden-planked road bed, firing his Sten gun as he ran. Just short of the Cafe Gondree, on the west bank of the canal, he was shot in the neck, and died soon after.
Lt. Brotheridge was the first Allied soldier to die by enemy action on D-Day, and is buried in Ranville church yard, separate from the adjoining War Graves Cemetery.
The seizure of the bridge is portrayed (not altogether accurately) in the 1962 movie "The Longest Day", with Richard Todd (Guy Gibson in "The Dam Busters" movie) playing the part of Major Howard. In reality, Todd was actually there at the time, as Lt.Todd, in 7 Para, who reinforced the Ox and Bucks at the bridge shortly after its capture, later that night.
Whilst all this was going on, the second bridge, the Pont du Ranville, just half a mile down the road, was also being stormed and seized and, within 15 minutes of landing, both bridges had been seized and secured, and the code words "Ham and Jam" were transmitted back to HQ.
Although a classic example of coup de main, this was just the beginning for the men at the bridge as, even after the arrival of 7 Para around 30 minutes later, counter attacks by 21st Panzer were expected, and soon materialised during the night, and the following days.
Although I'll attempt to describe some of these actions around the bridge and in Benouville and Le Port in subsequent posts, I will again refer you to suitable sources of reading for very detailed accounts of the battle towards the end of this "tour".
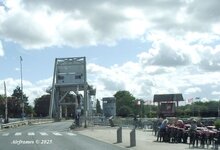
The pics below show an aerial view of just how close to the bridge the gliders landed, another view at ground level, and a similar view today.
Other pics show the LZ and the markers where the gliders landed (some obscured by foliage in the background), the memorial to Major Howard, and the bridge, with Cafe Gondree across the canal, and a closer view of Cafe Gondree . This was the very first building to be liberated in France on D-Day.
The final B&W photo shows Georges Gondree, with Major Howard and Lt. Wood, with a similar (rainy) view today.
Note that the bridge shown as it is today, is a newer bridge, longer than the original, which replaced the wartime bridge in 1994, when the canal was widened again.
The original bridge is preserved in the Memorial Pegasus Museum, and will be shown later.
Edit:- Note mistake in caption showing the gliders at ground level - it should read Cafe Gondree at right.


The first glider, with Major Howard and Lt. Den Brotheridge's 25 Platoon onboard, was piloted by Staff Sergeants Jim Wallwork and Johnnie Ainsworth, and touched down at 00.16 hours.
Slithering, banging and smashing over the soft ground, embedded with flints or rocks, with a line of trees on the port (canal) side, it lost a wing, suffered some other damage, and came to a halt with its nose embedded in the defensive barbed wire, just 47 yards (43 metres) from the bridge !!
An absolutely incredible demonstration of piloting skill.
The two other gliders quickly landed behind, with one ending up partly broken, in the edge of the pond and on marshy ground.
Several of the men on board were briefly trapped in the glider, but quickly recovered and fought their way out of the wreckage. Unfortunately, Bren gunner L/Cpl. Fred Greenhalgh was knocked unconscious and drowned. He became the first Allied casualty on D-Day, just 18 minutes into June 6th.
The men of the "Ox and Bucks" soon rallied and stormed the bridge, with Lt. Den Brotheridge, despite a fairly serious injury sustained during the landing, dashing across the wooden-planked road bed, firing his Sten gun as he ran. Just short of the Cafe Gondree, on the west bank of the canal, he was shot in the neck, and died soon after.
Lt. Brotheridge was the first Allied soldier to die by enemy action on D-Day, and is buried in Ranville church yard, separate from the adjoining War Graves Cemetery.
The seizure of the bridge is portrayed (not altogether accurately) in the 1962 movie "The Longest Day", with Richard Todd (Guy Gibson in "The Dam Busters" movie) playing the part of Major Howard. In reality, Todd was actually there at the time, as Lt.Todd, in 7 Para, who reinforced the Ox and Bucks at the bridge shortly after its capture, later that night.
Whilst all this was going on, the second bridge, the Pont du Ranville, just half a mile down the road, was also being stormed and seized and, within 15 minutes of landing, both bridges had been seized and secured, and the code words "Ham and Jam" were transmitted back to HQ.
Although a classic example of coup de main, this was just the beginning for the men at the bridge as, even after the arrival of 7 Para around 30 minutes later, counter attacks by 21st Panzer were expected, and soon materialised during the night, and the following days.
Although I'll attempt to describe some of these actions around the bridge and in Benouville and Le Port in subsequent posts, I will again refer you to suitable sources of reading for very detailed accounts of the battle towards the end of this "tour".
The pics below show an aerial view of just how close to the bridge the gliders landed, another view at ground level, and a similar view today.
Other pics show the LZ and the markers where the gliders landed (some obscured by foliage in the background), the memorial to Major Howard, and the bridge, with Cafe Gondree across the canal, and a closer view of Cafe Gondree . This was the very first building to be liberated in France on D-Day.
The final B&W photo shows Georges Gondree, with Major Howard and Lt. Wood, with a similar (rainy) view today.
Note that the bridge shown as it is today, is a newer bridge, longer than the original, which replaced the wartime bridge in 1994, when the canal was widened again.
The original bridge is preserved in the Memorial Pegasus Museum, and will be shown later.
Edit:- Note mistake in caption showing the gliders at ground level - it should read Cafe Gondree at right.
Attachments
-
 Peg bridge aerial.jpg54.4 KB · Views: 8
 -
 Peg Gliders and Cafe.jpg73.9 KB · Views: 7
 -
 Normandy 22.jpg69.7 KB · Views: 8
 -
 Normandy 23.jpg74 KB · Views: 6
 -
 Normandy 24.jpg90.7 KB · Views: 7
 -
 Normandy 25.jpg66.3 KB · Views: 7
 -
 Normandy 26.jpg65.4 KB · Views: 8
 -
 Normandy 27.jpg62.8 KB · Views: 7
 -
 Normandy 28.jpg61.5 KB · Views: 5
A4K
Brigadier General
Good stuff Terry. Great to see the 'then and now' shots.
- Thread starter
- #1,240
Airframes
Benevolens Magister
Just a very brief look at Pont du Ranville (Horsa bridge) over the Orne river, less than half a mile east of the canal bridge.
Whereas the canal bridge was a bascule type (a lifting bridge, pivoted at one end, which moves back on rollers as it lifts), the Orne river bridge was a pivoting bridge, which swung open, pivoting on a central support.
The original bridge has now been replaced with a fixed bridge, although some of the original structure has been retained, in particular the central and river bank supports. .
It wasn't possible. at the time, to photograph the bridge from the river banks, so I've only included a pic as we drove over it, heading towards Ranville.
The pics below show Karl and me, suitably attired, at Pegasus bridge, a satellite shot showing Horsa bridge in relation to Pegasus bridge and the glider landing sites, together with a wartime B&W pic of the bridge and an original architects model, displayed in the Pegasus Memorial Museum, with the colour pic showing the bridge today.
Back tomorrow (hopefully) with more coverage of the battle at Benouville and Le Port.
Users who are viewing this thread
Total: 1 (members: 0, guests: 1)