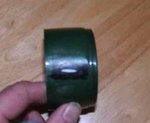
Sorry about the poor pic. But knoked this up to demonstrate the gun port.
Cut a slot in a spray paint lid. Cut a tube to length and glued in lid. Tube was inserted at an angle so you could see all the hole at one and not at the other. Filed and sanded tube flush to surface.
Hope it helps.
Cut a slot in a spray paint lid. Cut a tube to length and glued in lid. Tube was inserted at an angle so you could see all the hole at one and not at the other. Filed and sanded tube flush to surface.
Hope it helps.