Glad I don't use the stuff....
Navigation
Install the app
How to install the app on iOS
Follow along with the video below to see how to install our site as a web app on your home screen.
Note: This feature may not be available in some browsers.
More options
You are using an out of date browser. It may not display this or other websites correctly.
You should upgrade or use an alternative browser.
You should upgrade or use an alternative browser.
What's on The Workbench (2 Viewers)
- Thread starter Heinz
- Start date
Ad: This forum contains affiliate links to products on Amazon and eBay. More information in Terms and rules
More options
Who Replied?Airframes
Benevolens Magister
Bill, the two tins in the center, if the address is Hull, are the 'real', original Humbrol, and should be fine. They'll be at least five years old, and may need a lot of stirring, but should work fine. The tin on the right is the current stuff - might or might not work, but will not be as good as the original - and you can bet if you get another tin there'll be a difference in shade, or viscosity, or both!
I haven't seen the yellow cement containers in the UK, but perhaps my shop doesn't stock them. The design is new, but the cement wil not have been made by Humbrol, only the name being used, as the factory, and the company, no longer exist. I can't comment on the quality, as I no longer use the stuff , due to the original 'Britfix' cement being unavailable when the factory closed.I had to then use Revell, among others, which I still do.
Wojtek, I keep trying different tins of Humbrol, within an assortment of colours. Some work, some are poor quality, some work but are not the shade they're supposed to be, and so on. All the Humbrol metallics are of very poor quality, and very inconsistent.
I've placed an order with Hannant's for some frequently used colours from the Xtracolour range, which do work, and are superb. Unfortunately, they're out of stock of a couple I wanted, including two of the metallics, but I'll re-order when back in stock.
I'm also going to try a couple from the Model Master range, starting with metallics.
Unless Hornby improve the Humbrol paints (by finding a better manufacturer), then my days of using them, after 50 years, are over!
I was beginning to think I was perhaps being paranoid, but, talking to Iris, the owner of my LHS on Tuesday, she told me a number of her customers have commented on the paint. Also, she now only stocks the 'fast-moving', basic colours, which equates to about half the choice there used to be at this shop. I'm still working on trying to get her to stock an alternative enamel (she also stocks Tamiya acrylics), although she is restricted by various agreements with wholesalers etc.
Airframes
Benevolens Magister
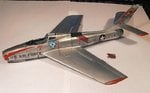
Well, I've managed to improve things a bit, and the bare metal finish is as good as it's going to get. I had thought of starting all over again, but thought that might make things worse, so cleaned the rough areas, blended in the rear canopy section, and brush-painted it around this area, using the first tin of silver, which was polished when dry. Some re-touching is needed in a few small areas, and the anti-glare panel and the black panel on the fuselage spine will need to be repainted, the latter also being too short - only noticed when checking reference photos!
The first lot of decals are on, and they needed a bit of help, and the adhesive cleaned off, as they're 28 years old, and rather thick!
To protect against cracking or dissolving once they hit the water, I gave them a coat of gloss acrylic varnish, but I don't think this was needed, as they're pretty tough - unlike the Microscale sheet I was going to use for some of the stencils and panel markings. Part of this dissolved, or became distorted when clear coated!
The kit decals have been sealed with 'Future', and will need a trim on the tail fin, and some retouching here and there, due to overlapping carrier film on the fin, the odd small flaked area, and some out of register bits.
Once all the decals are in place, they'll be toned-down a bit, as they're as shiny as a new penny at the moment!
More to follow when there's something top show.
Attachments
No too shabby at all Terry! 
looks great Dogsbody.
almost done with my J2M3 Raiden, couple of quick pics taken on my phone this A.M


almost done with my J2M3 Raiden, couple of quick pics taken on my phone this A.M
Airframes
Benevolens Magister
Thanks Wayne and Karl. That's looking the biz alright Karl - nice one mate!
A4K
Brigadier General
Great work Terry and Karl!
Wasn't able to concentrate on detail or paint work, so had a sanding/ construction session on some wheeled things:
Fuman (Bandai) 1/12 Yamaha XT250 (1983 kit)

Heller 1:72 GMC CCKW-353


Heads a bit better now, so retrying the Kranich cockpit...
Wasn't able to concentrate on detail or paint work, so had a sanding/ construction session on some wheeled things:
Fuman (Bandai) 1/12 Yamaha XT250 (1983 kit)
Heller 1:72 GMC CCKW-353
Heads a bit better now, so retrying the Kranich cockpit...
Nice work Karl and Evan 
Airframes
Benevolens Magister
Good stuff Evan. I don't think those tyres will fit that chassis though .....
Airframes
Benevolens Magister
That's looking smart Rob.
A4K
Brigadier General
With Terry there - great work mate!
Cheers Wojtek, Wayne and Terry re mine (...and Terry )
)
Cheers Wojtek, Wayne and Terry re mine (...and Terry
I like that Rob, looks good mate!
antennas finally installed on the 757. made from scratch. What I did was, I printed out a profile of the plane and resized it in photoshop. I then cut it out and placed it against a sheet of styrene, then traced along the shape, and cut out the antennas. I'm having trouble trying to find the right size and shape of the anti-collision beacon. I just need one good, large photo from above


A4K
Brigadier General
Looks great Rob!
T Bolt
Colonel
Real nice Rob