Navigation
Install the app
How to install the app on iOS
Follow along with the video below to see how to install our site as a web app on your home screen.
Note: This feature may not be available in some browsers.
More options
You are using an out of date browser. It may not display this or other websites correctly.
You should upgrade or use an alternative browser.
You should upgrade or use an alternative browser.
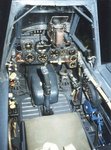
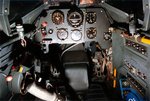
1/32 Hasegawa Bf109G-14
- Thread starter woody
- Start date
Ad: This forum contains affiliate links to products on Amazon and eBay. More information in Terms and rules
More options
Who Replied?Aaron Brooks Wolters
Brigadier General
Take your time and have fun with it Woody, there are a lot of folks here with a lot of expertise and who love to help out so you won't go wanting for help if you need it.
Crimea_River
Marshal
One of the biggest difference over the last 30 years is all the great aftermarket stuff and the resulting need for different glues. Back then you had a tube of styrene cement. I almost never use that anymore. For PE, you need to use Cyanoacrylate (CA) glue - same as the old "Crazy Glue". I use Tamiya Extra Thin liquid cement for most other work on the plastic stuff.
I'm with you on that score Andy.....
- Thread starter
- #5

- Thread starter
- #6
Vic Balshaw
Major General
That's a nice looking kit Woody me old mate and looks a lot of fun with all that detail, like Andy says, take your time and for goodness sake stop banging your head with the glue pot.
Where's the picture of the hand stuck to the forehead....
Crimea_River
Marshal
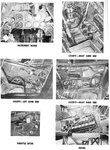
Looks good so far Woody. If you want to be even more realistic, the middle of the section in the fuel hose that you left as supplied wi the kit was, in reality, clear so that the pilot could actuallysee the fuel flow. Easily done with a piece of clear stretched sprue.
Oh, and you should be able to get a debonder for CA glue at your local hobby store. Comes in a separate bottle and is good to have around for the stuck body parts.
Oh, and you should be able to get a debonder for CA glue at your local hobby store. Comes in a separate bottle and is good to have around for the stuck body parts.
- Thread starter
- #11
- Thread starter
- #12
Not too bad at all!
Crimea_River
Marshal
I like it!
T Bolt
Colonel
Looks real good Woody.
- Thread starter
- #17
Airframes
Benevolens Magister
Crimea_River
Marshal
- Thread starter
- #20
Users who are viewing this thread
Total: 1 (members: 0, guests: 1)