Navigation
Install the app
How to install the app on iOS
Follow along with the video below to see how to install our site as a web app on your home screen.
Note: This feature may not be available in some browsers.
More options
You are using an out of date browser. It may not display this or other websites correctly.
You should upgrade or use an alternative browser.
You should upgrade or use an alternative browser.
1/32 Revell BF-110 G4 WIP
- Thread starter Kalakan
- Start date
Ad: This forum contains affiliate links to products on Amazon and eBay. More information in Terms and rules
More options
Who Replied?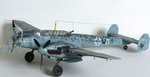
Crimea_River
Marshal
I noticed it a while ago Geo and posted the issue as well.
Nice work Gerry.
Nice work Gerry.
- Thread starter
- #24
Kalakan
Senior Airman
Thanks a lot HartmannVery long ago we did with a friend to order the model - had to work hard. Cockpit is not particularly worked through, the main attention to the color.
Good luck in your work!
")
Good work so far!
- Thread starter
- #26
Kalakan
Senior Airman
Hello everyone.
Here are the new images of the slow advance that the Bf-110 sports till today.... Hope you like it......
Here it is visible the new plastic strips located to bond the engine radiators to the wing......


Here´s how the radiator looks almost finished before being installed...

It was located RLM 76 as base for the in and outlets (with some additional pipings) and the location of the braces that controls and fixes in place the outer body of each radiator...
Then after pondering if on this kite should the external 300lts tanks should be installed, due that almost all the BF-110g´s in 1944 used this external tanks. (it would be greatly appreciated if someone can help me to clarify if the R7 conversion was applied to all its BF-110 nachtjagers?).
I then decided to make my own gasoline tanks with several materials, based in some 1:48 pieces that were not used in an early Bf-109 K. Sadly this Revell model did not included any of this external gas tanks.
In order to conform this gas tanks it was used from plastic putty to soap. (Yes, soap. Some years ago I modeled several 1:72 figures for a office building model and so far this figures had withstand the heat and the cold from this region). So I decided to give it a try.
Here are some images of the soap intent....

Then began the process of removing material and adding some more....


Then the prime works in order to begin with the suface finishes along with some punches here and there....

And finally the two guilty ones that dont let me advance the way I would like..... Lolo and Moka.

Here are the new images of the slow advance that the Bf-110 sports till today.... Hope you like it......
Here it is visible the new plastic strips located to bond the engine radiators to the wing......
Here´s how the radiator looks almost finished before being installed...
It was located RLM 76 as base for the in and outlets (with some additional pipings) and the location of the braces that controls and fixes in place the outer body of each radiator...
Then after pondering if on this kite should the external 300lts tanks should be installed, due that almost all the BF-110g´s in 1944 used this external tanks. (it would be greatly appreciated if someone can help me to clarify if the R7 conversion was applied to all its BF-110 nachtjagers?).
I then decided to make my own gasoline tanks with several materials, based in some 1:48 pieces that were not used in an early Bf-109 K. Sadly this Revell model did not included any of this external gas tanks.
In order to conform this gas tanks it was used from plastic putty to soap. (Yes, soap. Some years ago I modeled several 1:72 figures for a office building model and so far this figures had withstand the heat and the cold from this region). So I decided to give it a try.
Here are some images of the soap intent....
Then began the process of removing material and adding some more....
Then the prime works in order to begin with the suface finishes along with some punches here and there....
And finally the two guilty ones that dont let me advance the way I would like..... Lolo and Moka.
Airframes
Benevolens Magister
Nice work, and a good solution with the soap too !
And they are beaut dogs.
And they are beaut dogs.
Crimea_River
Marshal
Well, that's ingenious.
Good stuff!
Hartmann52
Airman 1st Class
Good progress!
- Thread starter
- #32
Kalakan
Senior Airman
Hello everyone, and thanks for your kind responses.
Here are attached more images of the advance made during this week of relaxation in my country. My idea is to begin the fuselage paint works during this day after some ponderation if the main antennas will be placed before of after the main painting.
It was then decided to advance without the main radar antennas for the time being and proceed with the rest of antennas that are found elsewhere in the main body and wings of the plane.
Then also after continuing to press for advance with the main external tanks it was decided to leave them for the end after the kite is almost finished due to the time that consumes preparing the fixing points as well as the main struts to locate this tanks. Here are some images of this advance with the welding points below the fixing plates.

Then the advance with the plates that receives the struts (with some cables pretending to be the bolts that join this plates with the tank body).

Then this is how the tanks looks without the priming paint and the metallic belts.

Then the advance with the fixing points (and the gas lines) to receive the tanks in the wings

Then an image of the shell shute infront of the nose

Then an image of the ventilation hatch (that actually opens and closes at will).....

Then some images of the fuselage ILS and the wing Fug 101 antennas. It it worth mentioning that it is incredible the oversize width of the model original pieces, so these HAD to be substituted......

It caught my attention that the Hendon kite presents only to fixing points rather that the usual three points than most of the photographed Bf-110G´s seen elsewhere. Can someone has any information regarding this change?

Here are attached more images of the advance made during this week of relaxation in my country. My idea is to begin the fuselage paint works during this day after some ponderation if the main antennas will be placed before of after the main painting.
It was then decided to advance without the main radar antennas for the time being and proceed with the rest of antennas that are found elsewhere in the main body and wings of the plane.
Then also after continuing to press for advance with the main external tanks it was decided to leave them for the end after the kite is almost finished due to the time that consumes preparing the fixing points as well as the main struts to locate this tanks. Here are some images of this advance with the welding points below the fixing plates.
Then the advance with the plates that receives the struts (with some cables pretending to be the bolts that join this plates with the tank body).
Then this is how the tanks looks without the priming paint and the metallic belts.
Then the advance with the fixing points (and the gas lines) to receive the tanks in the wings
Then an image of the shell shute infront of the nose
Then an image of the ventilation hatch (that actually opens and closes at will).....
Then some images of the fuselage ILS and the wing Fug 101 antennas. It it worth mentioning that it is incredible the oversize width of the model original pieces, so these HAD to be substituted......
It caught my attention that the Hendon kite presents only to fixing points rather that the usual three points than most of the photographed Bf-110G´s seen elsewhere. Can someone has any information regarding this change?
Nicely done so far!
- Thread starter
- #35
Kalakan
Senior Airman
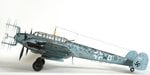
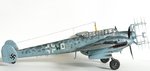
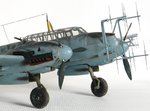
Hello again. So finally its time to begin with the paint works. Here are some images of the advance made son far during this weekend.
First I wanted to show the welding seams in the engine exhausts and begin presenting some thin sewing thread, and also presented a makeshift landing light (that after finding out that this piece will not need any detail due to the distortion of the original transparent cover). Maybe this will be changed along with the entire light cover.......

Then the complete paint work in black to the lower surfaces and some paint to the lateral fuselage as well. Also the location works of the different communication antennas and rudders were performed....

Also the openings for the instrument gauges in each nacelle were made....

Then after pondering for a while, I decided that it was time to apply some weathering in the undersurfaces, just for the kick of it.... I love the view of these kites that in most cases looks like mean machines, and also has to be weathered based on the fact that they flew intercept missions in all weather (mud, ice, hail, etc).....

Than ot was applied the dark base colour in the areas where the rivets are found....

And then the beginning of the masking works in the cabin prior to the main paint works in the upper fuselage....

First I wanted to show the welding seams in the engine exhausts and begin presenting some thin sewing thread, and also presented a makeshift landing light (that after finding out that this piece will not need any detail due to the distortion of the original transparent cover). Maybe this will be changed along with the entire light cover.......
Then the complete paint work in black to the lower surfaces and some paint to the lateral fuselage as well. Also the location works of the different communication antennas and rudders were performed....
Also the openings for the instrument gauges in each nacelle were made....
Then after pondering for a while, I decided that it was time to apply some weathering in the undersurfaces, just for the kick of it.... I love the view of these kites that in most cases looks like mean machines, and also has to be weathered based on the fact that they flew intercept missions in all weather (mud, ice, hail, etc).....
Than ot was applied the dark base colour in the areas where the rivets are found....
And then the beginning of the masking works in the cabin prior to the main paint works in the upper fuselage....
Lovely work so far!
- Thread starter
- #37
Kalakan
Senior Airman
fubar57
General
Looking good.
Geo
Geo
Not bad at all!
Users who are viewing this thread
Total: 1 (members: 0, guests: 1)