Airframes
Benevolens Magister
Spitfire, or 'Fire Spit'?
Here's the parallel build to the Spitfire MkXIV, using the rest of the Revell 'donor' kit.
Going along with the theme originally devised by Evan and Alex, rather than consign the unused parts of the Revell kit to the spares box, I thought I'd build the remains of the kit to represent an abandoned airframe, or in this case, to be more precise, a hulk used for fire rescue training and practice.
At one time, most airports and R.A.F. airfields had a 'fire dump', where obsolete or damaged aircraft were literally dumped, to be used by the Station or Airport Fire Service for training and practice in rescue and fire-fighting techniques. Depending on requirements specific to operations from the particular airfield, many different types of airframe were, and still are employed, from bombers and transports, to airliners and fighters, and, believe it or not, the Spitfire was no exception. I know of at least one instance where a Spitfire Mk22, and some earlier models, have been used for this inglorious, but vital role.
So, the kit will be built as the Mk22, and finished in a scheme representative of an Instructional Airframe, which means that the serial number will be followed by the letter 'M', for example 1234M. These numbers were allocated to time-expired aircraft by the R.A.F.,replacing the original number, in order to clasify them as non-flying airframes, still 'on strength', but not part of the operational inventory.Many of these aircraft, of varied types, were used for such things as Battle Damage Repair (BDR) training, airframe and systems training and so on, as well as the ultimate fate of fire training. Fortunately today, more and more of the rare types used for such work have been withdrawn from 'service', and have been, or are being, refurbished for static display, and some also to flying condition.
So, down to the build.
When I first had the idea for this project, I thought it would be a simple task of 'throwing together' the remaining, unused kit parts, together with some of the remains of those parts 'butchered' for the MkXIV build.
Wrong!
As it turns out, there is going to be almost as much work involved in this build, as there would be in a major conversion, such as the MkXIV, or a scratch-built detailing exercise. To just assemble the model and place it on a suitable base would not achieve the desired effect, so I sat back, studied the kit parts and lots of photographs of 'hulks', and thought carefully about how to go about this task.
In order to achieve the 'look' of a hulk used for fire training, there will have to be some detail work carried out, and most of this is not so much scratch-building, but more 'scratch-destroying'!
Much of the detail already present in the kit will need to be removed, and other areas will need to have 'decay' scratch-built. Such items as inspection panels, opening or removable hatches, control surfaces removed for spares, natural and fire damage, and, of course, the effects of wind and weather, will have to be considered. All this has been planned, and hopefully these plans will work, and allow me to build an acceptably attractive, if very unusual model.
Work commenced with the internal areas first, wih some of the cockpit parts being cleaned up and enhanced.
As the airframe would have been stripped of all usuable equipment and fittings, and other parts lost to vandals or souvenir hunters, I had to plan to build the cockpit more or less as a bare shell, but with empty equipment brackets, loose wires and pipe work etc.
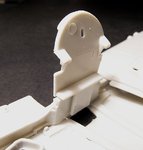
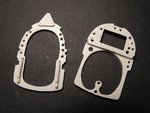
As the seat and armoured back-plate are not being used, this leaves the rear cockpit frame exposed and fully visible. The kit part is a reasonable representation of the this frame, but is rather bare. The prominent lightening holes, seen on all Spitfires, were drilled out around the frame, and the countersunk bolt heads on the head armour added.
The kit instrument panel includes a clear piece for the Blind Flying Panel in the centre of the main panel, which will be omitted from the build, helping enormously in providing an 'empty' appearance. The main instrument dials were drilled out, to give the appearance of empty apertures, and some bent or othersise damaged switch mounting plates etc will be added.
The rudder pedals were moulded as part of the instrument panel sub-frame, and were totally the wrong shape, so these were removed and the frame cleaned up. New pedals, and the push-rod tubes, will be fabricated later.
PIC 1 shows the two parts awaiting clean-up and the additions.
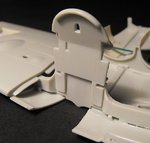
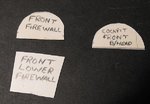
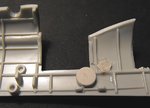
As mentioned in the MkXIV build, the kit firewall will be used in that build, in order to mount the engine. This meant that a new firewall, and front bulkhead had to be made, and these have been cut from plastic sheet, slightly oversize, ready to fit and sand to shape once the fuselage halves have been joined, as
shown in PIC 2.
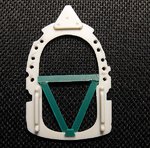
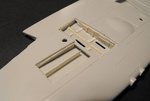
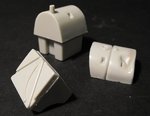
PIC 3Shows the forward upper and lower fuel tanks, and, in the rear, the fuselage tank assembled. The filler caps have been drilled out, as 'fire wrecks' would have the caps removed to prevent any concentration of explosive fumes. Note the 'dents' in the upper tank.
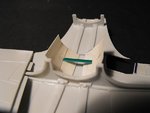
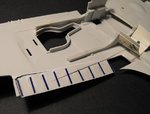
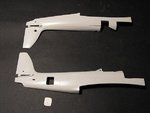
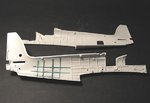
PIC 4 Shows the fuselage halves, with some holes drilled to represent removed or lost inspection covers, and the aperture cut out for the rear hatch, with the hatch skin made from plastic sheet. This is yet to be detailed on the internal surface, and will be positioned open on the finished model. The holes have yet to be cleaned up and the fuselage walls thinned around the edges in these areas.
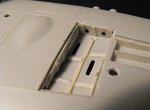
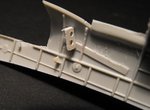
PIC 5 Shows the inside of the fuselage to date, with some basic framework added to the port rear side, as this will be partly visible through the open hatch. The dark marks and 'mess' are smudges from the heavy pencil used to mark the positions of the framework, which was made from plastic strip.
For some unknown reason, Revell have not included a throttle quadrant or trim wheel, although what appear to be locating pins for these are moulded onto the cockpit wall. I seem to recall that these items were included in the originall Matchbox kit, when I built it back in 1975 or '76. The beginings of these have been made from plastic sheet, and glued into position, as shown in PIC 6.
Throttle, pitch and boost levers will be added from stretched sprue later.
PIC 7 Is a couple of further additions, in the form of empty switch and instrument brackets, which have yet to be cleaned up and trimmed, and again plastic sheet was used to fabricate these. Note the rough appearance of the cockpit wall, which will be sanded before painting.
More detail will be added to the cockpit area once the 'walls' have been extended to form the lower fuselage area, as the Spitfire did not have a cockpit floor. This detail will be in the form of loose and broken wiring and pipework, the control runs, and a couple of more 'empty' brackets and so on; the control column will not be fitted.
So, that's it so far. The next stage is to trial fit the wings and wing root fillets, in order to work out the best way of extending the cockpit walls, and how to make the empty area at the front of the fuselage look convincing.
I hope you've enjoyed this so far,and I apologise for the long initial post, but the background did need some explaining!
I'll post some more pics once I've done more work!
Thanks for your interest,
Terry.
Here's the parallel build to the Spitfire MkXIV, using the rest of the Revell 'donor' kit.
Going along with the theme originally devised by Evan and Alex, rather than consign the unused parts of the Revell kit to the spares box, I thought I'd build the remains of the kit to represent an abandoned airframe, or in this case, to be more precise, a hulk used for fire rescue training and practice.
At one time, most airports and R.A.F. airfields had a 'fire dump', where obsolete or damaged aircraft were literally dumped, to be used by the Station or Airport Fire Service for training and practice in rescue and fire-fighting techniques. Depending on requirements specific to operations from the particular airfield, many different types of airframe were, and still are employed, from bombers and transports, to airliners and fighters, and, believe it or not, the Spitfire was no exception. I know of at least one instance where a Spitfire Mk22, and some earlier models, have been used for this inglorious, but vital role.
So, the kit will be built as the Mk22, and finished in a scheme representative of an Instructional Airframe, which means that the serial number will be followed by the letter 'M', for example 1234M. These numbers were allocated to time-expired aircraft by the R.A.F.,replacing the original number, in order to clasify them as non-flying airframes, still 'on strength', but not part of the operational inventory.Many of these aircraft, of varied types, were used for such things as Battle Damage Repair (BDR) training, airframe and systems training and so on, as well as the ultimate fate of fire training. Fortunately today, more and more of the rare types used for such work have been withdrawn from 'service', and have been, or are being, refurbished for static display, and some also to flying condition.
So, down to the build.
When I first had the idea for this project, I thought it would be a simple task of 'throwing together' the remaining, unused kit parts, together with some of the remains of those parts 'butchered' for the MkXIV build.
Wrong!
As it turns out, there is going to be almost as much work involved in this build, as there would be in a major conversion, such as the MkXIV, or a scratch-built detailing exercise. To just assemble the model and place it on a suitable base would not achieve the desired effect, so I sat back, studied the kit parts and lots of photographs of 'hulks', and thought carefully about how to go about this task.
In order to achieve the 'look' of a hulk used for fire training, there will have to be some detail work carried out, and most of this is not so much scratch-building, but more 'scratch-destroying'!
Much of the detail already present in the kit will need to be removed, and other areas will need to have 'decay' scratch-built. Such items as inspection panels, opening or removable hatches, control surfaces removed for spares, natural and fire damage, and, of course, the effects of wind and weather, will have to be considered. All this has been planned, and hopefully these plans will work, and allow me to build an acceptably attractive, if very unusual model.
Work commenced with the internal areas first, wih some of the cockpit parts being cleaned up and enhanced.
As the airframe would have been stripped of all usuable equipment and fittings, and other parts lost to vandals or souvenir hunters, I had to plan to build the cockpit more or less as a bare shell, but with empty equipment brackets, loose wires and pipe work etc.
As the seat and armoured back-plate are not being used, this leaves the rear cockpit frame exposed and fully visible. The kit part is a reasonable representation of the this frame, but is rather bare. The prominent lightening holes, seen on all Spitfires, were drilled out around the frame, and the countersunk bolt heads on the head armour added.
The kit instrument panel includes a clear piece for the Blind Flying Panel in the centre of the main panel, which will be omitted from the build, helping enormously in providing an 'empty' appearance. The main instrument dials were drilled out, to give the appearance of empty apertures, and some bent or othersise damaged switch mounting plates etc will be added.
The rudder pedals were moulded as part of the instrument panel sub-frame, and were totally the wrong shape, so these were removed and the frame cleaned up. New pedals, and the push-rod tubes, will be fabricated later.
PIC 1 shows the two parts awaiting clean-up and the additions.
As mentioned in the MkXIV build, the kit firewall will be used in that build, in order to mount the engine. This meant that a new firewall, and front bulkhead had to be made, and these have been cut from plastic sheet, slightly oversize, ready to fit and sand to shape once the fuselage halves have been joined, as
shown in PIC 2.
PIC 3Shows the forward upper and lower fuel tanks, and, in the rear, the fuselage tank assembled. The filler caps have been drilled out, as 'fire wrecks' would have the caps removed to prevent any concentration of explosive fumes. Note the 'dents' in the upper tank.
PIC 4 Shows the fuselage halves, with some holes drilled to represent removed or lost inspection covers, and the aperture cut out for the rear hatch, with the hatch skin made from plastic sheet. This is yet to be detailed on the internal surface, and will be positioned open on the finished model. The holes have yet to be cleaned up and the fuselage walls thinned around the edges in these areas.
PIC 5 Shows the inside of the fuselage to date, with some basic framework added to the port rear side, as this will be partly visible through the open hatch. The dark marks and 'mess' are smudges from the heavy pencil used to mark the positions of the framework, which was made from plastic strip.
For some unknown reason, Revell have not included a throttle quadrant or trim wheel, although what appear to be locating pins for these are moulded onto the cockpit wall. I seem to recall that these items were included in the originall Matchbox kit, when I built it back in 1975 or '76. The beginings of these have been made from plastic sheet, and glued into position, as shown in PIC 6.
Throttle, pitch and boost levers will be added from stretched sprue later.
PIC 7 Is a couple of further additions, in the form of empty switch and instrument brackets, which have yet to be cleaned up and trimmed, and again plastic sheet was used to fabricate these. Note the rough appearance of the cockpit wall, which will be sanded before painting.
More detail will be added to the cockpit area once the 'walls' have been extended to form the lower fuselage area, as the Spitfire did not have a cockpit floor. This detail will be in the form of loose and broken wiring and pipework, the control runs, and a couple of more 'empty' brackets and so on; the control column will not be fitted.
So, that's it so far. The next stage is to trial fit the wings and wing root fillets, in order to work out the best way of extending the cockpit walls, and how to make the empty area at the front of the fuselage look convincing.
I hope you've enjoyed this so far,and I apologise for the long initial post, but the background did need some explaining!
I'll post some more pics once I've done more work!
Thanks for your interest,
Terry.
Attachments
-
 Fire Spit Build 002.jpg64 KB · Views: 287
 -
 Fire Spit Build 006.jpg46.2 KB · Views: 281
 -
 Fire Spit Build 005.jpg29.7 KB · Views: 278
 -
 Fire Spit Build 007.jpg43 KB · Views: 276
 -
 Fire Spit Build 013.jpg29.7 KB · Views: 283
 -
 Fire Spit Build 011.jpg30.4 KB · Views: 280
 -
 Fire Spit Build 015.jpg32 KB · Views: 288
 Good work mate!