- Thread starter
- #21
Airframes
Benevolens Magister
Thanks Wayne and Dan.
Ever had the feeling you think you should never have started out on a particular project?
Well, this one is starting to be a right b!tch - I thought it would be relatively straightforward; just assemble the remains of the kit, allowing for a few gaps here and there, and add some 'distressed' areas along the way.
Wrong!
I remember building this kit (as the full model) back in the mid seventies, and recall that the parts were somewhat 'chunky', but that the fit was OK, apart from those parts designed to be removable, such as the cowlings and gun bay covers etc.
Well, the removable parts aren't being used, but the fit of some of the internal parts is a bit vague, although I'm sure there were more internal fittings, such as the throttle quadrant, and better location points for things like the fuel tanks. This is evident by the prescence of 'redundant' locatiing points moulded onto the inside of the fuselage halves.
The fact that I've added parts such as the lower cockpit skins, and chopped off most of the forward locating areas hasn't helped of course! Joining the remains of the front fuselage to the forward firewall proved to be..er...interesting!
Anyway, here's a progress report to date.
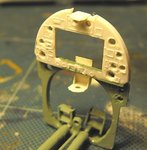
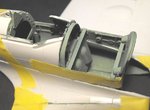
The Instrument panel has already been drilled out to represent the empty instrument apertures, and is yet to have the holes filed smooth(ish), but the compass and gunsight brackets have been added, fabricated from thin plastic sheet, shown in PIC 1.
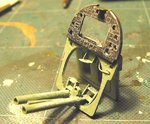
PIC 2. Shows the first stage of painting the empty panel, some more 'distress' will be added later.
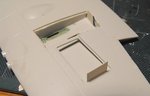
PIC 3. Is the port gun bay being boxed-in, again using thin plastic sheet, which is cut to fit into the bay, glued in place, then trimmed level with the top of the recessed lip for the bay covers.
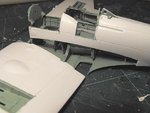
PIC 4. Shows the fuselage joined and fitted to the wing. As you can see, there was very little for the forward fuselage to glue to, and the open wing root was a bit of a sod to line-up and glue, a fact not particularly helped by the addition of the cockpit lower skinning, the control rods, mangled piping and wiring etc.
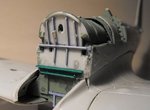
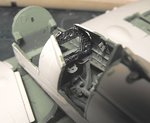
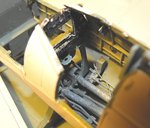
PICS 5 and 6. Are general views of the derelict cockpit, and I apologise for the poor quality of the pics - it was a tad difficult to get the angles and focus without blocking out the light from the lamp. (Too dull and wet to shoot outdoors!)
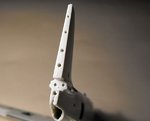
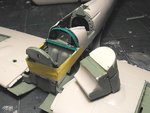
PIC 7. As the forward fuel tanks are supposed to attach to the inside of the cowling, and this no longer exists, being used for the MkXIV conversion, supports had to be made, and also a representation of the cowling support in front of the cockpit. These are shown as the bright green plastic strip, glued into postion using CA glue. (I used a whole tube on the front end of this ..er..'exercise'!)
PIC 8. Shows these additions painted in British Cockpit Green, which looks slightly darker than it actually is in these shots. I used Humbrol's Cockpit Green 78 for this. Although of the correct hue, out of the tin it is far to dark for this scale, so I mixed it approximately 60/40 with matt white. The forward upper and lower fuel tanks, and the angled oil tank, will be fitted after the model is painted, to make it easier to mask.
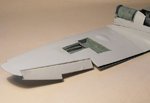
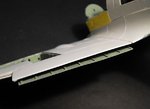
PIC 9. Is the port main flap section, slightly drooped, with the smaller, inboard section yet to be added. OK, the ribs aren't truly accurate, but most of this won't be seen anyway - it's only to provide a suggestion of decay and dillapidation.
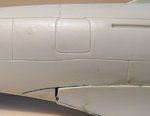
PIC 10. Shows the model to date, with the wing root fillets fitted, which required a lot of trimming, sanding and filing, and carefull glueing, in stages, using both poly cement and CA glue, the latter to prevent the darned things springing out of place at the forward end, where joining surfaces were very minimal! These will have some damage and 'missing parts' detailed later.
After quite a number of hours working on this 'simple build', I think I'll be having a rest for awhile. I just wish the Hasegawa Spit would arrive, so that I can start cutting that up for the MkXIV conversion!
Thanks again for your attention and kind comments, and I hope this is keeping you..er...entertained!
Ever had the feeling you think you should never have started out on a particular project?
Well, this one is starting to be a right b!tch - I thought it would be relatively straightforward; just assemble the remains of the kit, allowing for a few gaps here and there, and add some 'distressed' areas along the way.
Wrong!
I remember building this kit (as the full model) back in the mid seventies, and recall that the parts were somewhat 'chunky', but that the fit was OK, apart from those parts designed to be removable, such as the cowlings and gun bay covers etc.
Well, the removable parts aren't being used, but the fit of some of the internal parts is a bit vague, although I'm sure there were more internal fittings, such as the throttle quadrant, and better location points for things like the fuel tanks. This is evident by the prescence of 'redundant' locatiing points moulded onto the inside of the fuselage halves.
The fact that I've added parts such as the lower cockpit skins, and chopped off most of the forward locating areas hasn't helped of course! Joining the remains of the front fuselage to the forward firewall proved to be..er...interesting!
Anyway, here's a progress report to date.
The Instrument panel has already been drilled out to represent the empty instrument apertures, and is yet to have the holes filed smooth(ish), but the compass and gunsight brackets have been added, fabricated from thin plastic sheet, shown in PIC 1.
PIC 2. Shows the first stage of painting the empty panel, some more 'distress' will be added later.
PIC 3. Is the port gun bay being boxed-in, again using thin plastic sheet, which is cut to fit into the bay, glued in place, then trimmed level with the top of the recessed lip for the bay covers.
PIC 4. Shows the fuselage joined and fitted to the wing. As you can see, there was very little for the forward fuselage to glue to, and the open wing root was a bit of a sod to line-up and glue, a fact not particularly helped by the addition of the cockpit lower skinning, the control rods, mangled piping and wiring etc.
PICS 5 and 6. Are general views of the derelict cockpit, and I apologise for the poor quality of the pics - it was a tad difficult to get the angles and focus without blocking out the light from the lamp. (Too dull and wet to shoot outdoors!)
PIC 7. As the forward fuel tanks are supposed to attach to the inside of the cowling, and this no longer exists, being used for the MkXIV conversion, supports had to be made, and also a representation of the cowling support in front of the cockpit. These are shown as the bright green plastic strip, glued into postion using CA glue. (I used a whole tube on the front end of this ..er..'exercise'!)
PIC 8. Shows these additions painted in British Cockpit Green, which looks slightly darker than it actually is in these shots. I used Humbrol's Cockpit Green 78 for this. Although of the correct hue, out of the tin it is far to dark for this scale, so I mixed it approximately 60/40 with matt white. The forward upper and lower fuel tanks, and the angled oil tank, will be fitted after the model is painted, to make it easier to mask.
PIC 9. Is the port main flap section, slightly drooped, with the smaller, inboard section yet to be added. OK, the ribs aren't truly accurate, but most of this won't be seen anyway - it's only to provide a suggestion of decay and dillapidation.
PIC 10. Shows the model to date, with the wing root fillets fitted, which required a lot of trimming, sanding and filing, and carefull glueing, in stages, using both poly cement and CA glue, the latter to prevent the darned things springing out of place at the forward end, where joining surfaces were very minimal! These will have some damage and 'missing parts' detailed later.
After quite a number of hours working on this 'simple build', I think I'll be having a rest for awhile. I just wish the Hasegawa Spit would arrive, so that I can start cutting that up for the MkXIV conversion!
Thanks again for your attention and kind comments, and I hope this is keeping you..er...entertained!
Attachments
-
 Fire Spit Build 044.jpg41.6 KB · Views: 168
 -
 Fire Spit Build 048.jpg61 KB · Views: 176
 -
 Fire Spit Build 052.jpg21.2 KB · Views: 159
 -
 Fire Spit Build 053.jpg38.4 KB · Views: 175
 -
 Fire Spit Build 055.jpg35.5 KB · Views: 162
 -
 Fire Spit Build 077.jpg33.7 KB · Views: 161
 -
 Fire Spit Build 081.jpg20.8 KB · Views: 167
 -
 Fire Spit Build 080.jpg32 KB · Views: 164
 -
 Fire Spit Build 070.jpg42.4 KB · Views: 165
 -
 Fire Spit Build 057.jpg45.7 KB · Views: 159
Last edited: