- Thread starter
- #121
Navigation
Install the app
How to install the app on iOS
Follow along with the video below to see how to install our site as a web app on your home screen.
Note: This feature may not be available in some browsers.
More options
You are using an out of date browser. It may not display this or other websites correctly.
You should upgrade or use an alternative browser.
You should upgrade or use an alternative browser.
1/48 A-20G Havoc
- Thread starter Aaron Brooks Wolters
- Start date
Ad: This forum contains affiliate links to products on Amazon and eBay. More information in Terms and rules
More options
Who Replied?
Airframes
Benevolens Magister
Don 't need a mask kit Aaron. Get some Tamiya masking tape, and cover the required areas. Then, using a fine (propelling ) pencil, use the tip of this, sanded to a chisel edge, to mark the frame areas. This can be easily done by using the chisel point against any raised detail.
Then, with a sharp blade, carefully remove the frame area tape, then paint, easy- peasy - but takes time to prepare !
Then, with a sharp blade, carefully remove the frame area tape, then paint, easy- peasy - but takes time to prepare !
- Thread starter
- #123
Aaron Brooks Wolters
Brigadier General
Terry, the frame isn't raised. It is ever so slightly etched edges. We have a set of pinstriping brushes at the shop, I might sneak one out and see how well I can do on a nondescript piece of plastic and go from there. I have tried some extremely thin masking tape but the lines are just to small to see through it.
Airframes
Benevolens Magister
Ah, I forgot they are etched! Should have know, as the parts are the same mouldings as the Italeri Boston kit.
- Thread starter
- #125
Aaron Brooks Wolters
Brigadier General
I am in the process of doing some fill work on some of the wing and engine nacelle joints. I am use to doing "mud" work with a 5" squeegie and I sometimes have a hard time keeping this on the neat side which makes for more work later.")
- Thread starter
- #126
Aaron Brooks Wolters
Brigadier General
Still fighting with the fill work. I do this for a living but not on such a small scale.
vikingBerserker
Lieutenant General
- Thread starter
- #128
Aaron Brooks Wolters
Brigadier General
THE EXHAUST NACELLES!!!!!!!!!!!!!!!!!!!!!!!!!!!!!!!!!!!!!!!!!!!!!!!!!!!!

- Thread starter
- #129
Aaron Brooks Wolters
Brigadier General
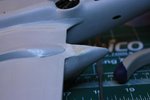
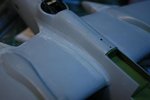
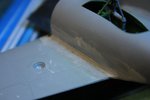
As I get time,(I know, I'm slower than Jan) I have been working on filling and sanding open seems. MAN!!! Some of these are in really hard to reach and sand spots.(patience...............) Here are some, I would say progress but it's to slow, shots.
Attachments
-
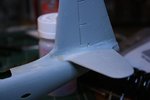 IMG_2530 A-20 Tail.jpg42.5 KB · Views: 163
 -
 IMG_2531 A-20 rear nacelle.jpg45.6 KB · Views: 155
 -
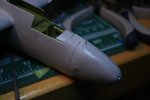 IMG_2527 A-20 nose.jpg45.7 KB · Views: 162
 -
 IMG_2525 A-20 wing root.jpg41.7 KB · Views: 155
 -
 IMG_2528 A-20 fuselage and wings.jpg42.5 KB · Views: 167
 -
 IMG_2532 A-20 engine nacelle.jpg43.9 KB · Views: 168
Airframes
Benevolens Magister
Keep at it Aaron, it'll be worth it in the end.
B-17engineer
Colonel
you can buy sanding sticks that are pretty small and bendable.. need to find them though!
again itll be worth it, the wing joint on my Do-17 was!
again itll be worth it, the wing joint on my Do-17 was!
ozhawk40
Master Sergeant
It's all in the prep Aaron!
T Bolt
Colonel
Great work Aaron. Do you have rifling files? They work good in some of those hard to get to places.
- Thread starter
- #134
Aaron Brooks Wolters
Brigadier General
I will keep after it Terry. If I don't I know it'll look like crap. Harrison, now that you mention it, I do have three different grits of those little sticks. Thanks for reminding me. Yeah, I know Oz, I get a little impatient because I'm use to doing this on a one to one scale. This is a little tedious. Glenn, I do and I use them where I can but the are not as easy to control as far as surface quality and they tend to dig a little more if your not careful. Thanks for the coaching and pep talk guys, I am eating lunch at the moment and as soon as I am finished I intend on sanding some more and filling some more.
B-17engineer
Colonel
Can't wait to see it!
- Thread starter
- #137
Aaron Brooks Wolters
Brigadier General
Thank you Wurger, Harrison, I will post some shots tomorrow after I have sanded the filler I applied today. I think the engine nacelles are ok, but I will prime the joints to make sure.
T Bolt
Colonel
Keep at it Aaron!
Crimea_River
Marshal
With all!
- Thread starter
- #140
Aaron Brooks Wolters
Brigadier General
Thank you Glenn and Andy. I had to work on my transportation this afternoon so hopefully tomorrow I can get some work done on the 20.
I had to work on my transportation this afternoon so hopefully tomorrow I can get some work done on the 20.Users who are viewing this thread
Total: 1 (members: 0, guests: 1)