1/48 He 51B-2 Float Plane - Seaplanes / Floatplanes of WWII

Ad: This forum contains affiliate links to products on Amazon and eBay. More information in Terms and rules

Yeah, the bloody grey.......
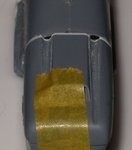
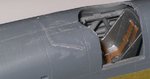
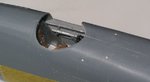
Regarding the hump? Answered my own question, nope, no hump. But from behind the engine cowling to the cockpit it slopes upwards to house the gun.
 
Even when I was in the Navy I found it difficult to say Sir!
Anyway.....
I've had to file the trough down to get the .91mm barrel to sit low enough to get it to fit under the front edge of the fuselage. Not to mention to thin the mating fuselage skin down to let the barrel fit Under it. Still have to thin the left side down. Getting close to buttoning up the halves. Got the control stick in, pushed forward, the elevators will be Down, and to the right, the starboard side ailerons will be Up, pulling the wing Down!

I sailor on.
 

Attachments

  • GB22 11.jpg
    GB22 11.jpg
    58 KB · Views: 92
Bill, been a while since I checked in, looking really nice. Thought I had all the German RLM cammo paints until I hit the seaplanes. Now I'm waiting for RLM 73
 
Ha, ha, ha! You think that was hard to match up? Wait until the wings!
Just kidding.
No really! Those effing wings!
That kit was one of the greatest pains in my @ss...
But I have to say that you are doing the best job I have ever seen on putting lipstick on this pig!
Seriously, THE BEST!
You truly belong in the advanced category.
Proud to be your friend, old buffalo!
Keep up the good work.
 
See, now someOne had to throw paint numbers inere! Now I'm questioning my paint choices and will spend hours trying to get a handle on what is right.......... gord ahmighty.

I can't wait to get to the blasted wings, Ive redone the radiator housing three times already and it STILL ain't right....... GD it! I've managed to get the **** pit to fit! I'm discovering the truth about this one!!!!!!!!!!!!!!!!!!!

I sailor on!
at least I've found a good sausage at the supermarket for lunch!
 
Colors are crazy when trying to match these old numbers. Mfrs never managed to match each others formulas, they were all over the place.

The fuselage is together, a red letter day!

However...... I have found in adding styrene at the wing root to close the gap, in doing so I had forced the wings to have a revere camber, the tips pointed Down, even farther.... not good. I also found the wings right off the sprue had a reverse camber....... So I had to remove what styrene I added, INCREASE the gap and fill all over again. This time leaving a bit of a gap so when glued it would pull the wing tips UP to correct the mfrs faux pas! So I made a simple jig, flat surface, 4 5x5mm blocks, shave the styrene down untill it slipped in easily, then until the wing tips came up and the bottom wing is flat. Gord, dunn.

Next, I didn't like the detail in the door. Since it is going to be open, and down, I want more deffinition. So I have used some tiny square styrene and thin sheet. I think it will look a bit better.

Then the windscreen. The clear doesn't match the "frame" molded in front of the cockpit, so I am taking it off and replace it with more styrene strip. I used a .5mm drill and made a small dimple at the corners and ends. I have filed the frame off and will use the drill spots to align the styrene. Then I'll shape them to match the clear windscreen.

I've filled the glued seams with CA which are very small. I was shown a trick when gluing the seams. It is to add plenty of glue to one side, match the parts, then move tme ever so slightly across the seam to force the glue out of the join. What is moving and protruding is some of the kti material, kind of like a weld bead. When dry it can be sanded down, self filling so to speak. Works a treat. Try it on scrap first to see what happens.

Paul was right about this kit! To put it kindly..... a lot of work.
 

Attachments

  • GB22 12a.jpg
    GB22 12a.jpg
    34.7 KB · Views: 99
  • GB22 12b.jpg
    GB22 12b.jpg
    34.5 KB · Views: 118
  • GB22 12c.jpg
    GB22 12c.jpg
    31.8 KB · Views: 111
  • GB22 12d.jpg
    GB22 12d.jpg
    39.7 KB · Views: 106
  • GB22 12e.jpg
    GB22 12e.jpg
    33 KB · Views: 87
If memory serves it was RLM 63. Anyways, the German paint at the time didn't stand up well to salt water. There are reports of a blue-ish to purple grey shade. So there is that.
On a side note,
Chuckle, chuckle, snort! If this isn't the worst designed model ever, than I am a hairy-nosed wombat!
Nothing fits, anywhere. Fuselage sides were off, engine cover was the wrong size and shape, wings didn't match up....
But, I have to say again, you are doing the best job of putting lipstick on this pig that I have ever seen!
 
I don't think Any of the old kits were of any worth, especially the lesser popular ones. As long as it had the name on the box, it was marketable! Nowadays, if you can create on 3D software, and save as a DXF file, precise tooling is easier than spanking the kids!
 

Users who are viewing this thread

Back