Navigation
Install the app
How to install the app on iOS
Follow along with the video below to see how to install our site as a web app on your home screen.
Note: This feature may not be available in some browsers.
More options
You are using an out of date browser. It may not display this or other websites correctly.
You should upgrade or use an alternative browser.
You should upgrade or use an alternative browser.
1/48 P-38 Lightning
- Thread starter Maglar
- Start date
Ad: This forum contains affiliate links to products on Amazon and eBay. More information in Terms and rules
More options
Who Replied?- Thread starter
- #42
Its good. The first re-spray I used cotton balls and stuffed them tight in there, nice and efficient mask. Also learning my airbrush better.. more control over paint flow and its spray.[AKA less glops, but I always shoot off the model then work into it to avoid those damn paint glops] 
Clean the nozzle tip regularly if you have build up,...to avoid the dreaded paint splatter effect!
- Thread starter
- #44
Good old Monogram kits. In 60's and early 70's the imported Monogram kits were the most expensive airplane kit items in hobby shops in Japan.
Especially, the 1/48 P-38 kit having with allay of optional parts allowing the conversions for the day fighter, the night fighter, the photo-recce and the pathfinder, was the champion. They cost about 1200 Yen in those days which is probably equal today's 10000 Yen or more.
Up to that time the standard scale for the medium sized airplane models in Japan was 1/50, probably originated from then dwindled handcrafted models based on the metric measurements. The 1/48 scale accompanied with imported foreign kits as represented by the Monogram's seemed to have expelled the 1/50 scale ever since.
Indeed there were a host of plastic kits sold from Japanese makers at that time but the details and the quality (and the air) never match the Monograms'. It is hard to explain the excitement of buying one which was expensive for a boy's money and maybe one per a year at most, and opening the box to see the highly detailed parts though in a little messy condition. I still love that feeling and miss it a lot.
- Thread starter
- #46
- Thread starter
- #47
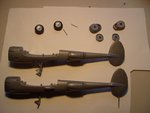
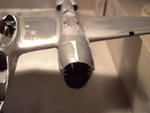
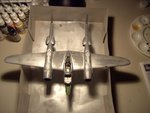
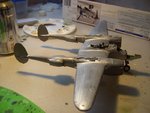
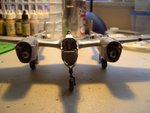
Ok heres some progress. I observed that the long spike on the bottom tail (in picture) could possibly be to counter a "tail sitter" which would be awesome. I'm still putting fishing weights in the front of both tails since it seems they will fit, if I get enough weight I might cut off the long spike to enhance the look, not decided yet. The tails are ready to be sprayed, the wheels are done, and the main body received a nice re-spray.
Attachments
109ROAMING
2nd Lieutenant
8)
Airframes
Benevolens Magister
Good work so far. You should be able to get enough weight in the engine nacelles, forward of the gear, and also under the guns in the nose.
- Thread starter
- #50
ccheese
Member In Perpetuity
Just saw this today. Looks like it's going to be a good build. Keep up the
good work...
Charles
good work...
Charles
- Thread starter
- #53
Good stuff Maglar doin' ok.....
Heinz
Captain
Gteat work so far
- Thread starter
- #56
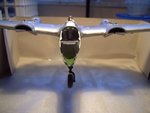
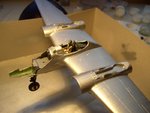
To go forward, you must step back... yeah. The booms made it on put I saw some gaps and filled them with milliput. At doing this, the paint job around lifted then my hand grabbed the sand paper and started going nuts all over the plane  . Atleast the particles and gunk are gone, some rivets might have been scratched but at this point I dont care. I will be glad to give it its final spray job once the milliput hardens and I sand it out, I think I will finish the rest of the plane though. This is probably my worst job on a model since start, but it seems a lot of people have stored their P-38s in the 'cabinet'. This is also my first time using an airbrush to its full use and I jumped the gun, the next plane will be sprayed after its complete
Attachments

Airframes
Benevolens Magister
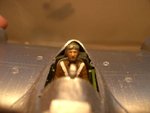
That's not at all bad, especially as the P38 is not the easiest model to get right. Everyone has their own way of doing things, but it's generally easier to paint the whole model after the main assembly, leaving off such things as wheels, props, antenna etc., as you've found out! This is even more important when a 'natural metal' finish is required, as anything like cement, thinner, filler and so on will damage the paint. But, from what I see, I reckon you'll still get a reasonable finish. Good work.
- Thread starter
- #58
Lucky13
Forum Mascot
Love the P-38 and this one really looks the part! Nice going mate, looking forward to more pics! 
- Thread starter
- #60
Users who are viewing this thread
Total: 1 (members: 0, guests: 1)