Navigation
Install the app
How to install the app on iOS
Follow along with the video below to see how to install our site as a web app on your home screen.
Note: This feature may not be available in some browsers.
More options
You are using an out of date browser. It may not display this or other websites correctly.
You should upgrade or use an alternative browser.
You should upgrade or use an alternative browser.
1/48th scale Hurricane MkIIc, 136 Sqn, India, 1943.
- Thread starter Airframes
- Start date
Ad: This forum contains affiliate links to products on Amazon and eBay. More information in Terms and rules
More options
Who Replied?- Thread starter
- #42
Airframes
Benevolens Magister
Cheers Woody !
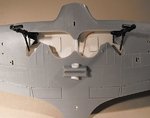
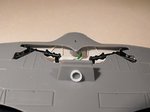
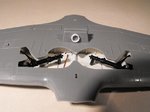
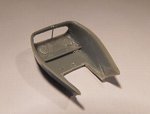
The wheel bay is done as far as it can go so far, with some tidying to do, and a little more detail to add once the landing gear legs are sorted. These are fitted in the up position, but will be extended and set in the down position, and the rest of the gear detail made and added later. It's a bit awkward having to fit the gear legs at this stage, but I'm sure I'll get around the minor problem.
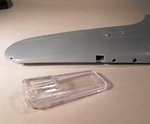
Apertures have been cut for the landing lamps and wing-tip navigation lights, and the latter will be made by filing, sanding and polishing scraps of clear sprue, after fixing them in position with super glue. I'm aiming to use some slices of curved clear plastic, cut from a scalpel blade cover, to make the landing lamp covers, with the lamps themselves being fabricated from tube and card.
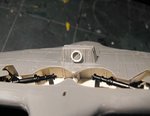
PICS 1 to 3 show the gear bay so far, and also visible is the oil cooler in the centre of the radiator, which is yet to be sanded and detailed, this being a sliver of plastic tube.
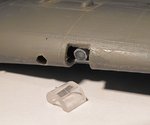
PIC 4 shows the lamp apertures, and the clear plastic cover from a scalpel blade. The wing joints will be cleaned-up after fitting the lamps.
Thanks again for your interest and comments, and I hope to post some more pics tomorrow.
The wheel bay is done as far as it can go so far, with some tidying to do, and a little more detail to add once the landing gear legs are sorted. These are fitted in the up position, but will be extended and set in the down position, and the rest of the gear detail made and added later. It's a bit awkward having to fit the gear legs at this stage, but I'm sure I'll get around the minor problem.
Apertures have been cut for the landing lamps and wing-tip navigation lights, and the latter will be made by filing, sanding and polishing scraps of clear sprue, after fixing them in position with super glue. I'm aiming to use some slices of curved clear plastic, cut from a scalpel blade cover, to make the landing lamp covers, with the lamps themselves being fabricated from tube and card.
PICS 1 to 3 show the gear bay so far, and also visible is the oil cooler in the centre of the radiator, which is yet to be sanded and detailed, this being a sliver of plastic tube.
PIC 4 shows the lamp apertures, and the clear plastic cover from a scalpel blade. The wing joints will be cleaned-up after fitting the lamps.
Thanks again for your interest and comments, and I hope to post some more pics tomorrow.
Attachments
Doin' great Terry!
Tony Hill
Tech Sergeant
Looking great Terry!!
imalko
Chief Master Sergeant
With all here. Great work!
- Thread starter
- #49
Airframes
Benevolens Magister
Thanks very much guys. I should have the plastic card 'panels' in the wheel bays edged and detailed later today, along with adding some of the other structural members. Some of the work can't be done until after painting the model (b*ll*cks!), as the gear legs need to be set in order to align everything.
Gerry
Staff Sergeant
Great work, Terry. A masterclass in scratch-building. You really go full tilt at it and it gives me confidence to have a go myself, when it's so clearly explained.
- Thread starter
- #51
Airframes
Benevolens Magister
Thanks very much Gerry, and I'm glad it helps.
Got some more done to the wing today, with the radiator detailed and the radiator bath prepared. The landing lamps have been made and fitted, and the scalpel blade cover cut to make the lamp covers. The wing-tip navigation lamps are part done too.
PIC 1. Shows the simple detail added to the radiator matrix, on both sides, using stretched sprue and slivers of plastic tube.
PIC 2. Work underway on the radiator bath, with some ugly ejector pins more or less removed, the shutter opening cut out and the walls thinned to a more scale appearance. The intake support stay has also been added from stretched sprue. A new shutter will be made from plastic card, and the internal support stays and shutter actuators made and fitted once the bath is in place.
PIC 3. The landing lamps were made from lengths of plastic tube and rod, painted with a chrome paint pen, and glazed with Micro Kristal Klear, which is in the process of drying (and clearing!) in this shot. The lamp covers, cut from the scalpel blade cover, will be fitted and sanded to blend-in with the wing, and then polished. They are a bit thick, but better than using 'solid' clear sprue, and certainly better than no lamps at all !
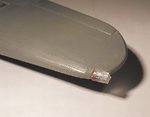
PIC 4. Scraps of clear sprue have been super glued onto the wing-tips, after first drilling holes on the inner face, which were filled with the appropriate coloured paint to represent the bulbs. Once fully hardened, these will be filed and sanded to shape, and then polished.
After around ten hours work on the wing, I feel I need a change of scene, so this will be set aside for now, and work will start on measuring up for the complex tubular frame work for the cockpit, and constructing the rear bulkhead, seat, instrument panel and other bits and pieces.
Thanks once again for your interest and kind comments, and I'll post another up-date soon.
Got some more done to the wing today, with the radiator detailed and the radiator bath prepared. The landing lamps have been made and fitted, and the scalpel blade cover cut to make the lamp covers. The wing-tip navigation lamps are part done too.
PIC 1. Shows the simple detail added to the radiator matrix, on both sides, using stretched sprue and slivers of plastic tube.
PIC 2. Work underway on the radiator bath, with some ugly ejector pins more or less removed, the shutter opening cut out and the walls thinned to a more scale appearance. The intake support stay has also been added from stretched sprue. A new shutter will be made from plastic card, and the internal support stays and shutter actuators made and fitted once the bath is in place.
PIC 3. The landing lamps were made from lengths of plastic tube and rod, painted with a chrome paint pen, and glazed with Micro Kristal Klear, which is in the process of drying (and clearing!) in this shot. The lamp covers, cut from the scalpel blade cover, will be fitted and sanded to blend-in with the wing, and then polished. They are a bit thick, but better than using 'solid' clear sprue, and certainly better than no lamps at all !
PIC 4. Scraps of clear sprue have been super glued onto the wing-tips, after first drilling holes on the inner face, which were filled with the appropriate coloured paint to represent the bulbs. Once fully hardened, these will be filed and sanded to shape, and then polished.
After around ten hours work on the wing, I feel I need a change of scene, so this will be set aside for now, and work will start on measuring up for the complex tubular frame work for the cockpit, and constructing the rear bulkhead, seat, instrument panel and other bits and pieces.
Thanks once again for your interest and kind comments, and I'll post another up-date soon.
Attachments
T Bolt
Colonel
Keep an eye on this thread if you want to learn to scratch-build from an expert! Excellent work Terry!!
- Thread starter
- #53
Airframes
Benevolens Magister
Very nice of you to say so, thanks Glenn !
Crimea_River
Marshal
Wonderful stuff Terry. The sanded down rivets will give it that little bit of extra character too. It's going to look really sharp when done.
- Thread starter
- #55
Airframes
Benevolens Magister
Thanks very much Andy. For a kit which is not much younger than me, it's turning out reasonably well so far.
zaxos345
Senior Airman
Nice work so far Terry ")
John
John
Tony Hill
Tech Sergeant
Lovin' it!!
Peebs
Senior Airman
Always impressed with your work mate!
8)
Users who are viewing this thread
Total: 1 (members: 0, guests: 1)