Navigation
Install the app
How to install the app on iOS
Follow along with the video below to see how to install our site as a web app on your home screen.
Note: This feature may not be available in some browsers.
More options
You are using an out of date browser. It may not display this or other websites correctly.
You should upgrade or use an alternative browser.
You should upgrade or use an alternative browser.
1/48th scale Hurricane MkIIc, 136 Sqn, India, 1943.
- Thread starter Airframes
- Start date
Ad: This forum contains affiliate links to products on Amazon and eBay. More information in Terms and rules
More options
Who Replied?wonderful as always Dogsbody
- Thread starter
- #63
Airframes
Benevolens Magister
I say, thanks awfully chaps!
N4521U
Plastic Pirate
It's always a pleasure to see the progress of one of your builds.....
Question: The walls of the wheel bays. You do use Super glue on the styrene sheet? Which do you use? And how do you get it to be so strong you can sand the tops of the the walls without breaking off while doing this?
I sure wish there was something stronger to use on styrene than super glue. Do we have any idea of the life of the super glue? I can just image a few years down the track all the bits falling off... bugger.
woljags
Staff Sergeant
i know i'm not in the same league as the rest of you chaps but i've been using stiff card and bostick timebomb to fix any detailing work inside my kits,it takes a little longer than normal to dry but lasts a very long time,i hope this helps although i'm proberly telling you all something you know already,
Bob
Bob
- Thread starter
- #67
Airframes
Benevolens Magister
Thanks all.
Bill, for this sort of work, depending on the surfaces, a 'glue' is not always a good thing. Super glue can be used for fixing in order to hold an item in place, but generally, I use a 'cement', as in poly cement (tube/liquid/ etc) to provide the chemical reaction bonding of the surfaces. Any 'glue', even 2-part epoxy etc can, by its very nature, break the bond at some time, whereas a cement has literally welded the parts. And of course, poly cement, in it's various forms. can be used in a controlled fashion, allowing a clean joint without blemishes, although may need minor clean-up when set.
As for sanding - it's a case of delicate 'finger feel' and experience!
woljags
Staff Sergeant
thanks for the tips
hawkeye2an
Staff Sergeant
Great stuff Mr. Fox. Looking forward to more.
- Thread starter
- #71
Airframes
Benevolens Magister
Thanks chaps, glad it's proving useful.
- Thread starter
- #72
Airframes
Benevolens Magister
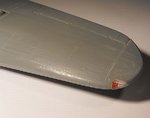
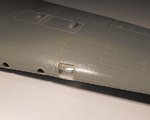
The wing-tip nav lights and the leading edge landing lamps have now been filed and sanded to shape, and polishing is nearly complete. The glazing will have a coat of 'Future' once the model has been painted. The lamps look a bit cloudy in the pictures, which is mainly reflection off the residue of 'T Cut' used to polish them. This will disappear once polished further and coated.
Meanwhile, work continues on planning and measuring for the cockpit components. More soon.
Meanwhile, work continues on planning and measuring for the cockpit components. More soon.
Attachments
Crimea_River
Marshal
Looks good Terry!
")
- Thread starter
- #75
Airframes
Benevolens Magister
Thanks Andy and Max. One of the landing lamps seems to have some dried 'T Cut' residue inside! I'm hoping I can wash it out without affecting the 'lens' of the lamp itself - b*gg*r !!
- Thread starter
- #77
Airframes
Benevolens Magister
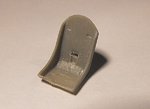
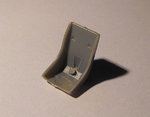
Thanks Kevin. The port landing lamp might be recovered - I'm waiting for it to dry to see if the remaining cloudiness is just condensation after washing. Meanwhile, I found a seat in the spares box which was an alternative part from the ICM P51C kit, which has been altered.
PICS 1 and 2 show the seat before and after alteration, although not polished yet and still dusty. The back was re-shaped, as were the side walls, and the walls thinned down, after removing that awkward ejector pin and some unwanted detail.
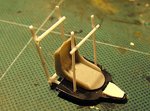
PIC 3 Shows the cockpit frame work under construction, utilising the kit bulkhead, with the armour plate added from plastic card, and the 'tubular' frames from 'Evergreen' rod. The slot for the seat harness has also been cut in the bulkhead, but there's still a lot of construction to follow!
More tomorrow, all being well!
PICS 1 and 2 show the seat before and after alteration, although not polished yet and still dusty. The back was re-shaped, as were the side walls, and the walls thinned down, after removing that awkward ejector pin and some unwanted detail.
PIC 3 Shows the cockpit frame work under construction, utilising the kit bulkhead, with the armour plate added from plastic card, and the 'tubular' frames from 'Evergreen' rod. The slot for the seat harness has also been cut in the bulkhead, but there's still a lot of construction to follow!
More tomorrow, all being well!
Attachments
Crimea_River
Marshal
Looking very spiffy Terry. The transformation of the seat is nicely done. It will be intersting to see what little tidbits for levers ,gauges, and other gingerbread you add ot the frames.
Great stuff Terry!
Users who are viewing this thread
Total: 1 (members: 0, guests: 1)