- Thread starter
- #21
Navigation
Install the app
How to install the app on iOS
Follow along with the video below to see how to install our site as a web app on your home screen.
Note: This feature may not be available in some browsers.
More options
You are using an out of date browser. It may not display this or other websites correctly.
You should upgrade or use an alternative browser.
You should upgrade or use an alternative browser.
1/72 Eduard B-24J USAAF w/Australian crew lost 28-08-44
- Thread starter N4521U
- Start date
Ad: This forum contains affiliate links to products on Amazon and eBay. More information in Terms and rules
More options
Who Replied?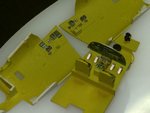
Looking good.
I'll be watching this with interest, since I have an older Minicraft boxing waiting in the stash.
I do have to say though, that it looks like the molds are getting quite worn, the propellors have always been iffy, but the cowlings on my kit, ( copyright 1998 ) don't look anything like the ones in yours, looks like the sections of the mold forming the intakes are chipped.
Wonder if Eduard will make the photo etch available?
Airframes
Benevolens Magister
Nice work Bill.
- Thread starter
- #25
N4521U
Colonel
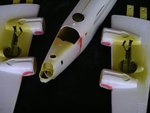
So to keep my grubby paws off the Yak when things are drying I do some work on the B-24.... The only way I can keep from buggering it up.
I am fitting the cockpit into the front and adding placards to the waist gunners positions. As mentioned above, it seems the kit dies are a little tired, or is it tYred, nope, it's tired. A bit of filing everywhere to get things into the places they belong. Had to remove the "map case" from the pilots side because it wanted to go where the pilots seat is. Had to take quite a bit off the top and sides of the instrument panel as well.
Didn't like the look of the guns for the ball turret, so I made some from PVC.
Added the panel to the underside of the wind screen. Funny thing is I started this first and decided it was to fiddly, so I abandoned it. But after working with all the placards, I went back and it wasn't so difficult. Just takes a little experience working with PE.
Attachments

Crimea_River
Marshal
Airframes
Benevolens Magister
Great stuff Bill.
T Bolt
Colonel
Excellent work Bill!
- Thread starter
- #29
N4521U
Colonel
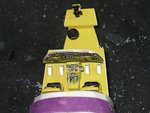
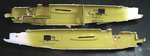
I meant tp put these on a few days back. Seems the dies are pretty well worn and maybe the injection and cooling times were fiddled with a bit cuz the fits are less then acceptable. I've had to use plenty of body putty in these areas. Filed and sanded, and still some more putty. I've attached the front cockpit halves to the front of the fuselage, some more filling and sanding I am afraid.
I sailor on. BTWQ the platform is yellow now!
I sailor on. BTWQ the platform is yellow now!
Attachments
- Thread starter
- #30
N4521U
Colonel
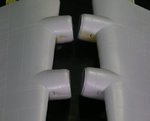
I feel like I'm running a "smash repair", body shop to them on the other side of the pond. Took a couple of goes to get the sides of the fusey filled. I was a bit innatentive with the lineup of the parts. Inexperience. Just a bit of scribing and it should be okay.
Attachments
Matt308
Glock Perfection
Wow, man. That's looking pretty sporty now isn't it! 
Airframes
Benevolens Magister
Looks darned good to me Bill !!
- Thread starter
- #33
N4521U
Colonel
Thanks maties.
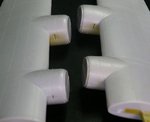
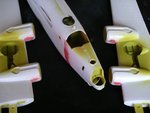
I've finished off all the putty work on the exterior. With a tip from Wayne I've gotten the windows in tonight. Have the interior decking glued in. I'm gonna leave it all alone till tomorrow evening so I don't bugger up the glass. Then the shell goes together and the wings on.
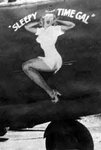
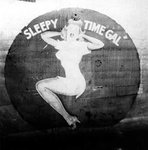
This one will be all silver with NO markings except for the nose art. Seems it was stripped of olive drab, cept for a circle around the name and areas of the vert stab, as in the photo. Can't make out if the wings are still OD, *looks like they may still be OD. Interesting eh?
I've finished off all the putty work on the exterior. With a tip from Wayne I've gotten the windows in tonight. Have the interior decking glued in. I'm gonna leave it all alone till tomorrow evening so I don't bugger up the glass. Then the shell goes together and the wings on.
This one will be all silver with NO markings except for the nose art. Seems it was stripped of olive drab, cept for a circle around the name and areas of the vert stab, as in the photo. Can't make out if the wings are still OD, *looks like they may still be OD. Interesting eh?
Attachments
Last edited:
Crimea_River
Marshal
The difference in shade on the upper parts of engines 3 abnd 4 could suggest a partial OD on top. Other than that, pure conjecture.
- Thread starter
- #35
N4521U
Colonel
I'd kinda like to do a kaleidoscope of color. Perhaps wings, top and bottom OD, horizontal stab OD, outside of port vert stab silver, inside of starboard vert stab OD. Markings still on wings. You think?
Crimea_River
Marshal
Well, unless there are more photos that show otherwise, no-one can prove you wrong! Personally, I would want proof that the things was in fact OD at one time and was then stripped to bare metal. Having established that, it's obvious there would have been a point in time where there was a transition. Depending on the number of people abvailable to do the job, it could have taken little time or it could have drawn out over a longer time. I wonder how the removal would have been done and why. Seems like a waste of time and effort.
Crimea_River
Marshal
Well, unless there are more photos that show otherwise, no-one can prove you wrong! Personally, I would want proof that the things was in fact OD at one time and was then stripped to bare metal. Having established that, it's obvious there would have been a point in time where there was a transition. Depending on the number of people/crews available to do the job, it could have taken little time or it could have drawn out over a longer time. I wonder how the removal would have been done (solvents?) and why. Seems like a waste of time and effort.
Airframes
Benevolens Magister
Nice work on the interior Bill.
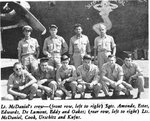
Looking at the pic of the real aircraft, I think it's overall bare metal, apart from maybe OD rudders, and what could be an Identification colour, or possibly OD, on the vertical fins. This might also be the tone on the rudders.
If the aircraft was painted at one time, then the uppers would have been Olive Drab, and the undersides Neutral Gray (American spelling!). Personally, I think it was probably always bare metal, just going of the period when received.
- Thread starter
- #39
N4521U
Colonel
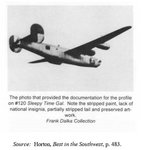
By the pictures I have found, and the descriptions, it was painted overall, then stripped but the round was left around the nose art to keep it on the plane. Attached are the couple of photos to verify this. It also appears to be overall OD.
Attachments
Airframes
Benevolens Magister
Ah, I see now. But it would never have been overall OD and, if you look closely at the nose art pic showing the nose wheel, and the pic with the crew, you can see the demarcation between the OD and Neutral Gray, with the latter showing a lighter tone, which would look darker than the upper surface if it was OD.
Users who are viewing this thread
Total: 1 (members: 0, guests: 1)