1/72 Eduard B-24J USAAF w/Australian crew lost 28-08-44 (1 Viewer)

Ad: This forum contains affiliate links to products on Amazon and eBay. More information in Terms and rules

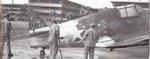
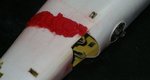
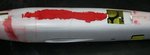
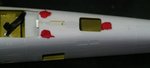
Taking Andy's idea further Bill, how about doing it in the process of the paint removal. Maybe the front of the fuselage bare metal and the rear OD with the line between looking ragged. It would look interesting. Somewhere at home I have a picture of a P-40 or P-36 being stripped of the OD paint by a maintaince crew. I can look for it if it would be helpful.
 
Terry, just after I posted I did notice the lighter shade. You are right about the colors.

I did some searching, but I am sure someone in here knows more, about the stripping of paint. As far as I can tell it was for weight and drag improvements. After 1943, early 1944 the air superiority was no longer in question and camo was not a great advantage. The IJA N also flew bare metal finishes, mainly as a cost cutting and production speed factor. Still doesn't explain why the time and effort was taken to strip an operational aircraft.

But this one originated in the US and flew out of Hamilton Field at the North end of San Francisco Bay. I ground crewed a P-51 at an air show there, Bod Loves old "Bernies Bo" machine when Russ Francis, a 49er team member at the time, owned it.

Glenn the idea of a ragged edge to the stripping sounds interesting.

I'm surprised this has raised this dialog, but then, this is why we are here. Thanks for everyone's input.

*A link regarding paint and weight. 5Enough to allow 500 lbs of fuel or ordinance.
http://www.taphilo.com/history/WWII/USAAF/Boeing/index.shtml
 
Last edited:
The picture below is from Air Force Colors Volume 3 by Dana Bell. The 3-volume set is a Must Have for a USAAF camouflage reference. The picture shows a P-36 having its camouflage being stripped off at a Hawaiian Air Depot using solvent, steam and scrub brushes. Looks like a rather nasty job! In the accompanying text, Mr. Bell mentions that the removal, or not applying of camouflage paint was put out to the individual numbered air forces in a memo in March or 1943, and the individual units decided what to do. Many factors were considered including increase of speed, visibility, ease of maintenance, and corrosion. The only mention of the 5th Air Force that is made is that they stripped off the camo from a number of B-26s, but B-24s are not mentioned.
 

Attachments

  • ScannedImage.jpg
    ScannedImage.jpg
    85.1 KB · Views: 105
Interesting, so it was optional!?
In the above link it states it was a pretty nasty job stripping in the field as they used 100 octane and paint remover. Pretty caustic I would say, and no fun!
I do know for a fact when a control surface is painted it needs weight and balance certificates.
 
Found some more info on markings. The way the tail is stripped is a marking used for joining up in large groups. An excerpt from WE WENT TO WAR.
Part V: Tail Markings 380th BG History -- Part V: Tail Markings

Like most combat groups before Fall 1943, the 380th went into combat with the aircraft painted the standard OD on the upper parts and sides of the aircraft and the standard neutral gray undersurfaces. This was modified only by the national insignia and, in many cases, a name with nose art. As in all theatres, a problem soon arises when planes needed to formate or rendezvous prior to hitting the target. If more than one group was involved, it became very difficult to tell the different units apart and some form of highly visible identification became necessary. The presence of the large twin tails on the B-24 made them the logical place to put whatever identification symbols were employed. This situation became critical in the Southwest Pacific area when MacArthur began preparations for the Cape Gloucester invasion of New Britain Island in late November 1943. all available bomber aircraft were scheduled to take part with three B-24 groups involved. An order was therefore issued for each group to pick a distinctive marking.

The 380th chose to paint the fins and rudders of their planes in a scheme of quadrants, as shown below. These pictures, for clarity, show the scheme after Spring 1944 (Northern Hemisphere seasons) when the OD paint was removed from our aircraft. The first version was to paint the chosen quadrant white on the
OD background. As noted, this was changed to black on NMF (natural metal finish) the following April-June period.

(The 380th had the lower right quadrant of the tail painted black.) So it appears the black was stripped off for the contrast with the bare metal finish.

I also found they were lost on the return from the 38th mission for this aircraft, to Macasaar with an observer on board, Maj. LATREILLE, Henry Robert, Aust Army VX21828.

Am fitting the fusey halves together, gotta put some weight up front tho. Masking the turrets is a right royal b!tch. Painting the inside of the engine cowlings. Gotten some scale props and have painted them and the hubs, now for their decals. Slowly but surely.
 

Attachments

  • TailMarkings-20.jpg
    TailMarkings-20.jpg
    27.6 KB · Views: 128
Last edited:
Just catching up on my B-24 to get the halves together. Just tired of seeing it lay there in parts, yah know?

So loaded the nose up with some fishing weights. Created a little void for them with some styrene. Hope it's enough! Then the fuselage halves are stuck together....... less chance for damage to the fiddly bits inside. I'll fill some little cracks in the seams, not many since I did a bit of filing of the mating surfaces, just to make sure they were flat and true.

Been thinking about the painting part. I'll have to mask the green circle for the nose art and paint that O.D. Then mask the circle for the Silver Leaf shiny coat. If I spray the SL over the O.D. it will be dull over the flat O.D. paint. Am very anxious to see this thing gleaming in the sunlight.......
 

Attachments

  • SD15a weighting.jpg
    SD15a weighting.jpg
    70.7 KB · Views: 139
  • SD15b fuey together.jpg
    SD15b fuey together.jpg
    63.9 KB · Views: 119
Should be easy to make yourself if you have that good a pic. Its a fairly simple process, just need some white decal film, some clear acrylic spray and a decent color print.
 
I guess I may have top try it..
Thought I had one for one split second.... Monogram made a B-24J from 530 Sqn with the decal, but it's 1/48th scale........ dam
 
Am having to do a lot of filling of seams, speshly the bottom at the bomb doors. I'll have to do a lot of scribing lines as well.

The red stuff is from a tube of auto body dent filler. Dries super fast and takes a pretty smooth finish and can be painted over. And it doesn't bloody shrink! It's used to fill them itty bitty door paint chips so is pretty fine.
 

Attachments

  • SD16b filling.jpg
    SD16b filling.jpg
    64.9 KB · Views: 104
  • SD16c filling.jpg
    SD16c filling.jpg
    65.5 KB · Views: 99
  • SD16d filling.jpg
    SD16d filling.jpg
    63.9 KB · Views: 102
  • SD16a filling.jpg
    SD16a filling.jpg
    62.9 KB · Views: 120
Good stuff Bill, and I'll have to try that filler, could be good for those annoying, very shallow depressions and sink marks etc.
Don't worry too much about the joint at the bomb bay doors - the B-24 used 'roller shutter' doors, and these were normally cranked open a touch on the ground, or even half open, to evacuate any build-up of fuel vapour.
 
Should be easy to make yourself if you have that good a pic. Its a fairly simple process, just need some white decal film, some clear acrylic spray and a decent color print.

Not much wrong with the posted one actually. Put it in a photo editor, scale it down to the size needed, and print it to decal paper.
 

Users who are viewing this thread

Back