Navigation
Install the app
How to install the app on iOS
Follow along with the video below to see how to install our site as a web app on your home screen.
Note: This feature may not be available in some browsers.
More options
You are using an out of date browser. It may not display this or other websites correctly.
You should upgrade or use an alternative browser.
You should upgrade or use an alternative browser.
352nd Fighter Group "Blue Nosed Bastards of Bodney" Build
- Thread starter B-17engineer
- Start date
Ad: This forum contains affiliate links to products on Amazon and eBay. More information in Terms and rules
More options
Who Replied?- Thread starter
- #622
B-17engineer
Colonel
Yes Wojtek
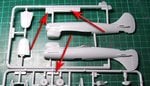
Harry, check sprues of your kits. There always are plastic plates with a manufacturer's name or of a plane. ALso there are smaller ones with numbers of parts. You can use them for these addition to the windshield basis. Just cut these plates off the sprue and make a stripe of the width equel of the lacking area. Then stick tham to the side areas using a glue for styrene. It will allow you to set them at a correct positions by moving if it's necessary . Of curse these letters or numbers on plates have to be sanded off firstly. Than you have to wait for the hardening of the glue. If done you can shape the upper edge of these small plates following the curvature of the windscreen base. I hope I have explained it correctly and you can understand the idea.
Attachments
- Thread starter
- #624
B-17engineer
Colonel
- Thread starter
- #626
B-17engineer
Colonel
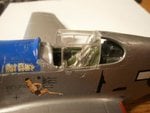
nothings glued just a test fit
- Thread starter
- #628
B-17engineer
Colonel
A bit less than a millimeter, I sprayed the parts I'm gonna use with the silver the P-51 is sprayed with so I dont have to paint it after its in place.
- Thread starter
- #630
B-17engineer
Colonel
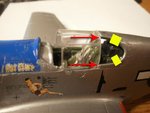
How do I get the rear windows to stay?
- Thread starter
- #631
B-17engineer
Colonel
Crimea_River
Marshal
Looking good!
How do I get the rear windows to stay?
Harry I would suggest sticking of them with two thin and small pieces of the adhesive tape ( yellow squares in the pic below.) to the fuselage. Set a rear window with them correctly. It let you have both of your hands free for farther operations. Then take a longer needle or a piece of a thin wire. Put some of the Superglue onto a piece of plastic plate ( it might be an old credit card for instance ). Then draw really a very small drop of the glue with the tip of the needle. Apply the glue drop to the top and bottom corners of the window ( red arrows ) and the fuselage edges. Usually there is always a thing gap between these two edges. Just touch the area with the needle tip. The glue will go along the gap itself. Also you can help the glue with its spreading moving slightly the needle tip along the gap. But it isn't necessary. Wait for hardening of the glue and remove gently these pieces of the masking tape.
Attachments
Last edited:
- Thread starter
- #634
B-17engineer
Colonel
I can try that Wojtek!
Aaron Brooks Wolters
Brigadier General
Just read this thread from start to finish - very cool, I am now inspired to get modelling again.
We have the best teachers in the world here on the forum.
We have the best teachers in the world here on the forum.
I'll need them too, although i don't think i'll be brave enough to post any of my works - they are that low quality. I just love the experience.
- Thread starter
- #638
B-17engineer
Colonel
Thanks 
I'm only in high school and the help from the guys has really improved my modeling skills, its a forum filled with fantastic and talented people!
I'm only in high school and the help from the guys has really improved my modeling skills, its a forum filled with fantastic and talented people!
vikingBerserker
Lieutenant General
I'll need them too, although i don't think i'll be brave enough to post any of my works - they are that low quality. I just love the experience.
If you want some good feedback and some tips, post them by all means. We all started with the same skill (none) and we have some incredible builders and teachers here!!
------------------
Well done H!
Thanks
I'm only in high school and the help from the guys has really improved my modeling skills, its a forum filled with fantastic and talented people!
Yeah I saw the support first-hand in this thread - really incredible, so kind and knowledgable. I actually have an unfinished 1/72 P38 that I may return to now.
BTW, what do the aircraft icons with banners signify in some signatures? (Sorry it's OT. please pm if worried it will go off track).
Users who are viewing this thread
Total: 1 (members: 0, guests: 1)