Navigation
Install the app
How to install the app on iOS
Follow along with the video below to see how to install our site as a web app on your home screen.
Note: This feature may not be available in some browsers.
More options
You are using an out of date browser. It may not display this or other websites correctly.
You should upgrade or use an alternative browser.
You should upgrade or use an alternative browser.
352nd Fighter Group "Blue Nosed Bastards of Bodney" Build
- Thread starter B-17engineer
- Start date
Ad: This forum contains affiliate links to products on Amazon and eBay. More information in Terms and rules
More options
Who Replied?- Thread starter
- #682
B-17engineer
Colonel
What parts of the conopy do you still have?
I think I have most as I've tried 2 or 3 different canopies which none have fit
- Thread starter
- #684
B-17engineer
Colonel
I can't get one up this second within the hour I htink I can
- Thread starter
- #686
B-17engineer
Colonel
Airframes
Benevolens Magister
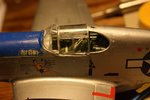
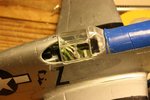
First things first H. The main canopy appears to be back to front, so turning it around will help. Next, try to carefully remove the windscreen - it's to far aft. Re-fit this, carefully, aligning the rear frame with the main canopy, with the forward edge sitting on top of the raised lip of the fuselage. You might have to sit it in a 'bed' of PVA, and seal it with same once its set, to fill any gaps. At the moment, it's too far down and to the rear, which is the main cause of the problems.
You might have to trim a very small amount off the plastic of the fuselage, where the curve meets the vertical line between windscreen verticcal frame and cockpit horizontal sill.
Oh, and once the windscreen is removed, clean-up the entire area of the scuttle over the instrument panel, especially around the edges where the 'screen sits, see if the joint can be filled, and then paint this dark green or Olive Drab.
Last edited:
Looking good so far Harrison!
Sure with the tutelage these guys give you'll fix the canopy in no time...
Sure with the tutelage these guys give you'll fix the canopy in no time...
Crimea_River
Marshal
Nice to see you back at Harrison. Terry's got the solution for sure.
- Thread starter
- #690
B-17engineer
Colonel
First things first H. The main canopy appears to be back to front, so turning it around will help. Next, try to carefully remove the windscreen - it's to far aft. Re-fit this, carefully, aligning the rear frame with the main canopy, with the forward edge sitting on top of the raised lip of the fuselage. You might have to sit it in a 'bed' of PVA, and seal it with same once its set, to fill any gaps. At the moment, it's too far down and to the rear, which is the main cause of the problems.
You might have to trim a very small amount off the plastic of the fuselage, where the curve meets the vertical line between windscreen verticcal frame and cockpit horizontal sill.
Oh, and once the windscreen is removed, clean-up the entire area of the scuttle over the instrument panel, especially around the edges where the 'screen sits, see if the joint can be filled, and then paint this dark green or Olive Drab.
Thanks everyone
Thank you T I will try this!
Matt308
Glock Perfection
Agree with Airframes. Looks backwards my friend.
- Thread starter
- #692
B-17engineer
Colonel
Agree with Airframes. Looks backwards my friend.
Yeah after dropping it many times I was like this is probably backwards, regardless, it doesn't fit
Airframes
Benevolens Magister
Definitely back to front. Apart from a narrower profile at the rear, the side panels which have extra detail around them are representing the opening panels of the real thing. The main problem causing the canopy not to fit is that windscreen - it's too far aft, and too low. This can be seen at the joint between the windrscreen bottom vertical frame, and the cockpit sill where it rises to the curve of the instrument panel scuttle.
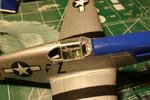
Once you've removed the windscreen, and cleaned the paint off the cockpit sill and around the curve, the 'screen should then fit neatly, with the front edge on top of that curved, raised section on the cowling top, and the main canopy should then drop into place.
Once you've removed the windscreen, and cleaned the paint off the cockpit sill and around the curve, the 'screen should then fit neatly, with the front edge on top of that curved, raised section on the cowling top, and the main canopy should then drop into place.
- Thread starter
- #694
B-17engineer
Colonel
Crimea_River
Marshal
Looks much better. Suggest PVA (white carpenter's glue) applied with a toothpick to fill the gaps. Goes on white and dries clear and will not fog the glass. You can also paint over it. If you mess up, just wipe off with a wet Q-Tip before the glue has set and start over.
- Thread starter
- #696
B-17engineer
Colonel
Thanks Andy! Will try that tomorrow!
Airframes
Benevolens Magister
Well done H, and as Andy said, PVA is the thing. You can also 'build it up' if required. If the first application seals it, but there's still a depression in the joint, run-in another bead, wiping off excess with a wet finger tip until smooth, let it dry, and repeat as required until a flawless joint is achieved.
That should take care of it!
nice to see this one on the go again Harrison
Nicely done so far Harrison!
Users who are viewing this thread
Total: 1 (members: 0, guests: 1)


