Crimea_River
Marshal
Great stuff Dirk. Don't forget to finish the history of this unique bird. Looking forward to the next installment.
Follow along with the video below to see how to install our site as a web app on your home screen.
Note: This feature may not be available in some browsers.
Ad: This forum contains affiliate links to products on Amazon and eBay. More information in Terms and rules
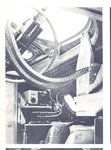
Just a quick note Dirk. On the B17E and early B17F, the radio room gun mount was on a (rather cumbersome) circular mount - basically a metal tube ring, with a semi- rigid feed chute and ammo box fixed on the starboard wall, unlike the mount in your posted pics. However, with two guns mounted, it's more than likely that a 'custom made' mount was fabricated.

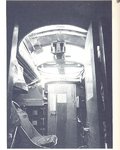
Well its been a long time since I worked on "Old 666" and thanks to Alex today was the day I found my grove. I was able to sit at my bench today at around 10:00am as opposed to 10:00pm which has been the norm these days. Seeing the work Alex has done in his B-17 "Hells Angels" was just the spark I needed.
Here's what I accomplished:
Starting with some styrene and Terry's photos from post 32, photo 6 I set to work.

I started by using some green Putty to fill in the optional staggered waste gunners position and started to lay out some frame work using .030 square stock styrene.

Next I used .080 H-Column to make the tracks for the waste gunners window.

More frame work.

Now before I could complete the frame work i had to install the gunners window but I had to paint it first. Using some fine grit sand paper i sanded the area around the window I wanted to paint olive green. This allowed the paint to stick to the clear plastic.

Once the frame work was completed I added some interior green, and dry brushed on some aluminum to add some wear. The window opens and closes. 8)


Next I turned to the nose of the aircraft.


Well that's it for now. Thanks for taking the time to look at my work.