ccheese
Member In Perpetuity
Username: ccheese
Name: Charles
Category: Intermediate
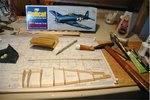
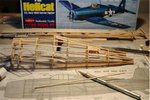
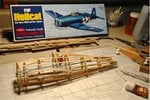
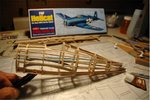
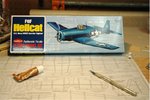
Kit: Guillows rubber powered balsa/tissue F6F "Hellcat"
Scale: 1/30
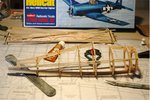
Accessories: None that can be purchased. However, I am going to make the rudder in two pieces. Ditto for the stabilizer. We've all see aircraft parked. In most instances, the elevator is in a down position. This one will be down also. And, I am going to make the ailerons separate, so I don't have to outline them with tape. I wanted to put the flaps down, but.... the flaps in the F6F we only in the lower section of the wing, and I have no way of splitting the wing.
I will have to modify the landing gear, also. Another instance of a "bent pin", which will not do.
Prior to the build I did quite a bit of research on the Hellcat. Thanks to Mr. Stephen Sherman, who wrote a piece for Acepilots.com, I have quite a history on the F6F. I have learned that prior to production there was an XF6F-1 and an XF6F-3 (only one dash two, with a turbo charged R-2600). Also, there was one F6F-4, fitted with a two speed turbo charged R2800 engine. Production wise they went straight to a dash five and on to -5N and -5P. The -5N and -5P had a 20mm cannon in the innermost position on the wing, and 200 rounds of ammo.
Because there was not much external difference between the dash three and the dash five, this will be a standard U.S. Navy F6F-3, not dedicated to any pilot or squadron.
The watchword for this build will be, "Leading edges rounded, training edges tapered".
Charles
Name: Charles
Category: Intermediate
Kit: Guillows rubber powered balsa/tissue F6F "Hellcat"
Scale: 1/30
Accessories: None that can be purchased. However, I am going to make the rudder in two pieces. Ditto for the stabilizer. We've all see aircraft parked. In most instances, the elevator is in a down position. This one will be down also. And, I am going to make the ailerons separate, so I don't have to outline them with tape. I wanted to put the flaps down, but.... the flaps in the F6F we only in the lower section of the wing, and I have no way of splitting the wing.
I will have to modify the landing gear, also. Another instance of a "bent pin", which will not do.
Prior to the build I did quite a bit of research on the Hellcat. Thanks to Mr. Stephen Sherman, who wrote a piece for Acepilots.com, I have quite a history on the F6F. I have learned that prior to production there was an XF6F-1 and an XF6F-3 (only one dash two, with a turbo charged R-2600). Also, there was one F6F-4, fitted with a two speed turbo charged R2800 engine. Production wise they went straight to a dash five and on to -5N and -5P. The -5N and -5P had a 20mm cannon in the innermost position on the wing, and 200 rounds of ammo.
Because there was not much external difference between the dash three and the dash five, this will be a standard U.S. Navy F6F-3, not dedicated to any pilot or squadron.
The watchword for this build will be, "Leading edges rounded, training edges tapered".
Charles
Attachments
Last edited by a moderator: