**** DONE: 1/48 A6M3 Q-102 - Carrier Aircraft GB

Ad: This forum contains affiliate links to products on Amazon and eBay. More information in Terms and rules
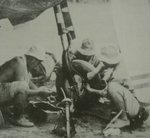
Thanks all for the comments :) Now, in regards to my paint, maybe we should title it: IJN Sky? :D in the following pictures you can see a bit of the tinted green thats in the color, a tad diffrent from Sky, I hope once my weathering is completed it'll look a bit better :) but I think the color is as close to what is described in numerous arguements about the Zero's Color Scheme, it isn't J.N Grey exactly, its more a Green Grey. At least next time for a Spit, I'll know how to mix the Sky for her :D

Its very similar to RAF Sky, the color if used straight out of the box is a slightly green tinted sky, but adding a bit too much pale green or grey, makes it sway one way or the other.
The Australian War memorial got back to me on the color their Zero was, and the curators helped me a lot, so I have to say a big thanks to the guys over there :)

I'll post some more pics, today I Futured the aircraft and left it to dry (2 days drying time I usually give it)

DSCN5679.jpg

Close up pic of the mask removed, you can see the greenish tint better in this photo, yet in the next two photos they appear more like Sky, when infact there similar to this green, even with the weathering :D
DSCN5680.jpg

Now I usually do this step after Future, but since I undercoated the plane in a Yellow Grey Green (just the same Grey Green Mix, then yellow added, under the original aircraft color, I thought of trying this step after reading a couple modelers doing something similer on other aircraft.
It should generate a diffrence in colors, after you lightly sand the aircraft, in certain sections I sanded just a bit more to expose the Yellow Grey Green underneath, giving it a aged looks, here in the photos on both sides you can slightly notice the diffrence.
On this picture you can see where the pilot would climb up into the aircraft, a slight variation in colors, when I apply a little wash later it should set it off to highlight the yellow. I only wanted to fade it a little bit, in case it shows up too prominantly. If you guys can't see it I'll highlight it later :)
RSCN5689.jpg

and the other side, which I kept to a minimum:
RSCN5691.jpg


Now the bigest question was, whether the cockpit canopy's mast was left intact or taken off, I've read that most of the group's radio masts were taken off (to increase speed! :D) and recently found a picture on the net of Q-102 with a nice full view of the rear cockpit section, no mast and it appears like someone patched up the hole for the mast section, so I'll need to take the canopy into the workshop again and putty her up.
Q-102-2.png


On the top wing does that look like chiping to you guys, or just sedement from the palm tree (or both?) It looks like this (Aussie?) Fellow is digging into a hole in the wing?

Thats all for now. :D
 
Looks like holes in the wing and foliage on it, check out the mark at the one 'o clock position from his hand. Seems to be a hole with a piece of leaf going in it.
 
Looks like holes from air burst shrapnel, and also leaves on the surface.

Thats what I originally thought, would you happen to have a "method" of doing these holes, they don't appear to be too deep, so I could drill a bit of hole and gouge them out with a tool to create a similar effect? Is there another way of doing this? :) its tedious but it looks great at the end (if its done properly :D, I've had good and bad times with it)

Would the holes be showing mostly the interior green, or aluminium? Since I'm not that well versed with the Zeros was wondering what color it would be showing, if I should simulate the IJN interior green from the interior or aluminium for the hole (in this case from the picture I can't really make out any color in the hole, maybe interior green since its pretty dark where the man is poking)

Thanks all for the help and advice :)
 
Shrapnel damage, now were getting down to the nitty gritty. Should look god when done.

One suggestion to achieve this is to add to the hole small slivers of crinkled kitchen foil or some similar material. Placed in irregular and fractured fashion, should give the appearance of ripped open metal.
 
Last edited:
I was going to suggest something similar. This sort of damage is normally best done before construction, as it involves thinning the plastic from the inside, or, better still, building separate panels, of thin material, such as thin aluminium or brass sheet, and adding the relevant damage.
However, one way to do it as this stage, is to drill the hole(s), then 'countersink' the surrounding area, to create a depression, as would be found in metal. But you need to decide what type of hole - irregular-shaped punctures from splinters, or holes punched by bullets.
If the latter, then the angle of impact has to be taken into account, in order to get the hole the right shape, and the depressed metal, as well as providing the right amount of missing surface paint, in the right shape.
Depending on the angle of entry, the paint is knocked off violently by the shock wave of the round, creating a distinctive shape for each angle. It's best to study close-up pictures of the various types of damage, in order to achieve a realistic effect, otherwise, it can look like a model full of very unconvincing holes!
 
Are you doing the plane before the Navy fixed it? Or have you decided to bin the US markings altogether?

I'll do it before the US fixed it, mostly because I can't find what type of grey the color would be, and because the decals I had ready for EB-201 disapeared in my bin :S plus in Biggy's honor I'll do Q-102 (the one in the previous photo) which is all damaged :D 
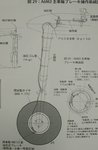
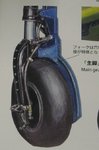
but its one of 3 that was used to make EB-201, I have 3 more A6M3 kits in the pile, so it'd be cool to do all 3 aircraft and EB-201 one day :D
 
Some pics for you Igor....:d

Source: first image!
 

Attachments

  • Profile 12.jpg
    Profile 12.jpg
    40.8 KB · Views: 134
  • Undercarriage_2405.jpg
    Undercarriage_2405.jpg
    41.5 KB · Views: 125
  • Undercarriage_2406.jpg
    Undercarriage_2406.jpg
    57.1 KB · Views: 123
  • Undercarriage_2408.jpg
    Undercarriage_2408.jpg
    52 KB · Views: 121
  • Undercarriage_2410.jpg
    Undercarriage_2410.jpg
    46.8 KB · Views: 126
Wayne you saved me on that gear :D didn't know where the wire ran, what color the brake line is etc, Thanks a ton mate :D

Just a quick question :D The 3rd pic, (second row, 1st picture) its from a restored or damaged aircraft? I notice that it has 2 wires instead of 1 :) or do the 2 wire meld into 1 (or am I completeley off atm :D) All the other pictures have 1 clear wire :)
 
Thanks all for the comments :D and Thanks Wayne for the Pictures :D but I have to keep working on this Zero, no time to take a break if I want to finish it on time :D

First off in this set, the tires and engine cowling, they turned out great :D I mixed a little flat black with J.N Grey, it gives it a Warn out in the sun look. Now I'll apply some powders to give it even more of a abandoned tint to the color.
DSCN5700.jpg

The tires will most likeley just get a bit of sand and dust on them. With the Addition of aluminum for the rims.
DSCN5701.jpg


Big Thanks in Part to Wayne's pics. I drilled some holes with my mini-drill into the landing gear, one of sections that I drilled, I took off, I'll apply some aluminium and dirt to make it aged later.
I'll see about applying some aluminium dots later to make it appear as if there are bolts in the side section of the gear. On the next A6M3 build (maybe sooner than later :D) I'll custom the gear with plasticard to resemble Wayne's pics some more :D It finally snowed today here in my town, so unfortunatley thats like the signal for the end of airbrushing season :S I'll see about constructing something to paint indoors, but I really have no room in the house :S
RSCN5705.jpg


Finally, just a little teaser, I've almost applied all the decals, I've made 1 or 2 chips in the paint for the hinomaru in the wings (but the fuselage I didn't touch too much I tried to mimic the "Wrinkling" in the photos of the hinomaru that I've seen, but even with a lot of wanting to wrinkle, after micro set and sol, they were down pretty tight, very wrinkle free :S), since from photos you can see the damage there. I'll see about how I'll make these holes in the wings, but theres still time to ponder on that issue :DJust a little decals for now :D I looked at applying the decals via the pictures but the decals arn't exactly to size, so I did the best I could with matching them up to the photo, I think its a pretty decent job :D, at least there even on both sides of the fuselage, but those pics will come later :D.
Amazingly being 30 something years old and Tamiya, they were still able to work with Micro Set and Sol, I usually don't have much luck with Tamiya decals when I use Set and Sol, but this batch came out great.
RSCN5709.jpg
 
Last edited:

Users who are viewing this thread

Back