Navigation
Install the app
How to install the app on iOS
Follow along with the video below to see how to install our site as a web app on your home screen.
Note: This feature may not be available in some browsers.
More options
You are using an out of date browser. It may not display this or other websites correctly.
You should upgrade or use an alternative browser.
You should upgrade or use an alternative browser.
**** DONE: 1/48 Harrier GR9,4(AC) Sqn RAF - Your Favorite Aircraft of All Time GB
- Thread starter Airframes
- Start date
Ad: This forum contains affiliate links to products on Amazon and eBay. More information in Terms and rules
More options
Who Replied?Aaron Brooks Wolters
Brigadier General
Very nice work Terry, she's looking sharp sir.
Vic Balshaw
Major General
Shame about that crack Terry, it's a shame some bright spark cant come up with a mending kit like you get for the cracks in the car windscreen.
Despite that you're doing a good job on the kit
Despite that you're doing a good job on the kit
woljags
Staff Sergeant
thats the same type of marks i had on my black widow rear end,really sorry you have the same problem,as always your work is amazing Terry even more so considering the condition of your hands,respect sir
brucejscott
Staff Sergeant
Sweet work Terry.
- Thread starter
- #246
Airframes
Benevolens Magister
Thanks very much indeed chaps, glad you approve.
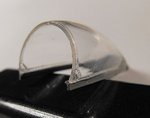
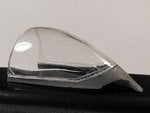
That bl*dy stress crack is all due to the very heavy sprue attachment points. I removed the windscreen from the sprue complete with the large lugs shown in the previous photo, to reduce any possibility of the screen cracking. But, due, I'm guessing, to the continued curve of the screen, beyond the 'half way mark', when I started to cut the off the lugs, I heard that horrible 'creak' noise, as the clear part stressed and crazed.
Hopefully, once coated in future, the crack will not be as visible. The really annoying thing is, that even with the central mould lines removed, it's still possible, under close inspection, to see the ridge, as the canopy shape actually comes to a peak!
I suppose there is a valid reason for moulding parts this way, possibly tool costs, but surely it should be possible to do so without that bl**dy seam! After all, the original price for this kit (from Hasegawa) was £40 !! - a heck of a lot for what you get, even though it's a nice kit.
Rant over, back to the work bench!
vikingBerserker
Lieutenant General
Besides the slight issue with the canopy, beautiful job so far.
- Thread starter
- #248
Airframes
Benevolens Magister
Thanks very much David.
I'm currently working on all the small bits, such as gear doors and antenna. Should have some pics in the next day or so. Almost finished, apart from making a display base to compliment the other Harrier (GR3) for my mate.
I'm currently working on all the small bits, such as gear doors and antenna. Should have some pics in the next day or so. Almost finished, apart from making a display base to compliment the other Harrier (GR3) for my mate.
Looking good so far Terry!
meatloaf109
1st Lieutenant
Bummer about the crack, hope the Future works!
Fingers crossed here too Terry...
- Thread starter
- #252
Airframes
Benevolens Magister
Thanks guys. Not got much done today, too busy with other things. Hope to make some noticeable progress over the weekend.
A4K
Brigadier General
Looking forward Terry! Hope that canopy gets sorted alright. How is your hand now btw?
- Thread starter
- #254
Airframes
Benevolens Magister
Canopy and 'screen a good as they're going to get, I reckon Evan.
Finger still f****d, but at least the swelling, and most of the pain, around the wrist has diminished. Thanks for asking mate - but reckon it's going to be a long, slow, and painful learning curve to get to even 50% of what I had before - if I'm lucky.
Know what I like about this disease?
F*** All !!!!
"if i'm lucky".....Sh!t Terry you don't want to be Jan do you...
Lucky13
Forum Mascot
Top drawer old boy, top drawer!
- Thread starter
- #257
Airframes
Benevolens Magister
Heck Wayne, one Jan is more than enough!
Oh, hello old boy! Very nice of you to say so, don't you know!
Oh, hello old boy! Very nice of you to say so, don't you know!
Lucky13
Forum Mascot
Not at all old boy....why don't one have a wee sniffter?
- Thread starter
- #259
Airframes
Benevolens Magister
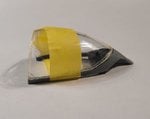
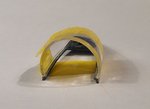
I'm afraid I haven't made much progress, apart from almost sorting out the fit problem with the canopy. Just my luck, a long Easter weekend, with no plans apart from modelling, and I've been laid-up with some sort of bug - still feel like cr@p.
Anyway, the canopy is sorted as best as possible, and just needs some light sanding along the port side joint of canopy and frame, and then the front frame and the seal strips will be painted.
The port, lower frame had to be bent outwards to at least partly match-up with the transparent part, and this, of course, will cause a slight fit problem when fitting the canopy to the fuselage, open or closed. I'm working on what needs to be sanded on the fuselage to allow a convincing open canopy display.
The pics show what was required to get the little blighter to sit correctly, and stay put once glued. The small gaps will be filled with Kristal Kleer. This little job involved glueing each side separately, allowing each to set before tackling the next, and took around 12 hours in total !
Thanks again for your interest, and I'll post more progress shots once I'm up to it.
Attachments
") But it turned out great
But it turned out great Users who are viewing this thread
Total: 1 (members: 0, guests: 1)