like the look of that pit Terry!
Navigation
Install the app
How to install the app on iOS
Follow along with the video below to see how to install our site as a web app on your home screen.
Note: This feature may not be available in some browsers.
More options
You are using an out of date browser. It may not display this or other websites correctly.
You should upgrade or use an alternative browser.
You should upgrade or use an alternative browser.
**** DONE: 1/48 Harrier GR9,4(AC) Sqn RAF - Your Favorite Aircraft of All Time GB
- Thread starter Airframes
- Start date
Ad: This forum contains affiliate links to products on Amazon and eBay. More information in Terms and rules
More options
Who Replied?Crimea_River
Marshal
Me too. Fabulous work.
A4K
Brigadier General
Man, with everyone here Terry! That is a superb job mate!
Looking good Terry!
- Thread starter
- #85
Airframes
Benevolens Magister
Thanks very much indeed chaps! Should have some more to show later tonight.
- Thread starter
- #86
Airframes
Benevolens Magister
As promised, a bit of progress to show, although there was some sanding to be done, rather unusual for an ex- Hasegawa kit.
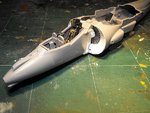
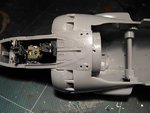
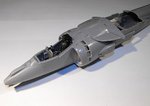
PIC 1. The nose and cockpit assemblies have been joined to the fuselage, after first painting the inner surfaces of the air intakes and the turbine blades.
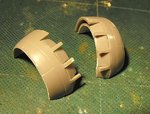
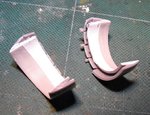
PICS 2 and 3. The auxiliary by-pass doors have been fitted in the drooped position, normal for on the ground without the engine running, and again the inner faces have been painted, white and medium Sea Grey, in a satin finish.
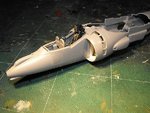
PIC 4. The intakes fitted. Some sanding around the joints is still to be done here.
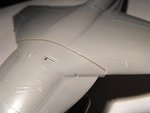
PIC 5. The upper panel, immediately aft of the cockpit, needed quite a lot of sanding around the edges, with a jeweler's file and wet n dry, to allow the panel to fit flush with intakes. A small amount of filler is now required to correct the very small gaps.
PIC 6. Top fuselage panel/wing root fillets in place. The joint will be filled with PVA later.
PIC 7. Test fitting of the main wing shows that again some sanding around the leading edge joint will be required to allow it to fit - that's tomorrows job!
Once the wing is fitted, then it's time to plan the rest of the build, to ensure the best sequence to allow ease of painting. All being well, I'll post another up-date tomorrow.
PIC 1. The nose and cockpit assemblies have been joined to the fuselage, after first painting the inner surfaces of the air intakes and the turbine blades.
PICS 2 and 3. The auxiliary by-pass doors have been fitted in the drooped position, normal for on the ground without the engine running, and again the inner faces have been painted, white and medium Sea Grey, in a satin finish.
PIC 4. The intakes fitted. Some sanding around the joints is still to be done here.
PIC 5. The upper panel, immediately aft of the cockpit, needed quite a lot of sanding around the edges, with a jeweler's file and wet n dry, to allow the panel to fit flush with intakes. A small amount of filler is now required to correct the very small gaps.
PIC 6. Top fuselage panel/wing root fillets in place. The joint will be filled with PVA later.
PIC 7. Test fitting of the main wing shows that again some sanding around the leading edge joint will be required to allow it to fit - that's tomorrows job!
Once the wing is fitted, then it's time to plan the rest of the build, to ensure the best sequence to allow ease of painting. All being well, I'll post another up-date tomorrow.
Attachments
-
 New Harrier build 070.jpg74.4 KB · Views: 121
 -
 New Harrier build 065.jpg70.8 KB · Views: 94
 -
 New Harrier build 068.jpg55.4 KB · Views: 85
 -
 New Harrier build 072.jpg74.3 KB · Views: 80
 -
 New Harrier build 078.jpg49.7 KB · Views: 83
 -
 New Harrier build 081.jpg37 KB · Views: 102
 -
 New Harrier build 087.jpg31.1 KB · Views: 120
A4K
Brigadier General
Great work Terry!
Nice to see you paid attention to the intake flaps - if I know right this is the natural position for them on the deck with power off.
Nice to see you paid attention to the intake flaps - if I know right this is the natural position for them on the deck with power off.
Crimea_River
Marshal
Looks great Terry.
looks great Dogsbody
- Thread starter
- #90
Airframes
Benevolens Magister
Thanks Evan, Andy and Karl. Working on that wing fit at the moment, should have something to show later.
See, you still have "hands" old boy! Great work!

T Bolt
Colonel
Glad to see you back at it Terry. You're work on the cockpit is fantastic. 
- Thread starter
- #94
Airframes
Benevolens Magister
Thanks chaps, but that wing problem has got worse!
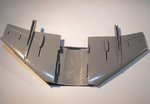
Having followed the Revell instruction sheet, which had some parts incorrectly numbered(!), the lower wing panels were fitted to the one-piece upper wing, and then this assembly was test-fitted to the fuselage. Result - it doesn't fit!
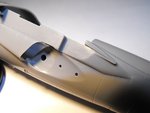
PIC 1. Shows the underside of the assembled wing, with the trailing edge flanges and internal wing flanges.
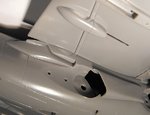
PIC 2. These internal trailing edge flanges are supposed to slot into the locating points on the fuselage.
PIC 3. And these are the locating points for the above mentioned wing fillet.
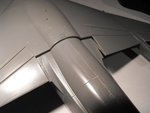
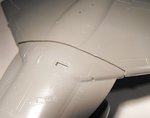
PIC 4. By flexing the wing tips upwards and outwards, it's possible to clip the rear flanges into place, and almost set the leading edge fillets.
PICS 5 and 6. This is the result at trailing and leading edges respectively !
Obviously, a fair amount of sanding and trimming is required, but this needs careful thought before committing file to plastic. To adapt a phrase from Sherlock Holmes, I think this is at least a four pint problem - so I'm off to the pub to think about it, before this Harrier goes for it's first, and last, flight!!
Maybe tomorrow I'll have this problem sorted, until then - cheers!!!
Having followed the Revell instruction sheet, which had some parts incorrectly numbered(!), the lower wing panels were fitted to the one-piece upper wing, and then this assembly was test-fitted to the fuselage. Result - it doesn't fit!
PIC 1. Shows the underside of the assembled wing, with the trailing edge flanges and internal wing flanges.
PIC 2. These internal trailing edge flanges are supposed to slot into the locating points on the fuselage.
PIC 3. And these are the locating points for the above mentioned wing fillet.
PIC 4. By flexing the wing tips upwards and outwards, it's possible to clip the rear flanges into place, and almost set the leading edge fillets.
PICS 5 and 6. This is the result at trailing and leading edges respectively !
Obviously, a fair amount of sanding and trimming is required, but this needs careful thought before committing file to plastic. To adapt a phrase from Sherlock Holmes, I think this is at least a four pint problem - so I'm off to the pub to think about it, before this Harrier goes for it's first, and last, flight!!
Maybe tomorrow I'll have this problem sorted, until then - cheers!!!
Attachments

Looking good Terry!
- Thread starter
- #97
Airframes
Benevolens Magister
Yep. Just done a preliminary filing and sanding, around the wing, the internal slots and flanges, and the front and rear fuselage aperture. It's starting to fit, and just needs a little more work to allow it to sit and align correctly. First though, it's pub time!
Pics tomorrow.
Pics tomorrow.
Vic Balshaw
Major General
Mmmmmm……..a sticky problem but it looks like you're on the right track T, a swift pint or four and the world will be put to rights.
brucejscott
Staff Sergeant
Good choice the pub. A little lubrication always makes things go easier.
Users who are viewing this thread
Total: 1 (members: 0, guests: 1)