**** DONE: 1/48 Messerschmitt Bf 110 G-2 - Me/ Fw Group Build.

Ad: This forum contains affiliate links to products on Amazon and eBay. More information in Terms and rules

Jeez, you guys are hard task-masters. But just to prove I haven't been spending all my time down the boozer, here's what I've managed over the last few days. I'll probably have to break this into two posts as I think there are too many photos for one.

Photos 1 2. Having had no adverse comments about my efforts detailing the cockpit, I decided it was time to button it into the fuselage. Shot 1, is the starboard wall and floor cemented (with superglue) to the fuselage sides. As you can see, the instrument panel and radio stack are now in position, which they weren't in the previous shots I posted. Shot 2, a different angle showing more of the pilot's station. Everything slotted in without any problems...or so I thought.

Photo 3. The port sidewall fitted together to the rest of the tub, nicely, but when I then cemented the two fuselage halves together, I was left with this gap in the shelf over the radios, that hadn't been apparent during any of the dry-fits! Well these things are sent to try us!! All the rest of the fuselage came together without any forcing and I'm baffled as to why this happened. I tried the canopy and that fits perfectly. I can only think that the radio stack might not have been, fractionally, far enough to the right. I didn't want to risk damage by forcing everything apart again, so I decided to fix the problem with a thin patch of plastic card (right image) . The edges of this will be masked by the lower canopy frame and as an instrument console sits on top of it, this will disguise it further.

Photo 4. Finally this is what the fuselage looks like, now it's together.

I'll post this now and start on the next section.
 

Attachments

  • Cockpit from top.jpg
    Cockpit from top.jpg
    48.1 KB · Views: 257
  • Completed fuselage.jpg
    Completed fuselage.jpg
    28 KB · Views: 263
  • Cabin top shim copy.jpg
    Cabin top shim copy.jpg
    56.6 KB · Views: 268
  • Starboard cockpit.jpg
    Starboard cockpit.jpg
    50.7 KB · Views: 276
Here's the rest of the progress I made.

Photo 1. The slats carriage has been added, from plastic card, firmly anchored under the wing top.

Photo 2. The end bulkhead in the nacelles needed a shim, of plastic rod, to fill a gap to the wheelwell roof. When dry, this this was trimmed and sanded to fit snugly.

I decided when starting the build to do as much assembly as possible, before painting. I found in previous builds, that paining first, both interfered with fit of tight sections and caused adhesion problems. Of course, there were some parts that had to be painted before assembly, as they wouldn't be accessible after assembly.

Photo 3. The first of these parts I came across were the cooling rads under the engine nacelles. These were first painted in Engine Black matt enamel, then dry-brushed with Boltgun Metal Acrylic. The dividers were highlighted in Chainmail Silver. These were then masked and cemented to the inside of one side of each nacelle. The insides of the nacelles then got a spray of RLM 02, avoiding the cement contact points. When dry, the masking was removed and the nacelle sides cemented together. I meant to take some shots at this point, but completely forgot (sorry).

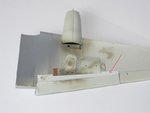
Photo 4. I then started work on the wheelwells. First a spray of RLM 02, which was then weathered with a brown/black thinned enamels mix. The rivets were dry-brushed with slightly lightened 02 and some metal wear was indicated in the shaped wheel recess, with Boltgun Metal. The two yellow cylinders (Hydraulics?) were made from resin sprue, shaped and painted. Where these are, the kit only featured a recessed, engraved circle. The rectangular aperture close to the firewall was drilled and sanded to shape. According to the photo references Andy supplied (Post 94), a hydraulic pipe attaches through there to the undercarriage. I'm working on scratch-building this. Lastly, I knocked off the very thin fairing on the right hand wing, left over after the flaps were cut away. I found it, but it won't be replaced until the flaps have been reattached.


Photo 5. The nacelles were then cemented to the wing bottoms. This is down to the assembly instructions. To me, it would make more sense to complete the wings, then add the nacelles. However, I found it isn't possible to do this. the wing tops have to be added after the nacelles are fitted. Anyhow, these went on without too much trouble giving a tight, neat fit. The only casualty was one of the yellow bottles, which clashed with one of the supports. This was easily taken out and repositioned slightly, for a proper fit. There is still some weathering/highlighting to be done on the nacelle walls.


Photo 6. The reverse angle of the nacelles from the front. I added some centre supports to the radiator housing, from plastic card. You can see here, how difficult it would have been to paint the grilles, if it was done after assembly. The rear nacelle support bulkhead need some filling and sanding, if I can get near it.

Photo 7. The kit assembly, to date. The next step, to complete the wings and attach the flaps. The slats can wait till towards the end.

More photos when I get those done.
 

Attachments

  • Painted wheelwells.jpg
    Painted wheelwells.jpg
    36.3 KB · Views: 219
  • wings and nacelles.jpg
    wings and nacelles.jpg
    34.7 KB · Views: 242
  • Wings and nacelles 2.jpg
    Wings and nacelles 2.jpg
    42.3 KB · Views: 248
  • Nacelle shims.jpg
    Nacelle shims.jpg
    33.8 KB · Views: 233
  • Oil Rads.jpg
    Oil Rads.jpg
    45.5 KB · Views: 234
  • Completed to date.jpg
    Completed to date.jpg
    39.5 KB · Views: 231
  • New slats.jpg
    New slats.jpg
    32.4 KB · Views: 210
Very nicely done Gerry and a couple of good fixes as well. Hope the canopy fits ok following that join behind the pilot, from you pic I see no tell tail bulges where they shouldn't be.
 
Thanks Jerry, Andy and David. Vic, the canopy fits perfectly - possibly because it comes in 3 pieces? - and I should be able to disguise the edges of the new shelf.

Karl, Thanks. Terry, Thanks, and send Jan over here. The price of the pint will scare the the beja*us out of him - currently €4.50 - €5. if that doesn't soften his cough, nothing will!

Gnomey, Evan and Wayne, really appreciate your comments, as indeed I do everyone's who've posted recently.

I'm currently working on attaching the flaps to the wing bottoms, before I complete the build of the wings - again this seems the logical way to proceed. Will post some more pictures when I've made some visible progress.
 
Here's some shots of the work I've done assembling the wings and flaps. I've merged some of the photos to save on upload space. I thought I'd take you through my working methods. I suspect that you more experienced builders have your own techniques for mounting cut flaps, which are probably much more sophisticated than mine, but I was tackling this for the first time.

My only other experience of cutting flaps was on my last 109E build. Whilst that worked out OK in the end, I wasn't happy with my technique. In that case I re-attached the flaps to the completed wings. I basically 'spot-welded' the flaps to the wing tailing edge with cyanoacrylate. This looked alright but resulted in very fragile flaps, which were accidentally knocked off on several occasions as I completed the build. This time I wanted to achieve something a lot more robust. This initial work was done before the wing halves were put together.

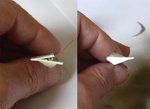
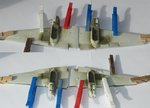
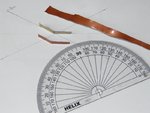
Pictures 1 2. First I measured out 30º degrees, with my kids' old geometry protractor, as I knew that this was about the max I could drop the flaps, from the dry-fits. Then I needed some material that was rigid, yet flexible, to adjust angles as necessary. After some experimentation, I settled for some metal from the neck of screw-cap wine bottles. This is a lot firmer than the soft metal collars you find on real-cork wine bottles. Cut into strips, these were bent to the correct angle, using the edge of a steel rule. They were rigid enough to hold their shape but with a little pressure, the angle could still be adjusted.

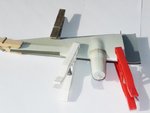
The strips were then inserted into the flap interior and firmly attached with cyanoacrylate (super glue). Then the flaps were carefully positioned to the tailing edge of the lower wing-half, making sure the flap angle was correct, there were no gaps and the bend in the metal was sitting exactly over the join. When I was happy with the fit, the hinges were superglued to the wing interior and left to set. When set, a bead of liquid poly was run along the wing/flap join, for extra strength.

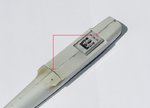
The arrowed part, in photo 2, is the scratch-built hydraulic line to the wheelwell. The vertical pipe will be added later, from below, when I figure out how the undercarriage fits. The parts used were from an old, broken, 1/48 Alouette Helicopter.

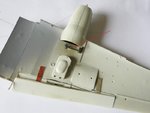
Pictures 3 4. Before the flaps could be attached, the ends had to be enclosed as these will be visible. The arrowed part is a piece of plastic tube to hold the two sections of the flap at the correct angle to get a sharp tailing edge, when they're cemented together. The flap ends were placed on to plastic card and a pencil run around them. These were cut to shape and attached to the flap with liquid poly. When dry, it was trimmed and sanded to fit.

The back for the flap was measured and cut from thin plastic card then adjusted to fit. When happy with the fit, I tacked it into position with spots of super glue then cemented along the join with liquid poly. When dry, it got a light sanding to clean up any melted poly/plastic. Finally, it got a spray of grey plastic primer.

Picture 5. The starboard wing top was slid into position, and with hardly any effort, was cemented into position with liquid poly, pegged and left to dry. Up to this point, I'm very impressed with the fit of this kit.

Pictures 6 7. The port wing came together in the same way, with the exception of the port top nacelle where there was a small gap (arrowed). A bit of pressure and some liquid has since closed up this gap even more, although a small amount of fill is probably still required. Otherwise the shots just show the wing tops and bottoms from front and back, with the flaps now positioned.

Pictures 8, 9 10. When dry, the wings were ready for attaching to the fuselage. The fuselage bottom, to cover the floor-cannon bay, comes pre-attached to the starboard wing. It needed some careful sanding, where arrowed, to get it to fit. When in position, the wing was carefully tensioned with masking tape to get both a good fit and the correct dihedral, and left to dry, overnight.

Today, I added the port wing. Again, careful positioning with tensioned masking tape was employed for fit and dihedral, which was carefully measured. I was very careful to get the underwing join tight, as I have seen a gap there in other builds of this kit. Anyhow I think I was distracted by this, because when I checked on it later, I found a step between the upper wing root and wing. This was caused by lack of support at the tailing edge, where the flaps should have been. This meant the curve didn't quite follow the wing root, all the way.

I think I've managed to fix this by reapplying liquid poly along the joint, which softened the seam and allowed me to put pressure on it from inside the wing, with a thin circular file, so it now follows the correct curve. It was still drying when I took these last photos, so we'll have to wait and see if I was successful.

The final two shots (9 10), are where I am up to now on the build. The next job is to build and add the tail section.

Sláinte, 'till next time.
 

Attachments

  • Both wings with pegs F  B.jpg
    Both wings with pegs F B.jpg
    59.3 KB · Views: 185
  • Starboard wing drying.jpg
    Starboard wing drying.jpg
    47.4 KB · Views: 181
  • Flap back.jpg
    Flap back.jpg
    36.1 KB · Views: 200
  • Wings joint.jpg
    Wings joint.jpg
    37.7 KB · Views: 211
  • Wings  Fuselage bottom.jpg
    Wings Fuselage bottom.jpg
    34.6 KB · Views: 188
  • Flap hinges glued.jpg
    Flap hinges glued.jpg
    52.2 KB · Views: 198
  • Flap end open  closed.jpg
    Flap end open closed.jpg
    47.6 KB · Views: 182
  • Wings  Fuselage top.jpg
    Wings Fuselage top.jpg
    33.4 KB · Views: 188
  • Wings bottom from front  back.jpg
    Wings bottom from front back.jpg
    63.5 KB · Views: 195
  • Flap hinges.jpg
    Flap hinges.jpg
    76.1 KB · Views: 175
Right Guys, I'm now at the stage where I've got to start making decisions about the finish of this Bf 110G-2. After a lot of trawling through the internet and some very welcome reference shots posted by members, I'm now committed to M8+EM, featured in the photos below. I pulled these two shots off the internet, so the quality isn't great, as I suspect they're copies of copies. If anyone has access to '1st generation' versions of these, or indeed any other shots of this particular aircraft, I'd love to see them, if only to clear up some questions I've listed below.

I've studied these photos at length, and have come to some conclusions based on my interpretation of what I see in them. I'm putting these out to the Members, hoping for consensus - or outright contradiction - if anyone has more definite knowledge/proof. So don't be shy in expressing an opinion if you feel I'm wrong, which is very likely. I've marked some points of interest in photo 1, which I'll go through, point by point. My interpretations are based on studying both ptotos, as some details are clearer in one rather than the other.

Erich has identified this aircraft as 4./ZG76 and I'm happy to take his word on that. It has also been (mis?)identified as 2N+M8 but the wide yellow rumpfband should identify it as ZG76 and Erich is adamant that 2N was a ZG 1 code only and never used by ZG76 at any stage of the war.

From what I've picked up researching this subject, since starting the build, my belief is that photo 1, was taken sometime in Spring/Summer 1944. Other than that, I have no information about this aircraft or who may have piloted it. But it is a good reference to build from and has all the stores and the fuselage gondola I want to feature.

(A) Shows the pitot tube at the wing tip - as opposed to the kit, which features it under the wing, agreed?

(B) The upper nose gun opening doesn't appear to be faired over, as in the kit and other G2s that had the cannon gondola. Is it likely to have still carried the machine guns in the nose at this point, or have the 'black men' just not got around to fairing it over? Even if still there, would the gun barrels have been visible?

(C) The shadow in the cockpit seems to suggest that this aircraft carried solid head armour behind the pilot, rather than the bars that I've seen in photos of other G2s, or could there be another explanation? The kit allows for head armour.

(D) I'm convincing myself that I can just about see the reduced 'M8' here, but it could be just wishful thinking. If anyone has access to a sharper photo and could confirm that, it would conclusively put an end to the M8 or 2N debate. The fuselage cross is the black version, outlined in white, and, because of the difference in tones I reckon that rumpfband is yellow. The 'E' is white with a black outline and 'M' is black.

(E) Again, because of the tonal difference, I believe part of the cowling bottom (as in the box art) is yellow. This difference is more obvious in the second photo.

Finally, (F) My interpretation of the spinner is that it has a red tip, white band and Black-Green back and backplate. I'm assuming that the general paint scheme would be RLM 74, 75 and 76, at this time. The photo gives a very good idea of the mottling on the sides and I'm assuming that it carried the standard splinter pattern on the upper wings and fuselage.

That's it, other than to say that I'm struck by the similarity between the scheme of this aircraft and the Revell box art. Apart from the white band on the spinner and the codes, it looks like it could have been very much based on these photos.
 

Attachments

  • bF110 Box Art.jpg
    bF110 Box Art.jpg
    91.4 KB · Views: 198
  • M8+EM b.jpg
    M8+EM b.jpg
    55.1 KB · Views: 190
  • M8+EM captioned.jpg
    M8+EM captioned.jpg
    56.6 KB · Views: 194
My Gerry that's a whole lot of great work and I admire your pluck cutting out the flaps and reusing them.
 

Users who are viewing this thread

Back