**** DONE: 1/48 P-47D Thunderbolt "Razorback" - Your Favorite Aircraft of All Time GB

Ad: This forum contains affiliate links to products on Amazon and eBay. More information in Terms and rules

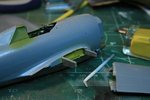
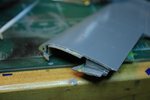
Sorry guys. I've been sick for a few days and not felt like doing much of anything. Here are some photos of my problem. Filling is not an option for me for I don't have the patience to scribe all the panel lines that would get covered. There is one section that is glued that Glenn will know about that can not be gotten to. It is the section on the wing assembly that slides up into the fuselage, yes, I put glue on this part hoping to make it more rigid.:banghead: I did not hold it quite long enough before releasing it. Live and learn. It moved up about 1/32 of a inch and will show up pretty bad once painted. I am going to start cutting it loose this afternoon I hope. Any suggestions would be much appreciated. This has gone so well that I hate to leave this. It be like leaving a dent in door on very nicely restored car. Know what I mean.
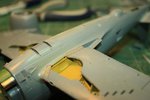
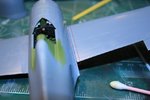
 

Attachments

  • IMG_5506 P-47D model..jpg
    IMG_5506 P-47D model..jpg
    52.1 KB · Views: 77
  • IMG_5508 P-47D model.jpg
    IMG_5508 P-47D model.jpg
    59.6 KB · Views: 81
Andy, I been scribing away with a razor knife most of the afternoon. At the rate it's going, should be done by the second Tuesday of next week.:lol: I don't have a saw at the moment but I will soon. Oh, and thank you for the tip the saw to.
 
Last edited:
First, I hope you start feeling better soon Aaron - I know exactly how you feel !
Second, from what I can see, if you can't remove the wing, by very gently and slowly bending it up and down, and at the same time working a scalpel blade or razor saw blade along the joint. to break the bond, then the following might work.
On the underside, it looks like there is a slight step. This can be carefully filed with a jeweller's file, then sanded with fine grit.
Forget about the panel lines for now. The upper joint, and the sanded lower joint, can be filled with repeated applications of PVA, allowing each to set before applying the next. If too wide for this, then a bead of CA run into the joint, and allowed to set, followed by more if required, then topped off with PVA could sort it.
Use a needle or sharpened cocktail stick (wooden) to apply both CA and PVA. The final application of PVA can be smoothed off with a wet finger tip.
Any missing panel lines, personally, I would ingnore - they probably won't be noticed anyway. But, if you really want to, they can be carefully etched with the tip of a scalpel blade, to give just a suggestion of the continuation of the line.
Bear in mind that, on the real aircraft, most panel joints can't be seen until up close, a few inches away.
Hope this helps.
 
Thank you Terry. The wing joint is fat on the wing side of the meeting point with the fuselage. Meaning I have a step up from the fuselage to the wing on both the upper and lower surface. I have gotten the lower surface free and it will line up now but the upper surface has a step on the wing that slides into the fuselage that if it must be undone will have to be cut. I should have explained further. There are no gaps in the wing and fuselage joint. Just an uneven meet of the two. I have been working with a razor knife most of the afternoon and have made some progress, especially on the bottom. The upper surface will be the test. My patience was wearing thin so I have taken a break. Again sir, thank you for the information.
 
Ah, now I see. In that case, more work with the razor saw. Try to cut into the cement, then start to gently 'waggle' the wing to continue breaking the bond, at the same time gently pulling outwards, away from the fuselage. This should weaken the joint, breaking the bond of the cement, until the wing comes free. It will leave dried cement residue, which can be sanded off, and both joint surfaces can be sanded smooth.
 
That's the direction I am hopefully headed in. Just time consuming. The one problem with this is that there is a large tab on the wing that slides into the fuselage. This tab is about an inch in length and a quarter inch in depth. I covered the top surface of said tab with a copious amount of glue, and it has adhered very well to its spot in the assembly.I hope I don't have to cut said tab but.....if I do, I do.:)Thank you for all the instructions and help Terry and Andy. Now....I think it's just time for work and see what happens. The tab is all that's left holding it in place now and is the only place I cannot get the correct alignment. Soooooooooooo, off we go.
 
Good stuff Aaron. If it's now only the tab holding the wing, then the 'waggling' movement should eventually break it free. I've don this a few times in the past, with success.
 
Sticky problem Aaron (sorry no pun intended) take it nice and slow and if you get frustrated just go make a cup of coffee or something. Got my fingers crossed for you.
 
If Terry had not prodded me into removing the wing I probably would not have but I did as he said and thank Terry, with a little more coaxing it came off. The photos show what I have, nothing major. Just clean up and reinstall and this time pay attention to what I have I had pressure in the wrong place and caused the problem. I will have some work to do to the wing before it goes back on to keep it from happening again. The glue did not hold in some areas along the back edge and into the joint area between the wing and fuselage. Thanks guys for the information, guidance and help.:notworthy:
 

Attachments

  • IMG_5509 P-47 wing redo.jpg
    IMG_5509 P-47 wing redo.jpg
    59.9 KB · Views: 77
  • IMG_5510 P-47 wing redo..jpg
    IMG_5510 P-47 wing redo..jpg
    52.7 KB · Views: 69
Thank you Terry and yes, I should be able to get it to fit this time. Just got home from work, don't know if I'll get to it tonight. I just need to shore up the wing and then reinstall it.
 
Looks like I missed most of this problem Aaron, but you certainly handled it well. I'll be watching out for the same problem when putting the wings on my razorback and will hopefully avoid it thanks to you.
 

Users who are viewing this thread

Back