Navigation
Install the app
How to install the app on iOS
Follow along with the video below to see how to install our site as a web app on your home screen.
Note: This feature may not be available in some browsers.
More options
You are using an out of date browser. It may not display this or other websites correctly.
You should upgrade or use an alternative browser.
You should upgrade or use an alternative browser.
**** DONE: 1/48 P-61A – Heavy Hitters II GB (1 Viewer)
- Thread starter ozhawk40
- Start date
Ad: This forum contains affiliate links to products on Amazon and eBay. More information in Terms and rules
More options
Who Replied?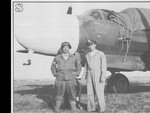
Catch22
Major
Great stuff guys.
Vic Balshaw
Major General
Nice choice Peter, always liked the rugged look of this machine.
get around to one myself some day...
- Thread starter
- #26
ozhawk40
Master Sergeant
get around to one myself some day...
oh yeah.....right!

Another shot for you Peter
I was reading one of the captions and they did say some of the widows had their noses painted
brilliant yellow
Mike
Thanks Mike. That's Herman Ernst standing next to his crew chief, but I haven't been able to find his name as yet. Herman Ernst was alive till around 2003 or so. He was interviewed by several authors, and I suspect the yellow nose is a pretty true representation.
Okay time to crack on and get a start before Wayne starts his P-61.8)
I purchased this boxing of the GWH p-61 a few months after release, after the hoo haa about what was right and wrong about it. Still, it requires a couple of 'fixes' and came with no less than three different nose cones, and two separate corrections to the instructions. I had better pay attention.
I started by ignoring the instructions and got on with the simple bits first - that's a good thing. I need to warm up.
Pic 1
First off, after opening the box, checked everything was there. All the sprues are bagged separately and those parts relating to the tail booms are in one handy bag.
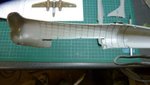
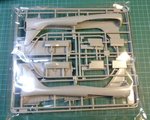
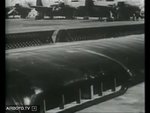
Pic 2
Wow - nice booms! Surface details is fine and the parts are free from distortion. Some very light flash on the edge of some of the parts, but otherwise my immediate impression is very good!
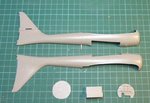
Pic 3
Separated the parts from the sprues. One thing I did notice is that the attach points to the sprues are thick and overlap the mating surfaces of the parts. Sprue cutters are an essential to remove the parts easily and without damage. A quick trim and good to go.
Pic 4
Close inspection of the interior surfaces shows that there is a lot of these circular markings (ejector pin markings?) in difficult to reach places. A bit of a spoiler really. Did my best with them, but there are lots to take care of.
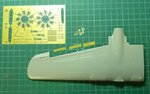
Pic 5
Time to get some interior paint on. Northrop painted the interior areas, other than the cockpit and engine firewall forward, in yellow zinc primer. I used Tamiya XF:4.
OKay, first update done!
Cheers
Peter
Attachments
Catch22
Major
Looks like a good kit Peter!
Airframes
Benevolens Magister
Nice looking kit, and a good start Peter.
Crimea_River
Marshal
I agree.
Vic Balshaw
Major General
It is a nice looking kit and a good start Peter, shame about the location of some of those ejection marks though.
oh yeah.....right!:rolleyes
Okay time to crack on and get a start before Wayne starts his P-61.8)
Cheers Peter
Aw Peter....that's a bit harsh man...
- Thread starter
- #33
ozhawk40
Master Sergeant
Aw Peter....that's a bit harsh man...
Says more about my lack of "commitment" to the hobby over the past 12 months, than your abilities vis-à-vis to achieve a stash reduction!
Anyways, I managed to sneak out to the workshop today whilst the good lady had lunch with pals.
Pic 1
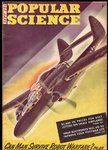
While looking around on the net I came across this killer artwork, so I thought I'd share. It's from September 1944 believe it or not. Pity there are no contents to read, because I'd love to know how electronics have improved my life, and how to dodge those killer Robots!
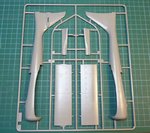
Pic 2
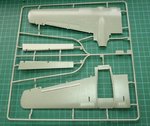
Wing sprues - check. Again very nicely moulded, surface detail is really quite something.
Pic 3
Once cut off the sprue there is only very minor clean up required before they are ready to stick together. Smooth as.
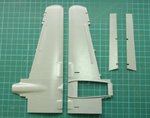
Pic 4
Inside the wings there are these great ribs, which add a lot of rigidity. You can clamp them up pretty hard to get a great bond and the fit is perfect.
Pic 5
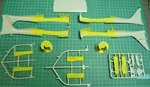
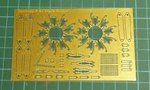
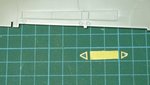
Also included in the kit is the photo etch fret, which among other things has the spoilerons, part of the P-61 control mechanism.
Pic 6
Here's a pic of the spoilerons deployed. They were activated in sync with the ailerons, which were very small on the 61. Note the series of small holes and note these are not featured on the photo etch parts 1 thru 6. on the fret. One of the issues with this kit. Also the spoilerons did not sit flat on the wing when not in use, but slide into the wing out of sight.
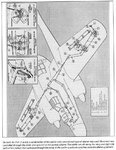
Pic 7
Heres a diagram out of the factory manual which shows how the controls were hooked up with the ailerons.
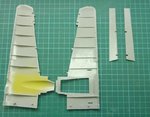
Pic 8
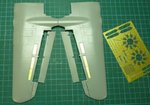
So, on the top of the wing you can see these areas that are basically square depressions that need to be filled. They should not be there even with the spoilerons deployed. The kit has instructions to use the photo etch, trimmed to size to cover these areas. So, yes that is what I did. Probably would have been better to fill with plastic sheet in hindsight.
Pic 9
Okay trimming in progress. A great idea was GWH cover the etch in plastic film both sides. You can cut the etch through this film so it all hangs together. Ever cut something of an etch fret to hear a 'ping', and the small part disappear never to be found?
Pic 10
All ready to glue.
Pic 11
Job done. I have deliberately left the flaps off, as I will need to paint these separately to look the best. The instructions require them to be added in this step, but I think I can clip them in later without too much trouble.
Have a good day!
Cheers
Peter
Attachments
-
 popular science Sept 1944.jpg187.3 KB · Views: 142
 -
 wings 009 - resized.jpg75.3 KB · Views: 147
 -
 wings 010 - resized.jpg91 KB · Views: 142
 -
 wings 001 - resized.jpg71.1 KB · Views: 138
 -
 wings 002 - resized.jpg76.7 KB · Views: 136
 -
 wings 004 - resized.jpg90.9 KB · Views: 133
 -
 wings 005 - resized.jpg54.2 KB · Views: 140
 -
 wings 006 - resized.jpg62.2 KB · Views: 145
 -
 wings 008 - resized.jpg68.6 KB · Views: 141
 -
 Warbird Tech 015 - P-61 Black Widow 48.jpg196.4 KB · Views: 644
 -
 P-61Spoilerons.jpg28.7 KB · Views: 135
meatloaf109
1st Lieutenant
Looking good!
Those killer robots have always been my greatest fear.
Those killer robots have always been my greatest fear.
Night Fighter Nut
Master Sergeant
Okay, you finally have my attention. Just came upon this build in between all my job hunting exercises. This kit currently resides in my stash and I have extensive photos of different parts of this plane. As for the yellow nose, yes they were painted yellow along with a few other colors. The reference I have says that soon after the widows arrived in England, the crews wanted to paint their planes gloss black. "... To perform the painting task, a nearby RAF unit was contacted. Their choice of colors, which probably weren't part of the original bargain, varied and apparently the crews picked whatever color tickled their fancy."
One person was quoted saying, "We got all our noses sprayed on an RAF base... they being the radar kings. They sprayed lead to the underside of the radome to reduce the ground scatter out of the radar... Well everybody had different colors- some had red, brick red noses." When this person brought their plane to be painted, the painter didn't have too many dark colors. "All he had were the light ones, so they took the yellow one and away he went..." This is from the history of the P-61. So if I understand correctly, the reason they had the colorful noses was because they didn't have dark paint to paint over the OD Green and Neutral Gray. So the pilots just picked what they wanted to paint over the nose.
Just came upon this build in between all my job hunting exercises. This kit currently resides in my stash and I have extensive photos of different parts of this plane. As for the yellow nose, yes they were painted yellow along with a few other colors. The reference I have says that soon after the widows arrived in England, the crews wanted to paint their planes gloss black. "... To perform the painting task, a nearby RAF unit was contacted. Their choice of colors, which probably weren't part of the original bargain, varied and apparently the crews picked whatever color tickled their fancy."One person was quoted saying, "We got all our noses sprayed on an RAF base... they being the radar kings. They sprayed lead to the underside of the radome to reduce the ground scatter out of the radar... Well everybody had different colors- some had red, brick red noses." When this person brought their plane to be painted, the painter didn't have too many dark colors. "All he had were the light ones, so they took the yellow one and away he went..." This is from the history of the P-61. So if I understand correctly, the reason they had the colorful noses was because they didn't have dark paint to paint over the OD Green and Neutral Gray. So the pilots just picked what they wanted to paint over the nose.
Night Fighter Nut
Master Sergeant
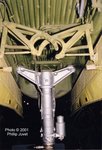
I believe the nose wheel well was the green chromate color and not the yellow of the main gears. This was because the ladder was in this area and I believe regulation required parts of the interior that are seen had to be green.
Bill
Bill
vikingBerserker
Lieutenant General
Very nice!
meatloaf109
1st Lieutenant
Nice bit of history there!Okay, you finally have my attention.
One person was quoted saying, "We got all our noses sprayed on an RAF base... they being the radar kings. They sprayed lead to the underside of the radome to reduce the ground scatter out of the radar... Well everybody had different colors- some had red, brick red noses." When this person brought their plane to be painted, the painter didn't have too many dark colors. "All he had were the light ones, so they took the yellow one and away he went..." This is from the history of the P-61. So if I understand correctly, the reason they had the colorful noses was because they didn't have dark paint to paint over the OD Green and Neutral Gray. So the pilots just picked what they wanted to paint over the nose.
- Thread starter
- #39
ozhawk40
Master Sergeant
I believe the nose wheel well was the green chromate color and not the yellow of the main gears. This was because the ladder was in this area and I believe regulation required parts of the interior that are seen had to be green.
Bill
Thanks for the extra info Bill. Do you mean the nose wheel area was the Northrop "cockpit green" or green zinc chromate primer?
Cheers
Peter
Night Fighter Nut
Master Sergeant
Users who are viewing this thread
Total: 2 (members: 0, guests: 2)