**** DONE: 1/48 P-61B Black Widow - Pacific Theatre of Operations II

Ad: This forum contains affiliate links to products on Amazon and eBay. More information in Terms and rules

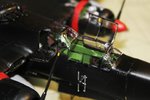
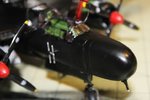
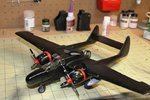
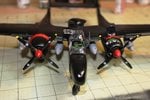
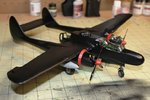
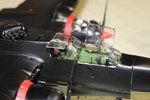
Many thanks to all for your kind comments. Meanwhile, back at the ranch, been fiddling with fussy stuff. The weighted nose cone kept falling off so I had to glue it in place, adios radar. Filled in some bad seams, applied some hidden decals, finished the cockpit canopy, and re-painted the entire plane.
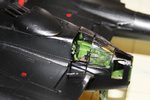
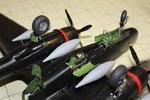
Some more work on the bottom, decals, and I done
 

Attachments

  • IMG_0875R.jpg
    IMG_0875R.jpg
    75.6 KB · Views: 90
  • IMG_0876R.jpg
    IMG_0876R.jpg
    65 KB · Views: 83
  • IMG_0877R.jpg
    IMG_0877R.jpg
    73 KB · Views: 85
  • IMG_0878R.jpg
    IMG_0878R.jpg
    66 KB · Views: 88
  • IMG_0879R.jpg
    IMG_0879R.jpg
    69 KB · Views: 94
My thanks to all, including the NFN trouble maker. :D
Directions did not call for the window to be opened. They either wanted it left off or glued closed. I thought either was silly, Sooo, since the top window opened up and out I figgured the side would do the same, 50-50 shot at it. Him going to stay that way now...
Actually, in a earlier combat, the bottom hinge had been shot completely off and was deemed unrepairable so a field repair was made hinging it at the top (little known fact about this aircraft)
 
Nice work Mike - and a good line in BS too - but I'll believe you!
Just one thing - the paint on the frames of the clear parts looks a tad 'thin' - maybe another coat, and paint the exposed edges, would improve it and, if possible, paint the internal frames.
If a canopy is going to remain closed, then a quick 'cheat' is to paint the internal frame colour on the outside first, then paint the external colour over the top of that. It looks acceptable enough through the canopy, although I'll admit I always prefer to try, whenever possible, to paint the inside of the frames themselves, especially if a canopy or hatch is modelled in the open position.
 
Terry, B.S.??, MOI! Shirley you Jest. Says so in the Book! :oops:
I can get to the bottom edge, noticed that on the pic when I look at it but as for the inside... The frame is/was molded on the outside so I had a groove to follow but the inside is smooth so nothing to follow. I'll look closely and see if I can work something out
 
Mike, you're doing fine. if you paint the windows again and accidentally get a little on the regular glass, a wooden tooth pick or wooden match works great for cleaning up the lines without scratching it. you know, I think I saw that repair in the McGyver tech manual. :)
 
Terry, B.S.??, MOI! Shirley you Jest. Says so in the Book! :oops:
I can get to the bottom edge, noticed that on the pic when I look at it but as for the inside... The frame is/was molded on the outside so I had a groove to follow but the inside is smooth so nothing to follow. I'll look closely and see if I can work something out

No problem - but don't call me Shirley ...............
 
Michael, the biggest factor, for me, was getting an airbrush and learning how to use it. REALLY skilled people can brush smooth finishes but that's not an easy skill to acquire and it is not one of mine. Other than that I can't hold a candle to the skill level of people like Wayne, Terry, Vic, etc. I stand in awe of what they can think to do and then actually do it.
Wayne many thanks finger paints and crayons in comparison
Bill going to see if I can fix the window. And I like Shirley..
 
Beautiful day outside, 82F(28C) sunny and a light breeze so not much done inside. Front canopy installed and "glued" with Future, gunner's window now opens from bottom, front receiving antennas and pitot tube installed and rear canopy "glued" with radar operator's window left open from the bottom (I hope)
ALMOST!
 

Attachments

  • IMG_0887R.jpg
    IMG_0887R.jpg
    60.7 KB · Views: 81
  • IMG_0888R.jpg
    IMG_0888R.jpg
    51.7 KB · Views: 74
  • IMG_0889R.jpg
    IMG_0889R.jpg
    70.8 KB · Views: 82

Users who are viewing this thread

Back