fubar57
General
Have a good weekend Mr. Wint. Hope it isn't one of those audience participation, everyone get nakedy kinda shows.
Geo
Geo
Follow along with the video below to see how to install our site as a web app on your home screen.
Note: This feature may not be available in some browsers.
Ad: This forum contains affiliate links to products on Amazon and eBay. More information in Terms and rules
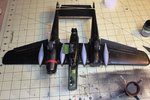
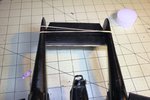
It's a bit of a heart stopper when you're trying to get the nose to stay down. I did a 1/48 resin Blackburn Beverly a few years back, I had about 2lb of brass rod up front and then it was still touch and go.
It's a bit of a heart stopper when you're trying to get the nose to stay down. I did a 1/48 resin Blackburn Beverly a few years back, I had about 2lb of brass rod up front and then it was still touch and go.
yeah Vic, make with the pics !Heck! A 1/48th scale Beverley - the flying barn - that must be a beast of a model! I'd love to see some pics of it Vic, if you still have it.
I had to use four sizable fishing weights to keep the nose of my old 1/72 scale P-61 down. Two were put into the nose and one flattered with a hammer to each engine cowling just behind engines.