brucejscott
Staff Sergeant
Nice choice Michael. Remember this kit fondly.
Follow along with the video below to see how to install our site as a web app on your home screen.
Note: This feature may not be available in some browsers.
Ad: This forum contains affiliate links to products on Amazon and eBay. More information in Terms and rules
That's looking good Michael. Don't know if 1/48th scale interests you, but Revell have re-released the Wessex helicopter, as the HAS 3, which was very similar to the Mk31 and Mk31B in RAN service. Not a bad kit, although the interior is incorrect for a ASW chopper.
thanks vic
if its okay, I am going to pinch some of the images you have posted of your build. i also have some pics of the interior of the WG HAS 31s which are helpful.
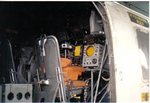
i have made a bit of a start .....have the bulkheads cut and fitted, as well as a ceiling which i might run some cabling on....might. I have no idea what wiring harness leads where, but if i can think of an easy way to do it, will attempt it.
at the risk of being thrown out of here, may I ask how you fabricated those crew seats? They really do look terrific and they do say emulation is the greatest of compliments.....at least thats my story and im sticking to it.....

![000_0290[1].jpg](/forum/data/attachments/182/182428-159c0364c9876a9f1fe8ca5ad971467f.jpg)
![000_0291[1].jpg](/forum/data/attachments/182/182429-b5407cd25cbcddd9153982a63521e69b.jpg)
![000_0294[1].jpg](/forum/data/attachments/182/182430-9877cbe5c9cadfddc958e8a5e769aeb5.jpg)
![000_0295[1].jpg](/forum/data/attachments/182/182431-9e0b3700fdec8241ea1180a075d21234.jpg)
![000_0196[1].jpg](/forum/data/attachments/182/182914-d685b472bad8ee5e1f83961e102f2d4b.jpg)
![000_0302[1].jpg](/forum/data/attachments/182/182915-dc7ef2e3de2d4aed4922d3ed193eb845.jpg)
![000_0303[1].jpg](/forum/data/attachments/182/182916-f66c0ce8c06530a9ea86d5b7aa0f60e0.jpg)
![000_0305[1].jpg](/forum/data/attachments/182/182917-9b9f6ee05dccf19907f6a19f31cdf39e.jpg)