Great work so far John!
Navigation
Install the app
How to install the app on iOS
Follow along with the video below to see how to install our site as a web app on your home screen.
Note: This feature may not be available in some browsers.
More options
You are using an out of date browser. It may not display this or other websites correctly.
You should upgrade or use an alternative browser.
You should upgrade or use an alternative browser.
**** DONE: GB-36 1/32 Bf109G-10 Erla - Axis Manufactured Aircraft of WWII
- Thread starter JKim
- Start date
Ad: This forum contains affiliate links to products on Amazon and eBay. More information in Terms and rules
More options
Who Replied?- Thread starter
- #262
JKim
Senior Master Sergeant
I jumped back onto the Erla build today. I wanted to continue with the weathering process. I picked up the model and started doing some paint chipping using a silver pencil.


I stopped when I remembered that I wanted to do some salt fading on this build. You can use salt crystals as mask to produce paint chips but also, if you use a more diluted paint mix, a way of producing random fading stains. I've had trouble modulating this effect on my past builds and produced barely noticeable effects, which seemed like a big waste of effort.
The process is quite simple. First, you brush a thin layer of water on to the surface of the model. Then you sprinkle salt onto the wet surface. The process of the salt melting and the water evaporating serves to secure the salt onto the surface of the model as the water dries.

Wait until the water is completely evaporated. Once dry, you lightly spray a diluted mix of a lighter color such as gray onto the model. The effect is hard to gauge because it's hard to see the results until you've actually wiped away the salt.

When the salt is removed from the model, the masking effects should be visible. Be very thorough in cleaning off the salt as it tends to gather in joints and recesses and will frost into a white bloom when the undetectable saline moisture dries. I use a spray bottle of water and spray the model off over a trash can and wiping dry with a clean, microfiber cloth. The result? Hmmm... interesting. I actually did the salt thing twice on my Dora build due to how subtle it was. I think I erred in the opposite direction this time.

Great. Looks like the model has a bad case of the freckles.

Since the camo coat is protected by multiple clear coats by now, you can dial back the salt fading effect by gentle polishing using Micromesh. However, this started to reveal some of the imperfections in the modeling surface and I could only correct so far using this method.

When it became apparent that I couldn't save the finish by rubbing the salt fading effect away, I had to resort to spraying the camo colors again. I wanted to preserve SOME of the salt fading effects so again, I used a very dilute mix of the camo colors and touched up the troublesome areas until they looked ok.

A close up of the corrective work on the Dark Green area on the cowling using a very dilute mix of RLM 83.

I did this over the entire surface of the model using RLM 83 and RLM 75.


What a pain but at least it wasn't a fatal mistake. I may have to seal this paint work and do the wash again in certain areas as the repainting destroyed some of that work.
I stopped when I remembered that I wanted to do some salt fading on this build. You can use salt crystals as mask to produce paint chips but also, if you use a more diluted paint mix, a way of producing random fading stains. I've had trouble modulating this effect on my past builds and produced barely noticeable effects, which seemed like a big waste of effort.
The process is quite simple. First, you brush a thin layer of water on to the surface of the model. Then you sprinkle salt onto the wet surface. The process of the salt melting and the water evaporating serves to secure the salt onto the surface of the model as the water dries.
Wait until the water is completely evaporated. Once dry, you lightly spray a diluted mix of a lighter color such as gray onto the model. The effect is hard to gauge because it's hard to see the results until you've actually wiped away the salt.
When the salt is removed from the model, the masking effects should be visible. Be very thorough in cleaning off the salt as it tends to gather in joints and recesses and will frost into a white bloom when the undetectable saline moisture dries. I use a spray bottle of water and spray the model off over a trash can and wiping dry with a clean, microfiber cloth. The result? Hmmm... interesting. I actually did the salt thing twice on my Dora build due to how subtle it was. I think I erred in the opposite direction this time.
Great. Looks like the model has a bad case of the freckles.
Since the camo coat is protected by multiple clear coats by now, you can dial back the salt fading effect by gentle polishing using Micromesh. However, this started to reveal some of the imperfections in the modeling surface and I could only correct so far using this method.
When it became apparent that I couldn't save the finish by rubbing the salt fading effect away, I had to resort to spraying the camo colors again. I wanted to preserve SOME of the salt fading effects so again, I used a very dilute mix of the camo colors and touched up the troublesome areas until they looked ok.
A close up of the corrective work on the Dark Green area on the cowling using a very dilute mix of RLM 83.
I did this over the entire surface of the model using RLM 83 and RLM 75.
What a pain but at least it wasn't a fatal mistake. I may have to seal this paint work and do the wash again in certain areas as the repainting destroyed some of that work.
Attachments
Last edited:
Crimea_River
Marshal
Next time maybe spray a diluted mixture of a similar colour to the shade underneath? RLM 83 with a drop of grey over the 83 and 75 with a touch of white over the 75? Seems to me the grey you used was too light and made the effect too stark.
mikewint
Captain
Zowie that be a LOT of work to do and then try to undo. You be a brave man
turbo
Staff Sergeant
Nice work John. Another couple of options to tone down the salt fading could have been to do a second round of salt fading with a darker colour (eg highly thinned green/brown or black/brown) or do an overall filter, perhaps green/brown, which would pull everything together.
Done good there John.....could have gone pear shaped on you....
Airframes
Benevolens Magister
Yep, good recovery, and looking the biz.
- Thread starter
- #269
JKim
Senior Master Sergeant
Thanks guys! Different ways that I could've avoid the results that I got. The color of the paint was fine but my application was too uniform and too heavy overall. I should've stuck with a single pass instead of multiple passes. This is coming off of my D-9 build where I thought that the effect was too small so I swung the pendulum too far the other way. I could've also used a slightly darker color like Andy suggested. But even the corrections, if do them carefully, will add depth to the finish so I look at it as a positive... just another layer in the presentation!
- Thread starter
- #270
JKim
Senior Master Sergeant
Corrective work has been performed on the salt fading areas. It's an easy fix using highly thinned mixes of the camo colors and I can still leave remnants of the salt fade effect to my liking. After the corrections had been made, the upper surfaces were given a gloss coat, another pastel wash was applied and then the uppers sealed with a flat coat. The effect is now MUCH more subtle, almost barely noticeable.


Some more post-shading has been done and I've been applying paint chips, silver pencil on the dark upper surfaces and pencil lead on the lighter bottoms.


As the weathering winds down, the various external bits and pieces are added to the aircraft. The resin supercharger exhaust has been previously painted and glued into place using CA glue.

The drop tank rack and Eduard metal landing gear legs have been attached. Before I put the tank on, I'll have to weather the rack a bit more to match the bottom.

The long tail gear is glued into place. The wheel is free spinning and won't be secured until I get the tires on the main gear and make sure the flat spots contact the ground correctly.

Some more post-shading has been done and I've been applying paint chips, silver pencil on the dark upper surfaces and pencil lead on the lighter bottoms.
As the weathering winds down, the various external bits and pieces are added to the aircraft. The resin supercharger exhaust has been previously painted and glued into place using CA glue.
The drop tank rack and Eduard metal landing gear legs have been attached. Before I put the tank on, I'll have to weather the rack a bit more to match the bottom.
The long tail gear is glued into place. The wheel is free spinning and won't be secured until I get the tires on the main gear and make sure the flat spots contact the ground correctly.
fubar57
General
Much better, well done
Damn nice man.....
- Thread starter
- #274
JKim
Senior Master Sergeant
Thanks guys! I do think it looks much better now that I've dialed back the salt fading freckles.
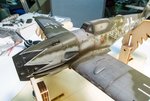
More cobbling together of the bits and pieces... the wheels are attached to the landing gear.

The G-10 can finally stand on its own legs. I made sure the wheels were splayed out and sitting on their flat spots.

The exhaust pipes are glued into place. During this stage, I've been adding more paint chipping and minor post-shading accents.

The port exhaust is installed with the exhaust deflector that I made from brass sheeting.

The landing gear covers are in place. Interestingly, the Eduard covers were fully riveted which I think would've looked odd if I had not applied rivets to the model.

A 3/4 rear view. Another tab for the aerial has been fashioned and attached to the tail fin. The previous one was knocked off during the painting process.

The drop tank is temporarily put into place. Right now, it stays put without glue but it will be permanently attached later on.


All of that painting/weathering on the cowl made a repaint of the gun barrels necessary.


More cobbling together of the bits and pieces... the wheels are attached to the landing gear.
The G-10 can finally stand on its own legs. I made sure the wheels were splayed out and sitting on their flat spots.
The exhaust pipes are glued into place. During this stage, I've been adding more paint chipping and minor post-shading accents.
The port exhaust is installed with the exhaust deflector that I made from brass sheeting.
The landing gear covers are in place. Interestingly, the Eduard covers were fully riveted which I think would've looked odd if I had not applied rivets to the model.
A 3/4 rear view. Another tab for the aerial has been fashioned and attached to the tail fin. The previous one was knocked off during the painting process.
The drop tank is temporarily put into place. Right now, it stays put without glue but it will be permanently attached later on.
All of that painting/weathering on the cowl made a repaint of the gun barrels necessary.
Crimea_River
Marshal
Brilliant John!
Just wondering about your canopy frames as they look to be RLM 66 or at least darker than the 75. Was there a coat of 83 or 75 to go on yet?
Just wondering about your canopy frames as they look to be RLM 66 or at least darker than the 75. Was there a coat of 83 or 75 to go on yet?
mikewint
Captain
Very impressive and quite a change
Airframes
Benevolens Magister
Nice !
- Thread starter
- #279
JKim
Senior Master Sergeant
Thanks for the comments guys!
The canopy frames were masked off and painted RLM 66. Although I cannot verify this for Hartmann's G-10, I have seen this practice on late G's and K's with the Erla-Haube style canopy. The kit instructions call for RLM 66 canopy frames. Anders Hjortsberg's profile of Hartmann's G-10 may or may not show RLM 66 canopy frames.

Thanks Andy!Brilliant John!
Just wondering about your canopy frames as they look to be RLM 66 or at least darker than the 75. Was there a coat of 83 or 75 to go on yet?
The canopy frames were masked off and painted RLM 66. Although I cannot verify this for Hartmann's G-10, I have seen this practice on late G's and K's with the Erla-Haube style canopy. The kit instructions call for RLM 66 canopy frames. Anders Hjortsberg's profile of Hartmann's G-10 may or may not show RLM 66 canopy frames.
turbo
Staff Sergeant
Fantastic John, the weathering looks great! 
Out of interest, did you end up using a fixative for the pigments?
Out of interest, did you end up using a fixative for the pigments?
Users who are viewing this thread
Total: 1 (members: 0, guests: 1)