**** DONE: GB-49 1/48 P-38M Lightning - WW2 Night Fighter

Ad: This forum contains affiliate links to products on Amazon and eBay. More information in Terms and rules

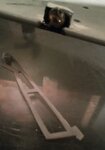
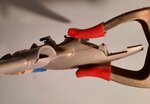
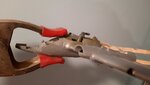
Ok found out that the pilot's seat was too far backward, should have positioned it in front of where the armored plate would have been. Moved it forward about 1/4" so the rack on the rear floor fit in correctly. Then I installed the rear radar operators interior and glued it all in place. The radar screen fits nicely behind the pilot's seat and on top of the rack, low enough in the cockpit that the canopy fits correctly.
 

Attachments

  • 20210413_202702.jpg
    20210413_202702.jpg
    249.1 KB · Views: 34
Getting ready to assemble the wing top and bottom. First I installed a bracket and landing light using an old MV lens. And don't forget to put the ladder in before gluing the wings together.
 

Attachments

  • 20210413_211023.jpg
    20210413_211023.jpg
    187.6 KB · Views: 23
Attached top wing to bottom wing last night. All fit perfectly except in front of the cockpit, not sure if it is due to the old molds being warped or if I had too much plastic inside the top of the landing gear bay that I added. But I had a gap over 1/16" on both sides where the angled sides attached. I used a plastic reinforcement inside the fuselage and super glue to secure it once clamped into place with some brute force big clamp from the garage! Hopefully once dry overnight i will be able to blend the seam in without losing too much surface detail.
 

Attachments

  • 20210413_214906.jpg
    20210413_214906.jpg
    346 KB · Views: 31
  • 20210413_214650.jpg
    20210413_214650.jpg
    393.6 KB · Views: 25
Actually that sized clamp was needed due to the large gap, needed something with enough pressure to force the parts together and hold it until the glue dried properly. Hopefully when I take the clamp off it the seam won't split. The clamp worked fine and the red rubber ends prevent it from marring the surface.
 
Seems to have come out good, and an extra piece of plastic on the inside should keep everything together permanently. Must be the age of the molds or something causing the poor fit, when test fitting the nose cone it looks like the lower nose piece is about 1/16" narrower than the nose cone. Will have to widen it that much to get a good fit. Can't wait to see how the gun doors fit!
 
If I remember correctly, those gun doors are not fun.

Exactly. That's the main reason I wanted to clamp the nose parts together to get the tightest seam possible as the angle of those parts needs to match the angle of the doors. From the looks of it I will need a lot of putty to get it to line up, I'm going to keep both doors closed for this one.
 
The fit of the nose panels isn't too bad, but will take quite a bit of putty and sanding to get smooth. I see why people complain about the fit on this kit, but I will continue working until it's nice and smooth. Not sure if I'm going to worry about replacing the rivets on the doors as they are finer and closer together than the screws on the engine panels.
20210416_202800.jpg

20210416_202739.jpg
 

Users who are viewing this thread

Back