**** DONE: GB-51 1/48 FJ-4B Fury - No Propellers

Ad: This forum contains affiliate links to products on Amazon and eBay. More information in Terms and rules

So here is the proof in the pudding based on the pdf from Catch up there.
So the kit wing is 110mm horiz.
The dwg scales 32mm from the fuselage.
The stripe scales 20mm wide on the dwg.
So to get inches... 20mm wide X 25.4 (conversion mm to Inch) = .787" X 48th scale = 37" actual width
by the dwg..
Close enough to the 3' or 36"
so doing it backwards..... 36"/48th scale=.15" X 25.4 = 19mm@1/48th scale.
Done
View attachment 644680
Hi Bill, you figured it out nicely but I wonder why was the band wider than 36" (915mm) :scratch:
When printed 1:1 the drawing should give you the exact sizes in 1:48. You are absolutely right that 3' in 1:48 are 19mm, and the band in my drawing is 19mm - I checked it.
The discrepancy probably comes from the length of the kit wing - 110mm as per your explanation. The same length in my drawing when printed 1:1 is less (107-108mm). So if you have printed bigger than 1:1 to match that size, the band became wider. Either the kit wing was made bigger or the drawing I used is not correct.
It doesn't matter actually, you did it so or so. :headbang:
Have fun! Those colours + engine gray are the ultimate killers!:wav:
Cheers!
Probably because I had to use/enlarge a pdf in Corel of all things and line up with Shadows of lines.
Never the less, we got it right at 3' thanks to your post mate!
So I've sprayed the red..... I will mask the stripe and spray yellow.
Result...............................?
GB51C-19.jpg
 
Good thing I got the sheet of all them Stars n Bars for my CA NG Mustang.
The fuselage decals for this are not as in the photo, and I F'kd up one of the wing decals.
I can replace all from the sheet!!!!! Besides the kit decals are in parts which are Not necessary!!!!
I struggle on.
BTW, still no F35B kit from China!!!!!!!!!!!!
 
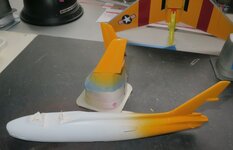
So I've done the filing sanding and finishing of all my filling.
It's primed white to keep the colors brilliant.
GB51C-23.jpg

Tomorrow, silver on the leading edge of the vertical fin.
Red on the trailing edge above the rudder hole, along with the rudder.
Then yellow on the aft section, Blue the rest along with the belly part between the wings.
Getting there!
 
It's going okay now.
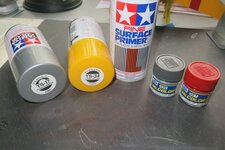
I'm using two brands of paint on this one, both acrylic lacquers.
Tamiya rattle cans and Mr color. Let's just say the airbrush is my enemy now!
I'm liking the Lacquers as they don't build up, lays niiiiice and thin.
I prime with the White for very bright colors, specially the red and yellow.
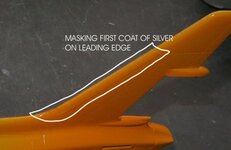
In the pic #3, I outlined the tape masking Silver on the leading edge of the vertical stab, shadow just visible.
I sprayed Silver first, then thought I could get away without the primer over the silver and laid down the yellow. Wrong, the yellow is just too transparent and looked muddy. So I did a light coat of primer to cover the silver, then yellow and Bob's yer Uncle, nice and bright.
I will now mask the yellow, a bit of primer over where the Red for the area above the rudder, and where there is yellow where the blue will go down on the rest of the fuselage.

GB51C-23b.jpgGB51C-24.jpgGB51C-25.jpg
 

Users who are viewing this thread

Back