**** DONE: PCM 1/32 Fw190A-1 Brown 1 Oblt.Walter Schneider 6/JG26

Ad: This forum contains affiliate links to products on Amazon and eBay. More information in Terms and rules

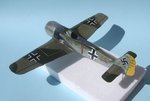
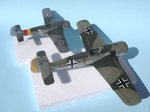
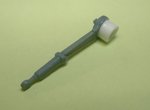
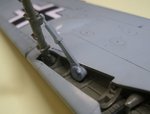
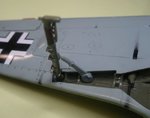
Nice stuff Wayne. I know it's probably right for the period, in RLM04, but I have seen FW tail wheel hubs in semi-gloss black, albeit later variants. Here's one recovered from wreckage in the Czech Republic, after the air battle in August 1944 over the White Carpathians.
 

Attachments

  • Czech 327.jpg
    Czech 327.jpg
    48.5 KB · Views: 98
They are just sitting on the toothpics in the undercarriage locating holes Vic, I set up the spacing before spraying the gloss and then place them before doing the last bit of spraying...

Now I wasn't going to do anything to the cooling Fan as it sits recessed out of the way and normally doesn't attract much attention, but I didnt like the square/rectangular top view profile so I set about changing the profile just a little to put my mind at rest.....
 

Attachments

  • Cooling Fan Mod 1_6047.JPG
    Cooling Fan Mod 1_6047.JPG
    12.8 KB · Views: 74
  • Cooling Fan Mod 2_6086.jpg
    Cooling Fan Mod 2_6086.jpg
    22.6 KB · Views: 70
Ok, the Under carriage legs on this one do not have your normal locating holes where the leg just fits in and bang you're done...I fitted a short piece of sprue in the bay, shaped with a 90 degree angle so one side glued flat against the upper wing section and the other flat face was facing into the U/C bay. Next I filed the same 90 deg. angle on the top of the leg at the suitable angle that allowed the leg to sit at its approximate angle against the bit of sprue previously glued in the bay, thus giving me additional surface area to secure the leg.
Next I added a bit of plastic tube to the retraction arm to extend it so it would actually attach to the bay wall, this was sanded back to the right length, once this was done the parts were ready to fit into place.....first some glue to attach the U/C leg in place, I let this set for 5 minutes so it actually stayed in place of its own accord....then I fitted the retraction arm and glued this in place, as the main leg was not fully cured i was still able to set the right angle which was dictated in part by the retraction arm.
Then today I added some strategically placed superglue to strengthen the bond and load bearing capability.
Today I did the same series of steps for the starboard leg!

In the bottom pic you can just see the Grey bit of sprue to the left of the U/C leg that I mentioned above.....do i need to draw a pic or have I explained it well enough??
 

Attachments

  • U-C retraction arm_6088.jpg
    U-C retraction arm_6088.jpg
    20.8 KB · Views: 67
  • U-C retraction arm_2_6088.jpg
    U-C retraction arm_2_6088.jpg
    30.9 KB · Views: 72
  • U-C attached_6096.jpg
    U-C attached_6096.jpg
    35.2 KB · Views: 76
Last edited:

Users who are viewing this thread

Back