Fw190A6 Sturmjager of Sturmstaffel1

Ad: This forum contains affiliate links to products on Amazon and eBay. More information in Terms and rules

Humm... Good question like our former Prime Minister said.

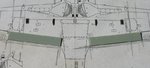
First of all, the main purpose of the thread is to show that we shouldn't be limited in our ideas to these "nice made" kits of very good quality.There are modellers who can't afford these quite expensive kits.What is more there is difference between assembling and building of a model I think.Moreover I like the kind of challange, my workmate says this is always "from no form to a shape" process and I agree with him fully.The kind of model building is a very good training of our abilities and using of different techinques.This can improve our skils.
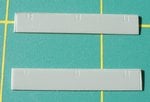
The second reason I've decided to use the kit is that I found three of them in my stash.I hate wasting plastic.:lol:

THX for all. :D

I know this was in the beginning of the thread...... and if all of you look at my profile comments Wojtek said he stopped counting in his stash at 50..... this makes me unbelievably jealous..... hmph!
 
Thank you guys...

Today not much done to the model. But I started correcting of flaps.Flaps show their inner structure when opened. I've decided to make something similar to that structure.

The first step was to make these parts that were cut off earlier, a little bit thinner and flat on inner surfaces.
I used a scalpel blade for scrapping and sandpaper for finishing.
 

Attachments

  • klapy1.jpg
    klapy1.jpg
    84.7 KB · Views: 136
  • klapy2.jpg
    klapy2.jpg
    101.1 KB · Views: 170
  • klapy9.jpg
    klapy9.jpg
    114.8 KB · Views: 124
  • klapy9a.jpg
    klapy9a.jpg
    117.6 KB · Views: 143
  • klapy9b.jpg
    klapy9b.jpg
    79.7 KB · Views: 130
Last edited:
Then I used a plastic sheet for making the inner structure.

1. I copied the scale drawings of it and print on adhesive transparent foil.Then I cut it off and sticked to the plastic sheet.Using a needle I marked points where I had to drill a few holes.
2. With my hand drill and two thin drill bits I made these.
3. Using a scalpel I cut out unwanted areas.
 

Attachments

  • klapy5.jpg
    klapy5.jpg
    109.6 KB · Views: 124
  • klapy4b.jpg
    klapy4b.jpg
    67.7 KB · Views: 123
  • klapy4a.jpg
    klapy4a.jpg
    84.6 KB · Views: 135
  • klapy4.jpg
    klapy4.jpg
    68.3 KB · Views: 143
  • klapy3.jpg
    klapy3.jpg
    69.2 KB · Views: 140
Thank you Paul.:D

Then I used files for making shapes of these holes.Then I cut down whole part and sanded in order to get the piece much thinner.Finaly I got something like the one in the last pic.
 

Attachments

  • klapy6.jpg
    klapy6.jpg
    59.6 KB · Views: 132
  • klapy7.jpg
    klapy7.jpg
    152.4 KB · Views: 158
  • klapy8.jpg
    klapy8.jpg
    70.5 KB · Views: 129
So Eduard aren't making any money off you for their brass aftermarket stuff? :D

That's true. Of course it would be easier to use these photoetched parts and other aftermarket rasin parts. But instead that I can buy some T-stoff for the money. :lol:


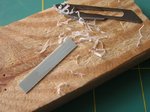
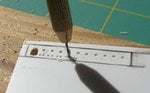
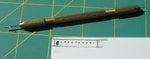
WOjtek in ur post # 528, in the third picture what is that tool, near all the shavings?


This is a scalpel cutting edge. These are offered of a few different shapes and are very useful for modelling.
 
These you can find in drug-stores I think. Ask your dad , he should know.
 

Users who are viewing this thread

Back