Galland's Bf 109E-4 1/32 scale (1 Viewer)

Ad: This forum contains affiliate links to products on Amazon and eBay. More information in Terms and rules

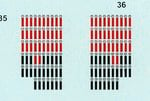
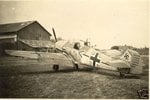
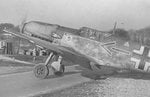
Don't add the hatches they were done later....stick with the 57 victories mottling should be as per this image, Sourced from the internet.

Your pattern currently reflects the period after the hatches were added and some repainting of the camo was done, the rudder was completely yellow and had 58 victories in slightly different position to the 57 victories on the blue background.

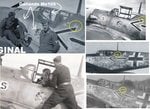
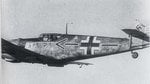
The additional in flight shot shows the heavier mottle and 57 victories. Source Model Art bf109E

Now at this point do you want to stay as is and go 58 or back to 57?
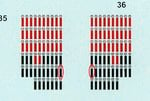
 

Attachments

  • Galland_Bf109E-4NGalland.jpg
    Galland_Bf109E-4NGalland.jpg
    58.6 KB · Views: 226
  • Galland_57 victories_a.jpg
    Galland_57 victories_a.jpg
    66.4 KB · Views: 209
Last edited:
Good stuff Wayne.
Re the flap colour - I'm not so sure the colour is solid all the way to the fuselage. Have a close look just inboard of the flap angle indicator stripes, there appears to be a line following the line of the demarcation of colours, which suggests that the darker colour (RLM71) bends down almost veretically to the flap trailing edge. It's feint, but it's there, and the lighting would explain the appearance of one colour. It's visible in all three pics.
 
Well, Andy, Terry and Wayne, thank you for your contributions. You have posed me my first real dilemma.

Wayne, I think at this stage I'd rather not have to repaint the mottling and would go for 58, provided that we're still talking an open nosed spinner. So, am I correct in interpreting what you're saying: that at 58 victories; the mottle remains pretty much as I've done it; the hatches would be added and it sports an all-yellow rudder with 58 victory bars? If yes, you can probably guess what my next question is. After your contribution to Mrf17 (Mark's) completed build, what colour(s) and sequence should the 58 victory bars be? I attach a photo of the kit decals, which if necessary can be cut and repositioned, provided I have the required numbers in the correct colours. And one final question: why the split between red and black? Was it because the kills were split between his different aircraft or is there another reason?

Terry, I cannot, for the life of me, spot that demarkation on the flap, which is not to say it isn't there. However, it is an easy fix and I will bow to the consensus of the Forum.
 

Attachments

  • Techmod Abscuss.jpg
    Techmod Abscuss.jpg
    67.1 KB · Views: 190
Frankly I don't see it either Gerry. There are what I would characterize as feint streaks across the flap from front to back but nothing that, to my admittedly unqualified eye, would suggest a camo demarcation between 02 and 71.
 
Comparing these little flashes at the top of the chevron, do they look like they are from the same plane? Or am I showing my ignorance again?? It's possible you know!
 

Attachments

  • gal planes.jpg
    gal planes.jpg
    76.1 KB · Views: 209
Firstly, Bill you are correct each of those images is of the same aircraft and it is 5819 but the 2 I posted are from early Dec and 57 victories while the others are later after modification and additional painting and has 60 victories.

Gerry you will need to make ONE change to the victory bars, one additional bar is RED as I have shown. Bar 58 is Black.

The BLACK marked victory bars are those scored in 5819.

Also the spinner back plate was changed from RLM70 to RLM04 Yellow but I'm not sure when?
 

Attachments

  • Techmod%20Abscuss.jpg
    Techmod%20Abscuss.jpg
    68 KB · Views: 162
Gerry, some NEW info, I have discovered another photo that shows the rudder completely in Yellow with the 57 victories repositioned and in the style above (41 still needs to be Red)
The photo also shows the light coloured patch where the new fuselage hatches are positioned, so the new painting, hatches and redone rudder and markings must have been done after the 30th Nov (57th Victory) and before the 5th Dec (58th Victory).
Hope this helps!
 
Gerry, looking again at this pic, I think the spinner back plate is yellow too, which makes sense if the rudder was repainted yellow....?

The Pic in question...Source : ebay
 

Attachments

  • Galland_Bf109E-7_5819_57 Vics.jpg
    Galland_Bf109E-7_5819_57 Vics.jpg
    19.8 KB · Views: 196
Wayne, roger your last two posts and I really appreciate the attention you're paying this. The good news is that 57 kills makes life a little easier. The bad news, a yellow backplate was not what I was hoping to hear, as my spinner is assembled. It's not impossible to fix but would be easier to handpaint because of the masking required. How certain are you on a scale of 1-10? Incidentally, that last photo seem to confirm Terry's theory of the colour split on the flap, definitely a possibility from this photo
 
I'm 95% certain about that flap colour. It actually matches the earlier camouflage pattern, before the splinter was simplified and the entire port flap painted one colour. In the previous pics (close ups) the tonal difference on the inboard section of flap matches what would be expected, given the light angles, for the RLM02 on the wing, and there's a definite division line, albeit feint in the pics.
Now that I've seen Wayne's final pic, I'm even more certain.
 
Coming along nicely Gerry. It's great seeing how other member's jump in with so much knowledege and help.
 
I'd certainly endorse Woody's post - at least the second half of it.

I'm now convinced about the colour split on the port flap and will alter that to the 02/71 split (I had already changed to an all 71 flap). I could be clutching to straws here, but I'm still hoping to use the RLM 70 spinner backplate, on the basis that it may not have been re-painted until the capped spinner was added? I certainly won't do anything to it just yet, in case any further evidence emerges either way. It won't hold me up on the other elements I need to finish.
 
Well, Gerry, seeing as how you are going all out to make this as exact as possible, here's another couple of things I spotted. Take a look at the shape of the 71 splinter on the port tailplane in the photo vs. your model. Also, if you look at the Balkenkreuz on the port main wing, it appears to have the 71/02 demarcation occuring somewhere under the cross whereas on your model, once you add the cross, you'll get a bit of 02 splinter showing on the inboard side.

Never knew that being this anal could be fun!
 
Well, didn't have any Bushmills to hand, but lots of wine. Managed to get some work done over the last couple of days. There were a couple of backward steps, i.e. losing the port flap when carelessly removing masking tape, ditto the aileron trim tabs, which have still to be replaced. Here are the results.

Pictures 12. This is the aircraft as it stands at the moment. I've made the corrections to the splinter pattern on the port wing and tailplane that Andy and Terry spotted, in the last series of posts.

I was annoyed about these changes, not because they were pointed out by Andy and Terry (I appreciated that) but because I had been looking at the same reference photos and completely missed them. I need to pay more attention. My wife claims I am the least observant person she's ever met. I'm inclined to believe her.

You will also see that I have added the two hatches for the nitrous oxide and the front and rear cockpit glazing has been added, with the telescope having to be pre-positioned, before I could add the front section.

Both the engine and saddle cowls are independently removable and the rudder, with the trim tab added, is now yellow but hasn't yet been attached.

The rest of the photos are some close-ups to show detail.

Picture 3. The nitrous oxide hatches, made from thin plastic sheet and cut and sanded to shape. These then got a rather hard edged spray of RLM 65, as a patch, which seems to corrospond to the photos I've seen of the actual aircraft. You can also see the telescope and supports, which tried to replicate a drawing I found on the internet.

Pictures 45. Front and rear views of the telescope and canopy elements. I drilled the hole for it as carefully as I could. The perspex still needs a final polish. In picture 5, you'll see I've added grab handles made from painted fuse wire. I had to compromise on the telescope mount, because the thickness of the kit perspex leaves much less room within the canopy than if it were cast to correct scale.

The front section of the canopy was positioned with spots of superglue. Unfortunately, it's very slightly off-square - something I only noticed when I was adding the saddle cowl for the photos. It doesn't match up as well as it did in the test fits. I need to check if it can be removed and repositioned without causing any major damage or problems with the telescope or Revi sight. If I think it can be done, I'll do it, otherwise I may have to leave it as is.

Picture 6. The head armour has been added to the canopy. As this is to be positioned open, It's one of the final items to be attached to the model.

I've noticed a couple of areas of overspray that need to be addressed, and some further retouches/refinements are needed. When these are done I hope to mask the canopy/cockpit and give it a couple of coats of Klear, ready for decaling and enhancing the panel lines. Then, hopefully on to weathering and final assembly.

Don't hold your breath.
 

Attachments

  • Camouflage corrections.jpg
    Camouflage corrections.jpg
    58.9 KB · Views: 185
  • Cockpit telescope.jpg
    Cockpit telescope.jpg
    54.1 KB · Views: 176
  • Nitrous Hatches.jpg
    Nitrous Hatches.jpg
    71.4 KB · Views: 192
  • Yellow rudder.jpg
    Yellow rudder.jpg
    58.6 KB · Views: 193
  • Cockpit telescope front.jpg
    Cockpit telescope front.jpg
    56.2 KB · Views: 174
  • Head armour.jpg
    Head armour.jpg
    38.2 KB · Views: 177

Users who are viewing this thread

Back