Galland's Bf 109E-4 1/32 scale (1 Viewer)

Ad: This forum contains affiliate links to products on Amazon and eBay. More information in Terms and rules
Thanks for the thumbs up Guys:lol:.

Andy, congratulations on being appointed a judge in the coming Group Build and Rochie (Karl, I believe), well done on your class win in the BoB Group Build. A very handsome aircraft, well presented.

I've managed to correct the misalignment of my front canopy, without damaging it and after a bit of touching-up, got two coats of Klear sprayed yesterday. I hope to start applying decals later today. Will post some more photos when some visible progress is made.
 
Firstly, Najco - Not only did I find your thread useful, but indispensable during the course of this build. I have been referring to it all through to check points of detail on the aircraft and only today, went back through it again to check something I have a question about at the end of this post. From you and your contributors, it's a great source of info for anyone modelling Galland's 109s.

Terry, Wayne, Andy, Woody and Javlin, thanks as ever for your interest and support.

I've been adding decals for the last couple of evenings, and while not yet finished have managed to get the main decals on, along with a start on the stencils. Thought I'd bring you up to date with the progress I've made.

I'm using Techmod decals and while I think they're of a really high quality, the base is so thin and delicate that they need to be handled really carefully to avoid cracking and breaking and are really designed for the very experienced builder. So it goes without saying that I found them a real challenge. But with a sharp scissors, a new scalpel blade and lots of kitchen towels to soak up excess moisture, I set about it. I tried to rely on photos of the aircraft, as much as possible, for their actual positioning rather than rely the plan that came with the decal sheet.

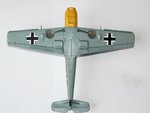
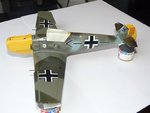
Picture 1. The underside. Very little to do here. The underwing crosses went on easily enough but I tried to mould them into the panel lines too soon and damaged the port one which will need to be touched-up.

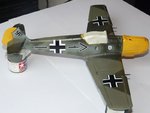
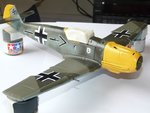
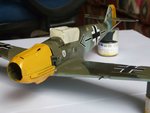
Pictures 2,3,4 5. General views of the port and starboard sides showing the extent of where I am to date. The cockpit will remained masked until I spray a couple more coats of Klear to protect the decals, before weathering commences.

This is when I hit my first problems with the decals. I thought any problems I would have would be with the smaller stencils - in fact it was with the larger pieces I had trouble, all of which I put down to my lack of experience with non-kit decals.

The port wing and fuselage crosses both cracked and split and not in a straight line, either. The reason for this was that when I soaked them (separately) in water, the backing paper curled and when I straightened them, that small amount of pressure caused them both to split and separate. In both cases I had to ease them on, in two sections, with plenty of water to lubricate them and 'float' them into position with a soft brush. A toothpick is too hard and after only a few seconds will tear the very thin decal rather than move it. Fortunately I was able to tease them together and any visible cracks will be retouched and hopefully will disappear under a few coats of gloss varnish (and the all concealing 'weathering').

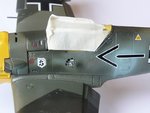
I had the same problem with the bar between the starboard fuselage cross and Chevron ( I don't know the technical name for it) but again managed to float it together before it disintegrated. With these decals you have to be very gentle and precise - they won't travel any distance before breaking. I use Humbrol Decal Set and Revell Decal Soft to bed them in but really haven't needed the Decal Set, at all. There is still some residue from these that needs to be cleaned off the wings.

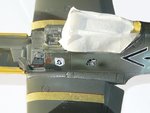
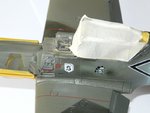
Picture 6. I noticed from the reference shots that the oil filler cap didn't have the triangular stencil that came on the decal sheet. I fashioned the circular stencil out of some very old decal scraps I kept from about 16 years ago. Ditto the red lettering. They still work - after a fashion!

Pictures 7 8. This was another nightmare - the wing walkway lines. I firstly tried to position the port wing line, by sight. This broke into four pieces as I tried to move it into position, and then just disintegrated completely and had to be scrapped. So, plan B. Fortunately Techmod supply a spare set of stencils so I positioned a strip of masking tape as a guide and tried again. Same result, complete disintegration. The backing film is just not strong enough over the length of the line, to allow any movement.

I didn't want to risk it again with the spare set, so back to the old decal stash. Fortunately, I built a 1/72 scale Lanc recently and got some Sky Model Decals to supplement those that came with the kit. On that sheet there were still 8 unused red lines, each about 15mm in length and the same width as the 109 walkway lines. I worked out, again by pure luck, that 4 of these, butted end to end, would give me the length I needed for each wing. They worked like a dream. They held their shape and moved easily into position and were much more comfortable to use than the Techmod lines and came together without any visible joins. My only concern was that they might adhere to the masking tape, when dry, and would pull away when the tape was removed, but as you can see in picture 8, I needn't have worried.

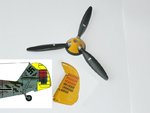
Picture 9. Got the decals on the prop blades and one side of the rudder completed. On the rudder, as per Wayne's post, I changed Bar 41 from black to red, again, with a piece of scrap decal. As you can see from the inset, Techmod, for some reason, have the bottom row of bars coming from right to left. From all the the reference photos I've seen, this is incorrect, as the gap should be to the right of the final row, so I had to cut and correct these as well. Even with a scalpel, not a lot of room to slice without damage.

That's as far as I've got to date. Still a lot of small warning stencils to be applied, then panelling and weathering. I have a question on the stenciling, if anyone can help. Techmod supplied schemes for 4/5 different 109s on this sheet. In each case they list which stencils go on each aircraft. In the case of Galland's 109 they don't list the (Zu-) markings, that go over the cowling locks, for inclusion but they do on all the other aircraft schemes. Is this because they were painted over on Galland's yellow cowling or is it just a mistake? If anyone wishes to hazard an opinion I would be grateful. I won't apply them for the moment, as they will be easier to add than to remove.

Back to finishing the decaling, tomorrow. Thanks, everyone.
 

Attachments

  • Decals Walkway masked.jpg
    Decals Walkway masked.jpg
    82.6 KB · Views: 215
  • Decals Walkway.jpg
    Decals Walkway.jpg
    68.2 KB · Views: 211
  • Decals underside.jpg
    Decals underside.jpg
    46.3 KB · Views: 205
  • Decals starboard.jpg
    Decals starboard.jpg
    60.5 KB · Views: 209
  • Decal Oil filler.jpg
    Decal Oil filler.jpg
    71.9 KB · Views: 211
  • 4.jpg
    4.jpg
    72.2 KB · Views: 207
  • Decals portside.jpg
    Decals portside.jpg
    59.6 KB · Views: 204
  • 4.jpg
    4.jpg
    65.3 KB · Views: 201
  • Decals Prop  Rudder.jpg
    Decals Prop Rudder.jpg
    56.1 KB · Views: 213
Gerry, the work you've done here looks exceptional, sir! Sorry I can't answer your question on the stencilling. All I can suggest is a thorough scour of Chris' (Njaco) thread again to see if there are any clues in the pics and, if not, to apply equal parts of common sense and artistic license to determine which stencils may have been overpainted and not replaced.

Looking forward to the finish which appears to be pretty close. Have you thought of entering something in the Me/FW Group Build?
 
Great work Gerry been a joy watching this build and educational.
 
Thanks Bill, Woody and Wayne.

Andy, went through Njaco's thread again but found it inconclusive. The photos just aren't clear enough to see either way. May add the (Zu-) stencil to locks on the saddle cowl , which is still in camouflage but not to the yellow cowl. Easy enough to add them later if necessary, unless I don't hear differently in the meantime.

I have been checking out the new group build. Can't seem to locate the details about start/closing dates, build criteria etc. I need to take a break after this current build is completed, as I have been long fingering a number of non-related projects and chores which now need attention. Also, with the arrival of (hopefully) Summer, my wife tells me I need to get out more! We will be away for a couple of weeks in late May and also have some trips planned later in the Summer, so it all depends on timing. I haven't ruled it out but haven't a clue what my entry might be. Not another 109E though, so soon after the one I'm still finishing.
 
A well considered decision on the Zu stencils Gerry. Personally, I would leave them off the yellow painted areas as I would think that "black men" would not have bothered re-apply them. If they didn't know how to open a fastener then they shouldn't have been there!

The current Messerschmitts and Focke-Wulfs GB just started and runs to August 30. A listing of all future builds can be found here: http://www.ww2aircraft.net/forum/group-builds/next-generation-group-builds-listing-23020.html and the GB rules are here: http://www.ww2aircraft.net/forum/group-builds/group-build-rules-17844.html But do get out and enjoy the sun. I tend to slow down myslef in the summer. Wouldn't want you to get rickets or something!
 

Users who are viewing this thread

Back