GB-49 1/48 P-51D - Favourite A/C of WWII (1 Viewer)

Ad: This forum contains affiliate links to products on Amazon and eBay. More information in Terms and rules

Bite me. I love it!

Yeah, Andy,
Don has been hearing that from me for decades now. I just could not pass that one up.

Ok, my plan is to get the wing together and deal with the puttying before I get too far into the rest of the kit. I think this approach will make thing far easier on me.

I was looking at the sprues closed today. I found a few ejector pins that I need to think through.
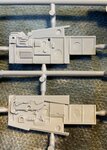
Pic 1. There is an ejector pin on the top of the rear deck where the radio goes. That one will have to be dealt with and should be no serious issue.
Pic 2. There are two ejector pins on each cockpit sidewall. After looking at the instructions, I think there is one (maybe two) ejector pins that will need to be dealt with.
Pic 3. Single ejector pins in each rear wheel well. I think I will not need to deal with these.


1) Radio platform: Radio Platform Ejector Pin.jpg

2) Cockpit: Cockpit Sidewall Ejector Pins.jpg

3) Rear Wheel Well: Tailwheel Ejector Pins.jpg

Thanks for stopping by.
 
Ok, wing assembly is in progress. I did the wheel well in NMF and the spare in ZC Green. First picture is the "box installed and clamped in the lower wing.

Lower wing and wheel well box.jpg

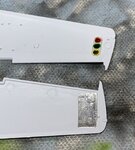
Now for the formation lights in wingtip. I got the clear piece installed into the wing with very carefully application of Tamiya thin. I then pulled out the appropriate Tamiya clear tints. I settled a "stout" drop onto each lens carefully as the clear piece is cast as one piece. I then applied a strip of thin, self adhesive metal tape to the opposite wing area. I find doing this really helps the lenses "pop".
Formation lites painted.jpg

The next picture is of just the lower wing held up to some light. I do love how the thin colors look versus the old days of painting with regular enamels.
Lites illumintated from behind.jpg

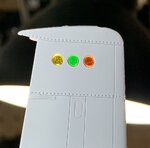
I then joined the upper wing to the lower wing. The following picture is a difficult attempt at showing how effective that metal tape can be with the clear colors.
FInal assembled formation lites.jpg

Other than the yet-to-be-determined-if-they-are-a-problem-ejector-pins, this is a nice kit. Yeah, not a ton of assembly, but it is meeting my expectations from the P-40 build.

Thanks for stopping by.
 
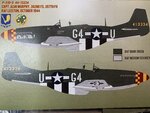
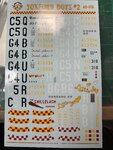
Ok, all, my decals came in today. Thought I post a few pics.
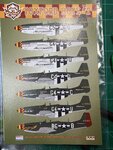
First one is the "cover" sheet of the set. Quite a few birds here and that is always nice.
Decals 1.jpg

Next is the bird I will be doing.
Decals 2.jpg

Last are the actual decals. Under the magnifying light they sure look good.
Decals 3.jpg

Thanks for stopping by.
 
Regarding the #3 "sink hole" I honestly wouldn't think twice about it. Why? That part of the tail wheel door(s) is so far up inside of the rear fuselage, you'd need both a pin light and magnifying glass to see it when tucked way up inside the tail of the fuselage.
The decals are outstanding (I have all four 357th sheets) but be aware they're VERY thin. That's a good thing because there will literally be no carrier film showing when applied but just be very careful with them as since they're so thin, they need to be handled with upmost care when applying.
Good stuff so far!

Thanks for the heads up, jgreiner! I will put on my kids gloves when dealing starts. And I agree 100% with the sink hole on the tail wheel well. I am not going to worry about those at all.

Now, found a less than pleasant issue with the gun ports. The fit on one port was reasonable. The other is a real pain in arse. The right hand side is way off with a significant step down from the wing to the port on the lower wing and significant step up from the wing to the port on the upper side. I am starting the whole fill / sand thing now. I am using sprue goo as I can apply it in layers with the brush included in the Tamiya bottle. Plus, I prefer the closer match in consistency between sprue goo and the kit plastic versus CA and kit plastic. The big challenge will be to minimize sanding damage to the gun barrel fairings. Grrrrrr.

Gunport fit 1.jpgGunport fit 2.jpg

Thanks for stopping by.
 
Last edited:
Thanks for the heads up, jgreiner! I will put on my kids gloves when dealing starts. And I agree 100% with the sink hole on the tail wheel well. I am not going to worry about those at all.

Now, found a less than pleasant issue with the gun ports. The fit on one port was reasonable. The other is a real pain in arse. The right hand side is way off with a significant step down from the wing to the port on the lower wing and significant step up from the wing to the port on the upper side. I am starting the whole fill / sand thing now. I am using sprue goo as I can apply it in layers with the brush included in the Tamiya bottle. Plus, I prefer the closer match in consistency between sprue goo and the kit plastic versus CA and kit plastic. The big challenge will be to minimize sanding damage to the gun barrel fairings. Grrrrrr.

View attachment 614969View attachment 614970

Thanks for stopping by.
Eeek! Fortunately, I haven't had nearly as much of a step on any of the gun ports with the ones I've built so far. Just a suggestion for the next one(s) you build would be to *maybe* try to insert a spreader (a length of sprue or small sprue rod) on the inside portion to widen it even just a tad to lessen the step. For what it's worth, I'd probably attack it the same way you are.......lol
One of the few gripes I have with the Airfix kit are the pretty drastically undersized 108 gal. paper tanks. Here are some pics of one I recently finished. Sweet Helen II is the Airfix kit and Shoo Shoo Baby is the Tamiya kit. You can kinda get the idea of how much smaller the tanks are in the second pic. It's not really noticeable when it's sitting by itself but when you have what I assume to be the correct sized tanks on the Tamiya kit sitting right next to it........yeah, it's noticeable!
Looking forward to seeing more!

SH Side.jpg


SH ShooShoo.jpg
 
Hey, Wayne,
Yeah, I am dealing with it. Nice and slow and thinking it out. Trying to be very careful not to get the sanding off the barrel fairings.
 

Users who are viewing this thread

Back