T Bolt
Colonel
You've done some really nice work there 
Follow along with the video below to see how to install our site as a web app on your home screen.
Note: This feature may not be available in some browsers.
Ad: This forum contains affiliate links to products on Amazon and eBay. More information in Terms and rules


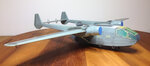
The names and numbers of colours are for Humbrol or Revell or Model Master enamels. The RLM codes should be RLM 74/75/76. The mottling on the fuselage sides - RLM75.
As far as the decals are concerned... I would suggest exposuring to sunlight on a very sunny day. If not it may be an UV lamp. Then I strongly recommend coating the entire decal sheet with a gloss clear varnish. It can be the Humbrol non yellowish gloss clear coat offered in glass bottles.
View attachment 621309


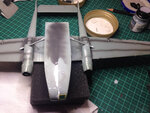
Thanks for taking the time to write such a detailed reply. Really appreciate it! I'm using Model Masters paints, thinned with Tamiya X-20A thinner, roughly 60:40 paint:thinner. Thanks for the note about de-tacking the tape... I was a bit surprised at how much it clung on! Interestingly I lost no RLM65 when I took the tape off.That really sucks, and after such a nice job on the mottles. I'm not sure if you mentioned before which acrylics you are using but some are more forgiving than others. Acrylics, in general, have the least ability to bond with plastic, the other two being enamels (second best) and lacquers (best). In your case, yes a primer might have helped but that's for next time.
Short of stripping everything and starting over, there's not a lot you can do that will give you the finish that you may want. I expect that if you try sanding the edges of the torn paint to make a smooth edge, the paint will just continue to tear. Waiting a few days might help but, either way, the goal is to try to make the rough edge of the torn paint disappear and sanding is the only way to do that. If you succeed, apply your Mr. Surfacer onto the exposed plastic and allow a bit to run up into the good paint. Just do one or two light coats and allow it to cure thoroughly. Then re-mask and paint over the patches with your acrylic.
It's also recommended that you de-tack the masking tape as much as possible. I stick it to to the palm of my hands a few times before applying it to the model. LIGHTLY burnish the edge with the rounded end of a paint brush and press the rest down very lightly with your fingers. After painting, peel back the tape slowly TOWARD the masked edge.
Sorry that I can't offer up more options. Good luck!