Nice work so far!
Navigation
Install the app
How to install the app on iOS
Follow along with the video below to see how to install our site as a web app on your home screen.
Note: This feature may not be available in some browsers.
More options
You are using an out of date browser. It may not display this or other websites correctly.
You should upgrade or use an alternative browser.
You should upgrade or use an alternative browser.
Hawker Typhoon IB "Nicky" 439 Squadron RCAF 1/48
- Thread starter Totalize
- Start date
Ad: This forum contains affiliate links to products on Amazon and eBay. More information in Terms and rules
More options
Who Replied?- Thread starter
- #242
Totalize
Tech Sergeant
Hey thanks Guys.
Terry, I will repaint the tail cone and fins in like a faded matt black. The green looks pretty close to RAF dark green. Do you think it would be acceptable?
Terry, I will repaint the tail cone and fins in like a faded matt black. The green looks pretty close to RAF dark green. Do you think it would be acceptable?
Airframes
Benevolens Magister
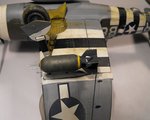
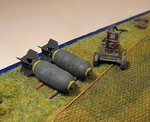
Yes, the RAF Dark Green should be fine. Normally, I add just a tiny touch of black, in order to make it very slightly darker, providing contrast against the camouflage colour on the aircraft itself. I also normally add a bit of 'weathering', in the way of scratches, dust or dirt marks, where the bombs have been dirtied in storage on the ground, and rolled around. Just a hint of this gives more authenticity, as in the P-47 items below.
Attachments
Donivanp
Lieutenant Colonel
Love this plane, always have. When I get going on mine this thred shall be a requirment. NICE WORK
fubar57
General
Some great info and some fine modelin'.
Geo
Geo
Some great info and some fine modelin'. Geo
can only agree with that!
- Thread starter
- #248
Totalize
Tech Sergeant
Yes, the RAF Dark Green should be fine. Normally, I add just a tiny touch of black, in order to make it very slightly darker, providing contrast against the camouflage colour on the aircraft itself. I also normally add a bit of 'weathering', in the way of scratches, dust or dirt marks, where the bombs have been dirtied in storage on the ground, and rolled around. Just a hint of this gives more authenticity, as in the P-47 items below.
Terry,
Thanks for the tips and suggestions for painting the bombs. The bombs you dd for your P47 are very nice indeed.
- Thread starter
- #249
Totalize
Tech Sergeant
Love this plane, always have. When I get going on mine this thred shall be a requirment. NICE WORK
Donivamp,
Thanks for stopping in and having a look at the build. The various contributors to this thread I think have made it a good reference source.
- Thread starter
- #250
Totalize
Tech Sergeant
Geo, Wayne, Wojtek,
Thanks for the comments. They are certainly most appreciated from you guys.
Thanks for the comments. They are certainly most appreciated from you guys.
- Thread starter
- #251
Totalize
Tech Sergeant
Hi Guys,
I have been working on my Tiffie over the weekend and now getting much closer to "gettin er done"
I didn't have time to take some good pics but did manage to snap one this morning with my Iphone before leaving for work. As you can see I got the bombs done up but they still need some weathering. I will post some better pics soon and description of my work.
The main reason for this post is to ask Terry if he or anyone has some close up pics of the whip antenna on the topside fuselage that I could work from as I still have to add this antenna. Also, what is the standard length of the antenna?
Cheers,
Dave.
Airframes
Benevolens Magister
I think I might have a pic of the whip antenna somewhere, and can measure the length from my scale drawings. It really was very simple in appearance though, and I normally just use a piece of stretched sprue, inserted and glued into a hole drilled in the fuselage. I'll sort something out in the next day or so.
The model is looking good - perhaps a little clean and 'factory fresh' at the moment, with the panel lines being a little prominent, giving a slight 'card model' appearance, but if you're going to do some subtle weathering, it should tone-down nicely.
The model is looking good - perhaps a little clean and 'factory fresh' at the moment, with the panel lines being a little prominent, giving a slight 'card model' appearance, but if you're going to do some subtle weathering, it should tone-down nicely.
- Thread starter
- #253
Totalize
Tech Sergeant
Thanks Terry. I was going to just drill a hole and drop a piece of sprue or brass rod in it but wasn't sure if it has something akin to a collar at its base.
Airframes
Benevolens Magister
On both Typhoon and Tempest, I've seen the whip just protruding from the fuselage, although there would be some form of grommet around the hole, and I've also seen a small collar of sorts which, like the grommet, was probably rubber.
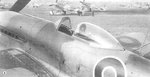
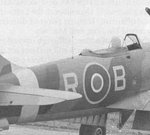
Pics show both types, on a Typhoon and a Tempest. Antenna length appears to be around 2 feet.
Pics show both types, on a Typhoon and a Tempest. Antenna length appears to be around 2 feet.
Attachments
- Thread starter
- #255
Totalize
Tech Sergeant
Terry,
I have the reference picture on the left of the ones you posted. Not great. The Tempest one on the right looks interesting though. Thanks very much for posting this one. I see what you mean by a grommet or collar. Of all the models I have seen on the net that have the whip antenna it looks like a fine piece of sprue has been glued to the fuselage top i.e. no grommet or collar. I have to think about this one as I am not sure how I could do the grommet without damaging the paint scheme unless I just drill a small hole and add the piece of sprue. Certainly any suggestions by the group would be most welcome.
I have the reference picture on the left of the ones you posted. Not great. The Tempest one on the right looks interesting though. Thanks very much for posting this one. I see what you mean by a grommet or collar. Of all the models I have seen on the net that have the whip antenna it looks like a fine piece of sprue has been glued to the fuselage top i.e. no grommet or collar. I have to think about this one as I am not sure how I could do the grommet without damaging the paint scheme unless I just drill a small hole and add the piece of sprue. Certainly any suggestions by the group would be most welcome.
Airframes
Benevolens Magister
It's Tempest at left, Typhoon at right.
As you can see, particularly in the enlarged shot of the Typhoon posted by Wojtek, the flexible attachment is very small, and in this scale you'd get away without any grommet or collar.
It's normally best to drill any holes before construction begins, to avoid possible surface damage, but not a major problem in this instance.
Remove the 'tack' from some low-tack masking tape, place a small piece over the area to be drilled, and mark the center of the required hole with a small 'X'.
Drill through the tape, and remove this once done. This will prevent any damage, particularly if the drill bit slips.
Apply a small 'blob' of cement (preferably liquid cement) to the end of the stretched sprue antenna, and insert into the hole at the correct angle - slightly raked back and to starboard, and note the mounting is offset to starboard. The 'antenna' itself can be made longer, for ease of handling, and once set, it can then be trimmed using either nail clippers or small, sharp, scissors.
Once the antenna has set, use a sharpened cocktail stick, or a pin, and apply a tiny spot of PVA adhesive to the base of the antenna, which should collect around the base of the stem and form the grommet/collar.
Once dry (it'll dry clear), and using black or dark grey paint, touch the tip of a fine lining brush to it.
Job done !
Oh, and do this after any weathering or other work!
Always add delicate, 'sticky out things' last !!
Donivanp
Lieutenant Colonel
Looks real nice, real nice
- Thread starter
- #260
Totalize
Tech Sergeant
Here you are an enlarged area of the first pic posted by Terry. I hope it can help.
View attachment 261595
Wojtek,
Thanks for the closeup. Much clearer indeed.
Users who are viewing this thread
Total: 1 (members: 0, guests: 1)