Italian Thunderjet - Hobby Boss F-84G in 1:32 scale (1 Viewer)

Ad: This forum contains affiliate links to products on Amazon and eBay. More information in Terms and rules
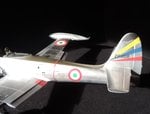
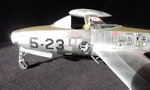
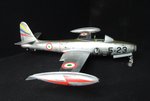
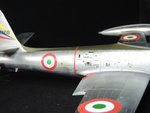
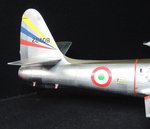
That's a wonderful build! It's interesting to me (since I've done no natural metal finishes... yet) how you get the different shading by simply underlaying black or white. We those nose weights included in the kit?
 
That's a wonderful build! It's interesting to me (since I've done no natural metal finishes... yet) how you get the different shading by simply underlaying black or white. We those nose weights included in the kit?
Hi,
yes I confirm that different shades are obtained just using white or black undercoat. This works perfectly with Kcolors products made here in Italy, I don't know if you can get same results with other brands. Here is the link for Kcolors
vernice cromo modellismo kcolors Kcolors.com
Website is in Italian, but you can contact them in English.
Ballast was included in the kit as castings.
I hope the above will be of some interest for you.
Alberto
 
Hi everybody.
I finally found time and quiet to start working again on this project and, as it is time for decals, I'm a bit in troubles because I need some la te sixty USAF stencils, any suggestion where to find them?
Many thanks
Alberto
 
I might have some spares. What do you need?
Thanks for answering.
I mostly need some "NO STEP" and rectangular outlines, red colour, like the one that can be seen in the picture.
Thanks again
Alberto
 

Attachments

  • riquadro.jpg
    riquadro.jpg
    17 KB · Views: 54
Alberto, I took a look and all I have in 1/32 are these from an ancient Monogram Mustang. Not sure if they are a help but they are yours if you want them, though they may disintegrate. The rectangles can be made by cutting strips of red decals and creating the shape you want. It's not likely you will find something exactly the right size unless you get a copy of the original sheet for the kit.

IMG_0982.JPG
 
Last edited:
I agree with Andy. Red decal strip will do the job for the rectangles. I just received some from Hannant's for a similar need (pics attached - if the 'system' is working. Can't see Andy's pic).
The 'No Step' decals can be made on the computer, in 'Word', using suitable font, and then printed on to clear decal sheet, which should be available from a computer paper supplier, either per sheet, or in packs, and is the same stuff sold by such companies as Testors, although a lot cheaper.
The printed decals might not be as 'sharp' or as dense as commercially produced decals, but for such things as stencils, they are normally good enough. Once printed, leave them for at least 15 minutes, in order for the ink to dry, and then spray them with a good quality artist's acrylic gloss varnish to seal them, leaving this around two hours or more before using the decals in the normal way.
When producing the decals on the computer, you don't need to keep typing the same word(s). Instead, use 'step and repeat', by typing the word(s) for one decal, 'highlight' this with a 'left click', then press 'CTRL - C'.
Then place the cursor at the end of the highlighted word(s), and press 'CTRL - V'.
This will repeat the already typed word, and continuing this process will repeat as many times as required.
Sizing can be adjusted by either the font size, or outlining the word() and using the mouse, diagonally, to expand or shrink the image.
I've attached a pic of some 1/48th scale Spitfire stencils I made using the above method.


Buys 472.jpg
Buys 473.jpg
Bob Cross build 176.jpg
 
Many thanks to all for your suggestion.
In the mean time, thanks to an Italian FB group dedicated to Italian Thunderjets I learned that decals supplied with the kit can be used also for Italian birds, so I went on, here following some pictures.
Thanks for your kind attention.
 

Attachments

  • DSCN2199.JPG
    DSCN2199.JPG
    335.7 KB · Views: 79
  • DSCN2201.JPG
    DSCN2201.JPG
    616.7 KB · Views: 76
  • DSCN2202.JPG
    DSCN2202.JPG
    528.3 KB · Views: 62
  • DSCN2204.JPG
    DSCN2204.JPG
    579.8 KB · Views: 62
  • DSCN2205.JPG
    DSCN2205.JPG
    611.3 KB · Views: 73
Hi everybody, I need some help again, if possible.
I've done some researches and I found the the only external weaponry carried by Italian Thunderjets were four HVAR rockets carried under the inner pylon of each wing, similar to those that can be seen in the enclosed pictures.
So I will appreciate if someone could help me understanding how those rockets were attached to the pylon.
Many thanks
Alberto
 

Attachments

  • 31st_FEW_Republic_F-84G-1-RE_Thunderjet_51-821.jpg
    31st_FEW_Republic_F-84G-1-RE_Thunderjet_51-821.jpg
    217.8 KB · Views: 60
  • FS-160.jpg
    FS-160.jpg
    295.6 KB · Views: 133
  • FS-887.jpg
    FS-887.jpg
    207.9 KB · Views: 77

Users who are viewing this thread

Back