I started on this kit now that I am in the trailing ends of the Graf Spee.The rigging there sometimes has to be done 3-4 times to get it right for me so something to relieve the stress and anxiety.So,out comes the Willow it's a beautiful frame and color(floatplane).I intend for the most part to be OOB but I am adding a trim wheel and cable lines here and there probably all fictional for few pictures exist about the web.The alerions,rudder and tailplanes will all be removed to represent the placement of the sticks and rudders in the pit.This is to be a relaxing and fun build and after this one the Me-280 will be next always wanted to do that one.Cheers
Navigation
Install the app
How to install the app on iOS
Follow along with the video below to see how to install our site as a web app on your home screen.
Note: This feature may not be available in some browsers.
More options
You are using an out of date browser. It may not display this or other websites correctly.
You should upgrade or use an alternative browser.
You should upgrade or use an alternative browser.
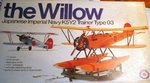
Japanese Willow Type 93 1/32
- Thread starter javlin
- Start date
Ad: This forum contains affiliate links to products on Amazon and eBay. More information in Terms and rules
More options
Who Replied?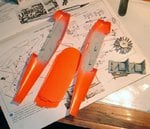
Airframes
Benevolens Magister
Nice one Kevin - and you shouldn't have any trouble with lost parts, they're so bright!!
JohnAnthony
Senior Airman
- 340
- Jul 26, 2010
Cool! Looking forward to seeing more of this one!
Good one Kevin....which brand is that?
Matt308
Glock Perfection
That looks like a cool build!
- Thread starter
- #7
Good one Kevin....which brand is that?
It states Entex Industries,Inc.,Carson California.Made in Japan nothing more than that Wayne.I saw a build of one over at LSP in the flaotplane scheme and it was really nice.
Airframes
Benevolens Magister
Thought I'd seen the trade mark somewhere before - had an Entex Phantom in 1/48th about 30 years ago.
- Thread starter
- #9
Thought I'd seen the trade mark somewhere before - had an Entex Phantom in 1/48th about 30 years ago.
It makes you wonder if someone like Tamiya or Hasegawa had the moulds and Entex slapped on there label.I for some reason upon seeing there trademark thought Aussie??

Last edited:
Vic Balshaw
Major General
Nice one Kevin, think you'll need your sunnies on when looking at it though.....
I know a company called Doyusha in Japan did both versions at one time maybe it is originally from them?
Sure I have some nice profiles of the Willow....will see where they are...
Sure I have some nice profiles of the Willow....will see where they are...
vikingBerserker
Lieutenant General
Very cool!
- Thread starter
- #13
I know a company called Doyusha in Japan did both versions at one time maybe it is originally from them?
Sure I have some nice profiles of the Willow....will see where they are...
I have there George in 1/32 and the pit on that one is a joke but I have seen guys do a total rebuild of it.
Aaron Brooks Wolters
Brigadier General
Very interesting. I agree with Terry, you parts should be very easy to see if you drop one. Can't wait to see it done.
- Thread starter
- #15
Very interesting. I agree with Terry, you parts should be very easy to see if you drop one. Can't wait to see it done.
You guys are right about that one but that's why I have hardwood floors in the shop and do you know I am still loosing sh!t.All though not as much as the carpet monster but still
 Also Wayne I think this model does not have the first locating pin no big deal just got to be careful might even be an aid in the end.We will find out.Cheers
- Thread starter
- #16
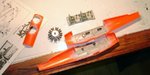
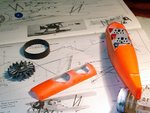
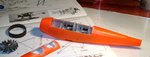
Today I got the fuselage together and it was a good fit.The boxes on the right side interfered with the seats some so had to back-cut them from underneath if I did not mention it you may never of known.I added cables for the throttle quad and the rudders while I feel confident about the TQ the rudders are probably fictitious.As I mentioned earlier there are few pics of this plane on the net so I made up the colors for the buttons on the black boxes on the R/S of the pit.I figured this being a trainer color codes for teaching maybe(?).The thing being that when that top cover goes on...you ain't going to be seeing much anyway but I wanted to play.Wayne the kit is a Nitto I saw it on the sprues the name sounds familiar??I got another week of vacation so should get alot done on this and Graf Spee.Cheers
Attachments
Last edited:
Vic Balshaw
Major General
This is a nice little kit and look sooooooo good Kevin.
- Thread starter
- #19
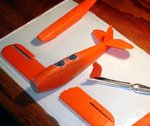
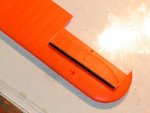
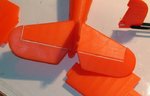
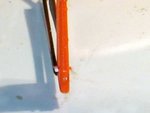
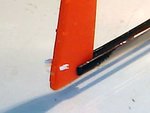
Well I am moving right along on this one.I got today the lower ailerons seperated and then took some tree stock sanded in half and attached to the front side and shaped.I also added .010 stryene stock to the ends to take up the width of the saw.I then removed the tailplanes with my scribing tool(some hard plastic) and attached some square stock and shaped to 1/2 round.In the last picture you will see my attempt at turnbuckles for the rudder crude but will suffice.They have been drilled with a .015 bit to accept a .010 piece of wire.As I looked at the fuse today I just cut off the moulded wires for the rudder and drilled the fuse also to accept the wire/cable.Rob or anybody the wood grain effect,I need a good tutorial.I want to try it on the struts first before the prop I be much obliged.I appreciate the nods there Shinpachi and Vic. Cheers
CheersAttachments
Last edited:
Vic Balshaw
Major General
It's looking very swish Kevin, simply love the colour. As for the wood painting, can't help you much there though I do believe that some guys use a mix of oil paint to get the texture. I do have a couple of articles which I'd be happy to scan and email to you if nothing else better comes up.
Let me know.
Let me know.
Users who are viewing this thread
Total: 1 (members: 0, guests: 1)