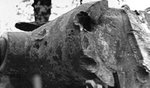
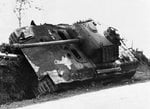
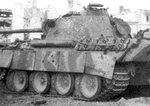
My First Attempt at Armour, The Panther Panzer KampfwagenV Ausf A....

Ad: This forum contains affiliate links to products on Amazon and eBay. More information in Terms and rules
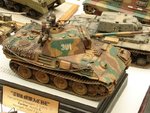
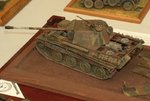
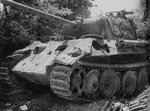
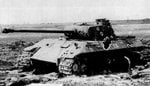
Really nice photos Wayne.:D

Here Krzysztof Barcz's two pics I've found in SuperModel Magazine.
 

Attachments

  • 1.jpg
    1.jpg
    125.3 KB · Views: 90
  • 2.jpg
    2.jpg
    93.4 KB · Views: 86
OK fellas, lookin for some battle damage shots, not kill shots, but deflections etc etc... I got my first coat of Dunklegelb on....

I dont think I have the right tools to do it (no dremel), but I wanna try and make some damage to the front slope....

Pics or pointers on makin it realistic???
 
Hi Les,

It is no easy to find such pics of the kind damages.I've found a couple of them only.These are of damages caused to the turret and zimmerit and side skirts.I hope these will help a bit.I think there are not strict rules how to make such damages.You should use your imagination, a knife,an needle,a nail etc.....Some of these damages can be made with mentioned tools using a warm.But I suggest to get training firstly.


Source unknown.
 

Attachments

  • panther_damaged.jpg
    panther_damaged.jpg
    78.5 KB · Views: 209
  • panther_damaged2.jpg
    panther_damaged2.jpg
    40.7 KB · Views: 70
  • panther_damaged3.jpg
    panther_damaged3.jpg
    63.5 KB · Views: 248
  • panther_damaged4.jpg
    panther_damaged4.jpg
    75.7 KB · Views: 68
  • panther_damaged5.jpg
    panther_damaged5.jpg
    81.2 KB · Views: 75
I just thought even you roughly cut out some divets in the hull of the tank. Then roughly filled it back in with filler you could simulate the texture or the armoured areas that have been hit. Rather than try and shape the plastic.
 
Heinz is right.It is better to shape plastic than other things.Dan you said, the plastic was very thin so you have to be very careful.
To be honest going through many Panther pics ,in almost all I have seen, I noticed that these tanks were in a very good condition.Even in these pics that were taken during struggles.The front armour plate was very hard and thick.Therefore these traces of hits are unvisible I suppose.
 
Hmmm....

Panthers in Normandy had to be hit with some sort of enemy fire, with the damage not being fatal.... Glancing shots that left some splatter effect on the armor, as well as a dipple/gouge/indentation.... It had to happen...

If its gonna be too much/too difficult to do, I'll skip it, but I really do want to add the realism to it, since the paint job isnt gonna be as great as I would like... If the realism factor indicates, like u said Wojtek, that there really wasnt this kind of damage on operational tanks, then so be it....

Next questions are gonna concern the weathering of it... Ive never done a wash before to add to the detail, but in reading up on it, the one thing I dont get is this:

With a very diluted blackish color, 80/20 (or 90/10) thinner/paint, using a very fine brush, u highlight panel lines/seams etc etc....

Do u then wipe off the excess and leave just a small bit of the diluted wash in place??? Do u just leave what u applied to dry without blotting/wiping??? I like the realism the wash seems to do, especially on armor, but I dont want to ruin the paint job/camo work thats gonna take me hours to complete to my satisfation...

HELP or pointers are appreciated...

Also, in regards to tracks/spare links used as additional armor plating on engine compartment/side of turret, how the hell am I supposed to paint these???

I use Model Master Enamel, and bought some rust to add to the realism of the tracks, but in looking at pics, its hard to tell how they were done... There seems to be an assortment of colors applied to the tracks/links to get the desired look....
 
Next questions are gonna concern the weathering of it... Ive never done a wash before to add to the detail, but in reading up on it, the one thing I dont get is this:

With a very diluted blackish color, 80/20 (or 90/10) thinner/paint, using a very fine brush, u highlight panel lines/seams etc etc....

Do u then wipe off the excess and leave just a small bit of the diluted wash in place??? Do u just leave what u applied to dry without blotting/wiping??? I like the realism the wash seems to do, especially on armor, but I dont want to ruin the paint job/camo work thats gonna take me hours to complete to my satisfation...

HELP or pointers are appreciated...

The main rule of the weathering is to use two different kinds of paints. oil enamels like Humbrol,Model Master ones and acrylic colours like Tamiya,Gunze etc... for instance.The rule is to apply an enamel on an acrylic paint and vice versa.You can ask what for,the answer is easy.These paints don't get reaction between them.So it is easy to apply an acrylic one on the basis surface painted with enamel and then to remove when something went wrong.So if you have your model painted with enamels you should use acrylic one to make the wash.What is more use a thin brush for applying the diluted paint into panel lines to intensify their outlines.The excess of the wash can be removed using a small piece of a soft rag with a thinner for a paint you used for the wash or using (I've forgotten the name) a stick for cleaning of ears.In the same way you can obtain an effect of rusty and dusty plates.The difference is in colours that have to be used.For all edges you want to highlight with light colours it is used the technics of a dry brush.Using a brush almost without a light paint ( also silver,steel etc...for instance) you go along all edges to make them much visible.


Also, in regards to tracks/spare links used as additional armor plating on engine compartment/side of turret, how the hell am I supposed to paint these???

All these details shuold be painted singly before fixing.Unless its colour is the same as the basic colour of the model,so you can mount them to a model and paint together.If not, and these are fixed to the model you have to use a thin brush (no.0 or 1) to paint them.

Dan, unfortunately a scanner device is not available for me today and I have to be at work tomorrow so I can scan some pics that will be better examples than my explanation on Monday only.If you are not in a hurry and you can wait, I'll do it with my pleasure.Unless Wayne or somebody else do it earlier. But for now I've upload some pic that can come in handy as well.
 

Attachments

  • for Dan.zip
    4.1 MB · Views: 58

Users who are viewing this thread

Back