My First Attempt at Armour, The Panther Panzer KampfwagenV Ausf A....

Ad: This forum contains affiliate links to products on Amazon and eBay. More information in Terms and rules

Thanks Wojtek, I like the idea of usin the acrylic over the enamel...

Thanks for the info on the cleanup of the extra wash, I was kinda lost as to the correct method... I will give it a go with some acyrlics when I get there....

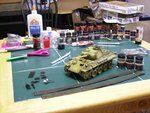
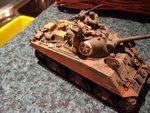
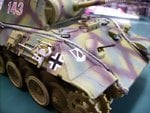
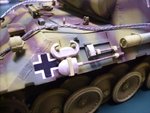
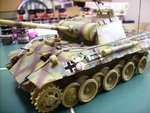
Im replaceing the plastic tow cables with picture frame wire, but Im gonna have to jury-rig up the eyelets...

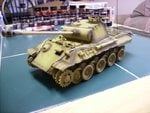
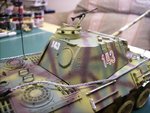
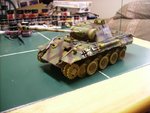
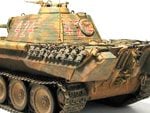
As far as the tracks go, Ive glued some 3 section and 2 section pieces toether, but they are not attached to the tank yet... Those, along with the pioneer tools will be glued on after the tank is completed....

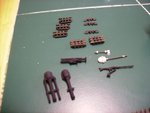
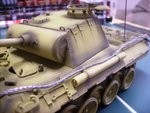
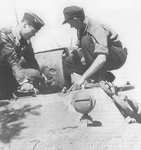
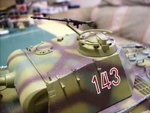
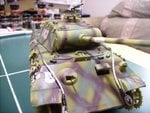
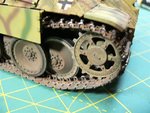
However, I still dont know how to paint them, as well as the rubber/latex tracks that the kits came with.... Heres a pic below as refrence.... There seems to be differences in how different modelers do these tracks.... I am planning on doing the following:
Paint steel, the blacken lightly, then add rust and dust coloring... HELP obn this!!!!

And for the record, those things u clean ur ears out with are called Q-Tips...
 

Attachments

  • JSzcz17Oct07_177.jpg
    JSzcz17Oct07_177.jpg
    52.3 KB · Views: 59
  • Panther%20Ausf%20A%20Late%20424(Normandy)%2010-1.jpg
    Panther%20Ausf%20A%20Late%20424(Normandy)%2010-1.jpg
    77.9 KB · Views: 62
THX Dan for the name for Q-tips.:D Simply I haven't been using the name for long long time therefore forgot it.:(

As far as these tracks are concerned, you can put all sections together and paint these both separately and attached to the model.It's up to you only which way you will choose.And you are right there is as much ways on how to do it as modellers.It seems that one of the good ways is to paint them with red-brown colour as the base.Then using the technics of a wash, apply some different colours, light red-brick and then diluted black grey, rusty.The next step is "the dry brush" with steel, gun-metal,a thiny bit of silver.Very nice effect of metal tonality can be achieved by using a pencil on edges.Of course all places where these tracks are working in reality ( its "teeth" and teeth of main wheels ) should be much more metalic.You should remember that the next layer of wash has to be applied when the previous is dry..
Personally I paint tracks with mixture of steel and silver paints.When dry I apply gun-metal wash and then rusty, red-brick. red-brown and if these tracks are too redish - black one.A pencil is the last thing I use.
 
Excellent Wojtek, thanks for the info.... I will do my best...

Here are some progress shots... I base coated it yesterday, and today I did a pre-shade session.... Im now ready to do the 3 color camo.... Im nervous....

I made up my top cables, they came out alright.. They will pass scrutiny.... Also added the antenna, painted that flat black...
 

Attachments

  • 004.JPG
    004.JPG
    113 KB · Views: 70
  • 005.JPG
    005.JPG
    66.6 KB · Views: 64
  • 008.JPG
    008.JPG
    95 KB · Views: 65
  • 011a.JPG
    011a.JPG
    87.6 KB · Views: 82
  • 012.JPG
    012.JPG
    91.5 KB · Views: 68
OK, heres a shot of the first application of camo, the Olivgrun... I looked at all the camo jobs I could find, and went with something that works for the Nomandie timeframe...

It seems so far that I havent made any mistakes, but theres plenty of time for that, once I finish up with the Dunklgelb after the Rotbraun...

My airbrush sucks ass BTW... No water sputtering this round, but damn, this takes forever.... Christ.............
 

Attachments

  • 013.JPG
    013.JPG
    95.2 KB · Views: 76
OK, heres a shot of the first application of camo, the Olivgrun... I looked at all the camo jobs I could find, and went with something that works for the Nomandie timeframe...

It seems so far that I havent made any mistakes, but theres plenty of time for that, once I finish up with the Dunklgelb after the Rotbraun...

My airbrush sucks ass BTW... No water sputtering this round, but damn, this takes forever.... Christ.............

Yes, it takes time mate, slowly and carefully , light on the trigger and every once in while give the end of your airbrush tip a wipe with a q-tip just in case you get a little paint build up around the nozzle, you don't want any splatter!

Your doing a great job so far!:D
 
camo is looking great Dan. Nice job on the tools.

Last tank I finish was my Sherman with 100mm Howitzer, I used the thin E guitar string for its antenna which worked well.

What I used for weathering was a few enamel washes over the hull. Then dry brushed very lightly white to get the edges. Finally used pastels to simulate dirt and dust from the muzzle and from the road. Its crude but came up ok.
 

Attachments

  • sherman2.jpg
    sherman2.jpg
    59.4 KB · Views: 94
  • sherman.jpg
    sherman.jpg
    55.4 KB · Views: 95
Thanks for posting those pics.... Looks very nice....

Heres a shot after all three camo colors are on and touched up... It came out alright I think, no real errors... Some painstakingly slow sh!t to do...

The colors are off due to the lighting in the garage...
 

Attachments

  • z004.JPG
    z004.JPG
    87.7 KB · Views: 87
Dan the Panther looks really cool.You have a hidden talent.Excellent work friend.:D :D :D

I've uploaded here another pic of damages on the type of tanks.Hoping it will be helpful for you as well.


Heinz I like your Sherman howitzer.Well done Alex.:D :D :D
 

Attachments

  • Panther damages.jpg
    Panther damages.jpg
    97.7 KB · Views: 84
I rode in and on a couple Tanks in my time... Enjoyed the hell out of it I can tell ya... Exhilarating to say the least....

But I was and still am a man of the Sea, so being wrapped up inside a steel box wouldnt have suited me...

Thanks for the compliments and pics fellas.... Im very happy with how this is turning out, and it may convince me to do another tank, after building the 3 planes Ive got waitin on me...
 
Thanks man...

OK, heres some more shots, after the decals are on, and other small things done.... Still have to do the tracks, UGH!!!

It looks pretty good, and I think it'll look better once the wash and dull cote are applied...
 

Attachments

  • new04.JPG
    new04.JPG
    103.3 KB · Views: 73
  • new03.JPG
    new03.JPG
    98.3 KB · Views: 71
  • new02.JPG
    new02.JPG
    94.1 KB · Views: 74
  • new01.JPG
    new01.JPG
    97.2 KB · Views: 78
  • z005.JPG
    z005.JPG
    94.3 KB · Views: 69
  • new05.JPG
    new05.JPG
    94.4 KB · Views: 70
  • new06.JPG
    new06.JPG
    101.4 KB · Views: 71

Users who are viewing this thread

Back