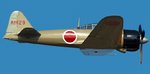
Luis, don't take that colourized pic to represent the Overall Colour of the A6M2-N the more accurate colour is an Earth Colour called Tsuchi-iro or I3 it has been likened to FS16160, while fabric surfaces were a light to medium grey.
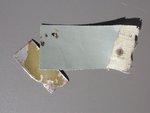
see image of Nakajima Zero artifacts colour reference, metal and fabric surfaces, my apologies for the source it escapes me for now but quite possibly J-aircraft.com, it can be found on the net.
see image of Nakajima Zero artifacts colour reference, metal and fabric surfaces, my apologies for the source it escapes me for now but quite possibly J-aircraft.com, it can be found on the net.


 ), I could tell that the color Light Grey suggested by the instructive, is only possible with out model of the factory (yet still I have my doubts ), ... and pretend that this boy is to show us that already has a good road traveled ...