P-38L-5-LO from Trumpeter kit in 1/32

Ad: This forum contains affiliate links to products on Amazon and eBay. More information in Terms and rules

A bit more.
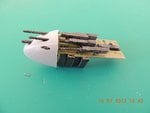
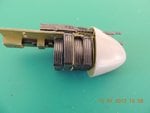
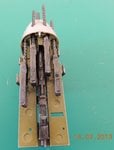
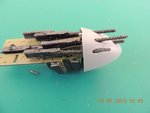
Added front and rear m.g. supports and modified installation of upper left m,g.
DSCN0451.JPG
DSCN0452.JPG
DSCN0453.JPG


Dry fit m.g. and 20 mm cannon

DSCN0457.JPG
DSCN0458.JPG


and the nose cone
 

Attachments

  • DSCN0456.JPG
    DSCN0456.JPG
    103.2 KB · Views: 116
  • DSCN0459.JPG
    DSCN0459.JPG
    108.1 KB · Views: 126
  • DSCN0454.JPG
    DSCN0454.JPG
    91.9 KB · Views: 119
  • DSCN0455.JPG
    DSCN0455.JPG
    192 KB · Views: 112
Last edited:
I meesed up a little bit with last pictures concerning the nose cone, I hope you can see them.

Besides the above, I will keep going with this project until my 18 months old grandson will arrive here, then modelling will be almost off for some time.
Alberto
 
Hi everybody,
quite slowly and besides my grandson, I did some progress

To start, the unnecessary work I did on wings: Eduard p.e. fret include some nice detailing items but, as I understood later, flaps were raised on parked birds, so nothing will be visible.
DSCN0463.JPG
DSCN0464.JPG

also done some work on landing gear, front and main with some small items still to be added.
DSCN0465.JPG
DSCN0466.JPG
DSCN0468.JPG

DSCN0469.JPG
DSCN0470.JPG


Unfortunately the above pictures aren't the best possible, I think due a to too soft light, but everything was painted matt aluminium with large pipes painted stainless steel and piston rods painted chromium. Everything weathered with very diluted brunt umber oil colour.
Alberto
 
Last edited:
Hi everybody,
I'm here again!

Some pictures of progress I made.

First I completed the cockpit adding seat belts and dashboard:

DSCN0481.JPG
DSCN0482.JPG
DSCN0483.JPG
DSCN0484.JPG
DSCN0484-vi.jpg


I decided not to add any wiring behind the dashboard as they will not be visible at all.
About the seat belts, I bought them form HGW as USAAF/US NAVY seatbelts and I like them very much, but I'm not sure they are correct in shape.

DSCN0485.JPG
DSCN0486.JPG
DSCN0487.JPG


Then I decided to assembly the main elements and leave for afterwords the addition of all external detail
Now in front of me is a long season of filling, sanding, re-scribing etc.
Alberto
 
Yes, at last I decided to surrender!

I spent many hours to improve the gun bay and I think I came to a reasonably good result, as you can see here:

DSCN0524.JPG
DSCN0526.JPG
DSCN0527.JPG


but, possibly due to the big hinges that Trumpy provided for the cowls or probably due to my poor skill, I was really unable to fit the gun bay and the cowls together, so I had to surrender.

I will show the gun bay as a separate item and I filled that space with ballast: at least I will not have a tail sitter!

DSCN0528.JPG
DSCN0529.JPG


Now I can go to the next step.
Alberto
 

Users who are viewing this thread

Back