Putty, gaps, yes

Ad: This forum contains affiliate links to products on Amazon and eBay. More information in Terms and rules

Maglar

Tech Sergeant
1,570
8
Jan 29, 2009
Florida
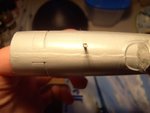
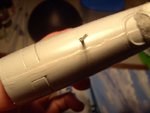
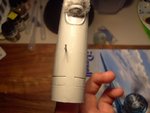
I have begun my new build of the Corsair F4U-4 and have just glued the fuselages together. I used my milliput but after I got all the areas and looked closer I saw that the putty went below the uneven alignment instead of filling it in. I know this means I have to re-putty but, do I sand it down when it dries then putty or just go put more putty in?

PS: Its all an eye trick, on one angle I see all my putty filling in the gaps then on another angle I see the putty below the gaps! :eek:

Thanks guys!
 
I stopped using putty some time ago. Now I stretch a piece of styrene into a filament of appropriate size and lay it in with fast CA through a capillary dispenser tip. It has immediate results and can be built up and completed inside of a few minutes rather than waiting for the putty to dry.
 
That's a good tip from Sweb there Maglar. Filling gaps, cracks or bl**dy great holes is a sort of art. There is no straight answer on how to do it, or what is the best material to use to do it, it all depends on how wide, deep, long, even etc the gap or crack is.
There are numerous materials that can be used, depending on the above, and some materials might be ideal for some jobs, but virtually impossible to apply accurately or effectively in others, due, perhaps, to angles and accessability.
One thing with 'Milliput' though, the warmer you get it, and the more you knead it, the softer it will become, and therefore easier to manipulate. Also, once squeezed into a gap, if it is then wet, it can be smoothed over with a wet finger, to the point that it is almost (but not quite) perfect, given the area concerned is accessable.
But, you need to consider the job in hand, and what might be a better method to remedy it. The materials to consider include; stretched sprue (as mentioned by Sweb) in various 'gauges', plastic rod, strip, and card. Fillers and putty's of various types can be used, as can liquid cement and superglue.
Some people, when confronted by a very small gap, use 'Tipex' (typewriter correction fluid), and you can also use PVA or Micro 'Kristal Kleer'. One I use for those very awkward tiny joints, particularly around delicate areas such as canopies, is a mix of talcum powder and gloss varnish. This can be varied in viscosity, applied by brush or toothpick, and will flow into the gap, drying smooth (if any excess is carefully wiped away) and hard, giving a virtually perfect, almost invisible seal once painted.
 
Good stuff Airframes.. I do have CA 5 - 15 sec gap filler glue which I use for glue and gaps but it just doesnt do it. In this case, the seam was about 1 mm wide and it wasnt a gap but more of a misalignment. I have done two putty fills and its filled between the crack. I need to let it dry and go back to work tomorrow because on the third try my rubbing and stuff pushed the still drying milliput further down removing its purpose. I do knead for a good 4 minutes then dunk the whole piece into the water to get it peanut butter like and apply it. When put on softer and damper its hella easier to smooth down and such. I am being patient with this bird for I want it to be flawless with seams, once I get them filled and sanded I will prime them to see if I missed anything and work from there. Might do a metalizer brush stroke also, silver reveals everything!
 
Heres a pic of the main seam after milliput, sanding, CA gap filler, and some lqiuid cement lol! Given some minimal sanding id say its fine, but I would like some opinions
 

Attachments

  • PICT0526.JPG
    PICT0526.JPG
    52 KB · Views: 127
  • PICT0527.JPG
    PICT0527.JPG
    50.4 KB · Views: 129
  • PICT0528.JPG
    PICT0528.JPG
    58.4 KB · Views: 125
That looks like a misalignment but I have noticed some kit fuse halves are of different thicknesses right at the joint. They align okay on the locator pins but one side is thinner leaving you with a shallow (frustrating) running trough on one side of the joint.

There's a way to do this in one shot and that's by using baking soda and fast CA. The baking soda is applied dry to the discontinuity and carefully shaped to it. Don't pile it too high. If you do you'll be jack-hammering all day and cursing me (if you try it). Less is more and layering is always better. Test an area for practice. Once you have the baking soda where you want it carefully run in some fast CA. It wicks into the area and catalyses instantly. Do not put your face above the area because the kick-off of the CA will put a temporary sting to your eyes and nose. It kicks off violently and there will be visible smoke. Do small areas no more than maybe a half inch long and keep them thin. The result will be a joint that can be filed with jeweler's files.

Again, don't try to do the entire joint in one shot and better to practice it on a scrap piece of plastic to get a feel for the method. Because it catalyses violently there's heat generated so working with thin layers of baking soda minimizes this. It can be built up by layering. The advantages of this method are instant results that are pretty bullet-proof with regard to strength and it can be worked immediately.
 
I dont think i'll be mixing baking soda and CA but maybe down the road lol. It was a misalignment and those pictures showed my attempt at repairing it, I have further sanded down the CA glue and it feels smooth and such, sprayed a quick layer of primer and it looked fine.. some more fine sanding and then I will continue to the wings, which will most likely need putty between them and the main body. Im glad I fixed the seam though 8). Esp on the nose, most people dont see seams on the bottom of plane because no one takes photos down there!
 
I dont think i'll be mixing baking soda and CA but maybe down the road lol. It was a misalignment and those pictures showed my attempt at repairing it, I have further sanded down the CA glue and it feels smooth and such, sprayed a quick layer of primer and it looked fine.. some more fine sanding and then I will continue to the wings, which will most likely need putty between them and the main body. Im glad I fixed the seam though 8). Esp on the nose, most people dont see seams on the bottom of plane because no one takes photos down there!

Great! Yep, those top-side joints need to disappear. Seams are the tough-love part of modeling. Glad you got it sorted out.
 
Good tip there Sweb, nice one! Glad you're getting it sorted Maglar. It's a b*tch when you get a step through misalignment; it doesn't always cure it, but constant test-fitting before glueing can help identify a possible problem. Once identified, it's often possible to take remedial steps before continuing. This might involve some carving, sanding, and/or adding spacers, or spreaders, inside the parts. It's sometimes better to assemble the affected area WITH the gap, allowing it to be a little wider than neccessary, which will make it easier to 'plug' with a strip of plastic, stretched sprue etc, which in turn can then be 'fine tuned' with a thin filler, and sanded smooth to the point of virtual invisibility.
As you freely admit, you're still learning (as we all are!), so take the time to assess the job before rushing into it. Time spent in recce is rarely wasted!!
Good work so far though mate.
 
We are always learning Airframes, A craft is built upon basic principles that are always evident, as in practice makes perfect [hobby, sports, school work, etc etc]. Ive only been modeling seriously since January 09 lol!
 
Speaking of gaps......

I'm almost finished with the 410 and I have a problem. As I was test fitting the front glass piece of the 410 I found a large gap along one side. The fuselage doesn't exactly come together or something. Anyhow, once the piece is attached I need to fill the gap. Heres the question....

I have no filler, putty or otherwise. No way to get any. I'm thinking of making my own with some sprue but does anybody know how this will affect the clear plastic of the piece (clouding, etc.,) or if going slowly will work out ok?
 
You might have fogging problems with sprue and cement Chris. It might be better, and easier (probably will be both) to use Micro 'Kristal Kleer'. If you can't get this, then use PVA (white glue), which is basically the same stuff. Apply it with a cocktail stick or similar, and let it flow into the gap. Wipe off any excess with a wet finger tip or whatever will fit. If the gap hasn't filled when dry, repeat the exercise. Once dry, paint to match. Job done!
 
Speaking of gaps......

I'm almost finished with the 410 and I have a problem. As I was test fitting the front glass piece of the 410 I found a large gap along one side. The fuselage doesn't exactly come together or something. Anyhow, once the piece is attached I need to fill the gap. Heres the question....

I have no filler, putty or otherwise. No way to get any. I'm thinking of making my own with some sprue but does anybody know how this will affect the clear plastic of the piece (clouding, etc.,) or if going slowly will work out ok?

Ever tried mixing baking soda with acrylic model paint? Mix your color, add the baking soda to create a paste and carefully trowel it in. Keep it thick enough to prevent sagging. A piece of easy-release tape over the area can ensure no external sagging occurs as well as providing for little needed final contour shaping. Position the model such that gravity does the rest. The paint is the glue. It's good for filling canopy seams in a thinner, flowable slurry and can be worked down well because the color is throughout. This mixture isn't particularly good for filling other seams because the acrylic paint constituent doesn't coarse-sand well. But, it is a good substitute for putty around critical areas such as clear pieces.
 
Good tip Sweb. I find that gloss (enamel-type) varnish and talcum powder is slightly better; this is because the varnish binds better and, when dry and hard, sands well without break-down, and the talcum powder is less prone to decomposition than baking soda, and will blend better during mixing, eliminating 'lumps'. The principle is exactly the same though, and some, such as Master Wojtek, use paint instead of clear varnish. I prefer the varnish as there is no pigment to contend with; for a very thin 'mix', where a very fine fill is required that will not be sanded, then a similar mix is used, where the gloss varnish is replaced by Johnson's 'Klear' (Future).
 
OK, I have no talc but the baking soda sounds good. It is baking soda and not baking powder? I have a thin seam along the widshield that needs a slight packing just to finish off. Don't think I can sand it but if this works, it may not need it.

So would a mixture of enamel paint and baking soda work?
 
It should Chris, but if you want to avoid the risk of the paint content getting on the clear part, use the varnish instead, or PVA (white glue) by itself. The latter can be brushed in, or 'drawn' in with a cocktail stick or similar, then the excess wiped off with the tip of a wet finger. Any residue that might get onto the clear part should wipe off the same way or, if dried, will peel off without damage to the part.
 
Good tip Sweb. I find that gloss (enamel-type) varnish and talcum powder is slightly better; this is because the varnish binds better and, when dry and hard, sands well without break-down, and the talcum powder is less prone to decomposition than baking soda, and will blend better during mixing, eliminating 'lumps'. The principle is exactly the same though, and some, such as Master Wojtek, use paint instead of clear varnish. I prefer the varnish as there is no pigment to contend with; for a very thin 'mix', where a very fine fill is required that will not be sanded, then a similar mix is used, where the gloss varnish is replaced by Johnson's 'Klear' (Future).

I'll try this, thanks. There's another product R/C modelers use because it sands easily and that is micro-balloons. Mixed with epoxy (no strong smell) finishing resin to a paste consistency it's used for fillets and voids in soft balsa wood. I've yet to apply it to plastics but I do use it for the R/C stuff. Plus, you can color it with enamel paint - just a bit to tint it - and it doesn't change the workability. Micro-balloons are available from good hobby stores like Tower Hobbies. It's a powder consisting of tiny hollow spheres (balloons) that bind the resin and make it less dense. The more balloons, the easier to sand.
 

Users who are viewing this thread

Back